Hello! Welcome back to our series on Docker.
In our last two lessons, we learned how to define a multi-container application with a docker-compose.yml file and how to write the individual Dockerfiles for each service. We now have the building blocks for our application, but a crucial question remains: how do these isolated containers talk to each other?
Today, we'll answer that question by diving into Docker Compose networking. You'll learn how Compose makes it incredibly simple for services to discover and communicate with one another, and how you can create more complex and secure network topologies.
Today's Learning Outcome: By the end of this lesson, you will be able to configure inter-service communication using Docker Compose networks.
We'll start with the automatic networking that Docker Compose provides "for free" and then move on to defining custom networks to control how our services interact.
1. The Default Network: Automatic Service Discovery
When you run docker compose up, Docker Compose does something magical behind the scenes: it creates a single, private network and connects all the services defined in your docker-compose.yml file to it.
This network has a special property: it provides an internal DNS service. This means each service can find any other service simply by using its service name as a hostname.
For example, if you have a web service and a db service, your web container's application code can connect to the database using a connection string like postgres://db:5432. You don't need to worry about finding the container's internal IP address, which can change every time it restarts. Compose handles it all for you.
The official Docker documentation explains this concept clearly. Let's read the first part of their networking guide to solidify this understanding.
Read the introductory section and the part about what happens when you run docker compose up. Pay close attention to the example where the web service connects to the db service using the hostname db.
From Manual to Automatic
To fully appreciate the convenience of Docker Compose, it helps to see how you would achieve this manually using just the Docker CLI. It involves creating a network first and then explicitly attaching containers to it.
The following video does an excellent job of demonstrating this "before and after" scenario.
Ultimate Docker Compose Tutorial
In the 'Ultimate Docker Compose Tutorial', TechWorld with Nana first shows how to connect two containers manually and then demonstrates how Docker Compose automates the entire process.
Please watch the following three clips: Manual Setup (02:59 - 10:14): Watch how a network is created with docker network create and how two containers (mongo and a UI) are launched into that network. Notice the use of the --network flag and how the UI container refers to the database container by its name (--name db). The Compose Way (15:21 - 16:18): Now, see how the docker-compose.yml file doesn't require any explicit network configuration. The video explains that Compose handles this automatically. Verification (18:50 - 20:29): Finally, see the proof. After running docker compose up, the presenter uses docker network ls to show the network that Compose created automatically (named after the project directory).
As you can see, what took several manual commands is handled automatically by Compose. This default network is perfect for many applications where all services need to communicate freely.
2. Custom Networks: Gaining Control and Security
While the default network is convenient, it's not always ideal. In a real-world application, you often want to enforce stricter rules about which services can communicate. For instance, you might want your frontend to talk to your backend API, but you almost certainly do not want the frontend to have direct access to your database. This is a security best practice known as the principle of least privilege.
This is where custom networks come in. Docker Compose allows you to define your own networks and selectively connect services to them.
This enables you to create network topologies that match your application's architecture, such as a multi-tier design with a frontend and a backend network.
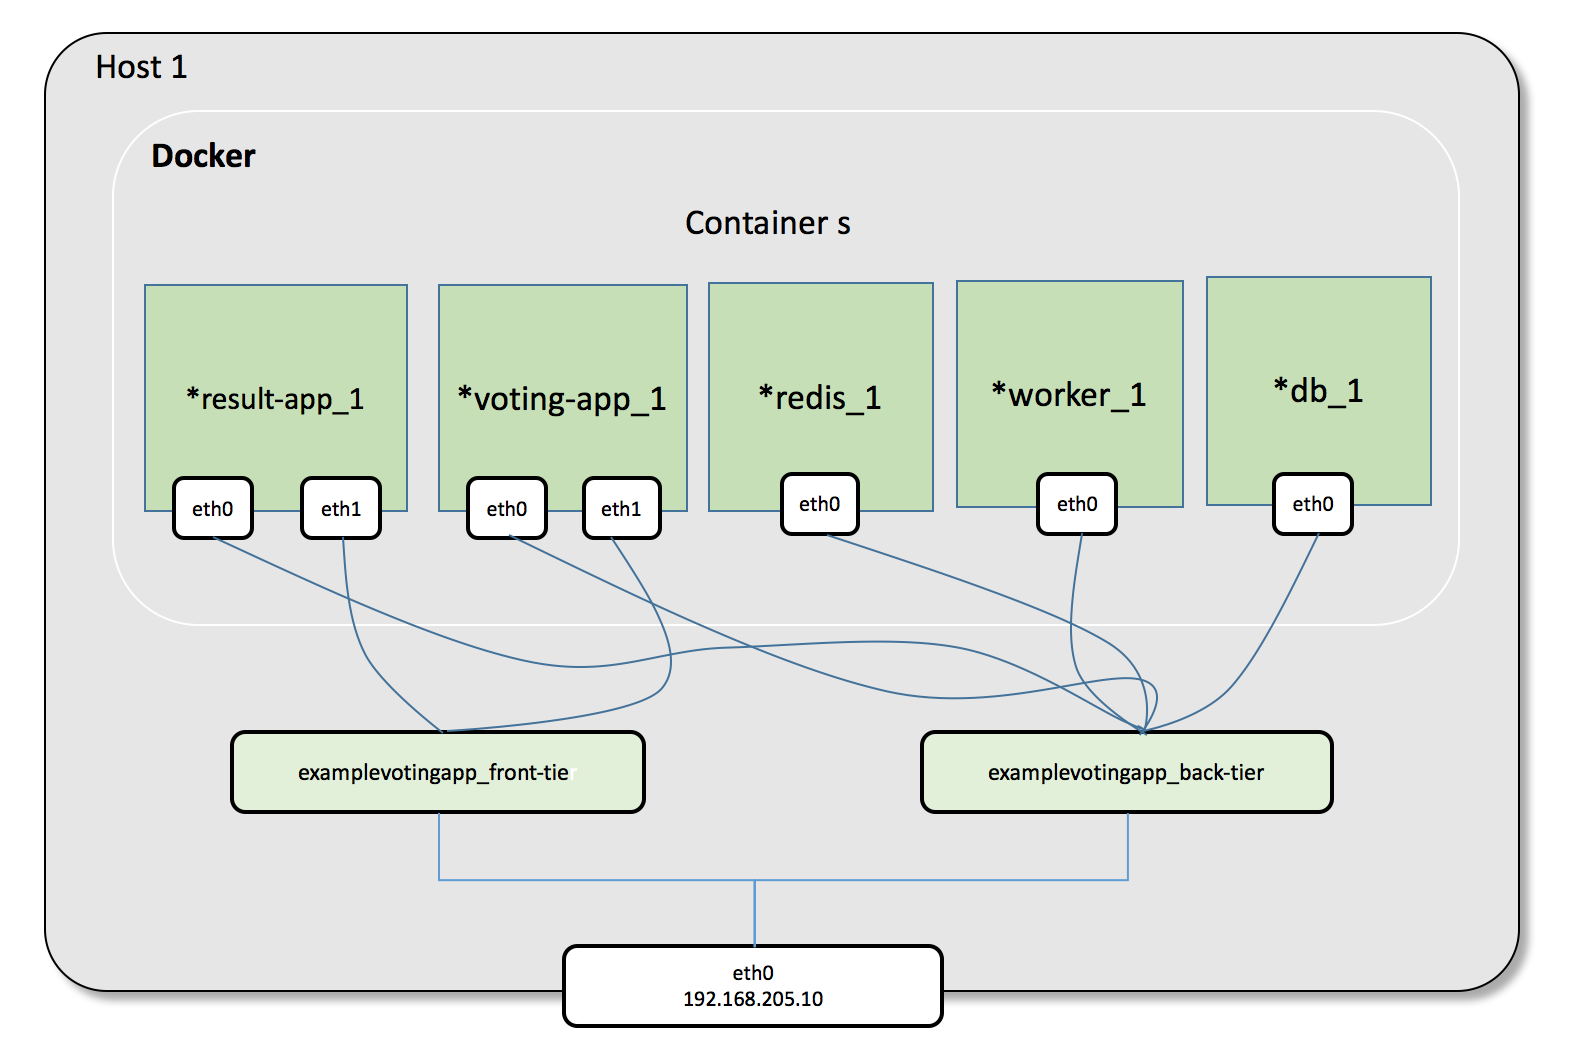
Defining and Using Custom Networks
To implement a custom network topology, you use two keys in your docker-compose.yml file:
- Top-level
networkskey: This is where you declare your custom networks. You can simply list their names. - Service-level
networkskey: Under each service, you specify which of the declared networks it should connect to.
Here’s the classic example from the Docker documentation, which implements the topology we discussed:
Let's return to the official Docker documentation to see the syntax for specifying custom networks.
Read the section titled 'Specify custom networks'. The example shows a proxy, an app, and a db service. Analyze how the networks keys are used to ensure the proxy service cannot talk directly to the db service.
And for another clear, concise example, see the "Custom Networks" section in this guide from CubePath.
Docker Compose: Complete Guide with Practical Examples
This guide provides another great example of a multi-network setup.
Find the section 'Networks in Compose' and then the subsection 'Custom Networks'. The YAML snippet clearly shows web, api, and database services being assigned to frontend and backend networks.
Test your understanding!
You have a docker-compose.yml file with three services: frontend, api, and database.
- The
frontendshould only be able to communicate with theapi. - The
apishould be able to communicate with both thefrontendand thedatabase. - The
databaseshould only be able to communicate with theapi.
How would you define and assign networks to achieve this? Write the networks sections for the services and the top-level networks definition.
Show answer
You would create two networks, let's call them frontend-net and backend-net.
- Connect
frontendtofrontend-net. - Connect
databasetobackend-net. - Connect
apito bothfrontend-netandbackend-net.
This way, the api service acts as a bridge between the two networks.
Here's the YAML structure:
version: '3.8'

services:
  frontend:
    # ... other service config
    networks:
      - frontend-net

  api:
    # ... other service config
    networks:
      - frontend-net
      - backend-net

  database:
    # ... other service config
    networks:
      - backend-net

networks:
  frontend-net:
  backend-net:
3. Practical Example: Securing a Database
Let's see this in action with a more complete, practical example. The video below demonstrates creating a public network for an Nginx proxy and a private network for a PostgreSQL database, improving the application's security posture. It also shows you how to verify that the isolation is working correctly.
Docker Compose Tutorial for Beginners (Networks - Volumes - Secrets - Postgres - Letsencrypt)
This video from Anton Putra provides a great, hands-on demonstration of using multiple networks for security and then verifying the setup.
Please watch the following two clips: Creating Public and Private Networks (52:32 - 54:16): The presenter explains the rationale for creating public and private networks to isolate the database. Pay attention to how the networks keys are assigned to the nginx, flask (API), and postgres services. Verifying Network Isolation (55:34 - 57:00): This is the crucial part. The presenter uses docker compose exec to get a shell inside the nginx container and then tries to reach both the flask service and the postgres service. You'll see that it can resolve and reach flask, but it cannot resolve the postgres hostname, proving the network isolation is working as intended.
Verifying Your Network Setup
As shown in the video, you can and should always verify your network configuration. Here are the key commands:
docker network ls: Lists all Docker networks on the host. You'll see the networks created by Compose, typically prefixed with your project's directory name (e.g.,myproject_frontend-net).docker network inspect <network-name>: Shows detailed information about a network, including which containers are connected to it and their IP addresses within that network.docker compose exec <service-name> <command>: Executes a command inside a running service container. This is invaluable for testing. Common commands include:docker compose exec api sh(to get an interactive shell)docker compose exec frontend ping api(to test iffrontendcan resolve and reachapi)
Conclusion
You've now mastered a fundamental concept in orchestrating multi-container applications. Understanding Docker Compose networking allows you to move beyond simple applications and build complex, secure, and well-architected systems.
Key Takeaways:
- Default Network: Docker Compose automatically creates a shared network for all services, allowing them to communicate using their service names as hostnames.
- Custom Networks: You can define your own networks to create isolated communication channels between specific services. This is a crucial security practice.
- Configuration: You use the top-level
networkskey to define networks and the service-levelnetworkskey to connect services to them. - Verification: Always use tools like
docker network inspectanddocker compose execto verify that your network topology is configured as you expect.
Next Up
We've figured out how to build our services and make them communicate. But what happens when a database container is removed and recreated? All the data is lost! In our next lesson, we will solve this problem by learning how to manage persistent data for stateful services using named volumes in a Compose file.