Hello! Welcome back to our course on the Django framework.
In our last lesson, we took a big step forward by learning how to create custom permission classes. We saw how the has_permission and has_object_permission methods allow us to implement fine-grained access control that goes beyond DRF's built-in options.
Today, we're going to zero in on the core of that concept: implementing object-level permissions. This is all about verifying if a user has the right to perform an action on a specific instance of a model. The classic example, which we'll build on, is allowing a user to edit their own blog post but not anyone else's.
By the end of this lesson, you will be able to confidently implement robust, object-specific permission checks using two powerful approaches:
- By creating a custom
IsOwnerOrReadOnlypermission class from scratch. - By leveraging a powerful third-party library,
django-guardian, for even more granular, per-object, per-user permission assignments.
Let's get started.
The Foundation: The owner Field
Before you can check if a user is the owner of an object, the object's model needs to know who its owner is! This typically involves two key steps:
- Adding an
ownerfield to your model: This is usually aForeignKeyrelationship to Django's built-inUsermodel. - Associating the user on creation: When a new object is created via the API, you need to automatically assign the currently authenticated user to the
ownerfield.
The official Django REST Framework tutorial provides the canonical guide for this.
4 - Authentication and permissions
Let's review the necessary model and view modifications from the official DRF tutorial to support ownership.
Please read the following three sections from the tutorial: Adding information to our model: See how an owner field (a ForeignKey to the auth.User model) is added to the Snippet model. Associating Snippets with Users: This is a crucial step. Pay attention to how the perform_create method in the view is overridden to set owner=self.request.user when the serializer saves the new instance. Updating our serializer: Finally, learn how to expose the owner's username in the API response by adding a ReadOnlyField to the serializer.
With this setup in place, every object will be tied to a user, paving the way for ownership checks.
Approach 1: The IsOwnerOrReadOnly Custom Permission
This is the most common and direct way to handle object-level permissions in DRF. The logic is simple:
- If the request is a "safe" one (like
GET), allow it. - If it's a write request (like
PUTorDELETE), only allow it if the requesting user is the object's owner.
The key to this is the has_object_permission method, which, unlike has_permission, is passed the actual object (obj) being requested.
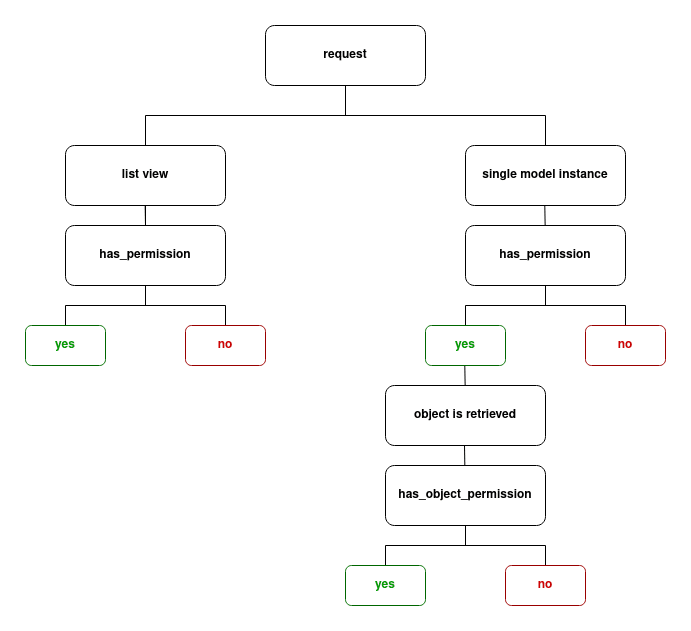
Let's see how to build this permission class.
4 - Authentication and permissions
The official DRF tutorial provides the definitive implementation for an ownership-based permission class.
Now, focus on the section titled Object level permissions. This is the core of our first approach. Observe the creation of the IsOwnerOrReadOnly class in a new permissions.py file. Analyze the logic within has_object_permission. It first allows any request using a SAFE_METHODS check. For all other methods, it performs the critical comparison: obj.owner == request.user. Note how this new permission is added to the permission_classes on the detail view, often alongside a general permission like IsAuthenticatedOrReadOnly.
To see this implemented in a real-world scenario, the video from our previous lesson provides an excellent walkthrough.
Django Rest Framework Series - Permissions and Custom Permissions - Part-2
This clip from Very Academy demonstrates building and applying a permission class that is functionally identical to IsOwnerOrReadOnly.
Watch the following segments to see the code in action: Building the Custom Permission (19:33 - 25:08): The presenter creates a PostUserWritePermission class. The logic in has_object_permission is what you should focus on. Applying and Testing (25:08 - 31:09): The presenter applies this class to a detail view and tests the API with different users to show how it correctly restricts access.
This custom class approach is perfect for many common use cases, especially those centered around a single "owner" of an object.
Test your understanding!
Imagine you want to extend the IsOwnerOrReadOnly permission. The new rule is: "An object can be edited by its owner OR by any user who is a staff member (is_staff=True)."
How would you modify the last line of the has_object_permission method to implement this logic?
Show answer
You would change the final return statement to include a check for request.user.is_staff.
# In permissions.py

from rest_framework import permissions

class IsOwnerOrStaffOrReadOnly(permissions.BasePermission):
    """
    Custom permission to only allow owners of an object or staff to edit it.
    """
    def has_object_permission(self, request, view, obj):
        # Read permissions are allowed to any request,
        # so we'll always allow GET, HEAD or OPTIONS requests.
        if request.method in permissions.SAFE_METHODS:
            return True

        # Write permissions are allowed to the owner of the snippet
        # or to any staff user.
        return obj.owner == request.user or request.user.is_staff
The key is the or request.user.is_staff condition, which grants access if either condition is met.
Approach 2: Advanced Control with django-guardian
The IsOwnerOrReadOnly pattern is powerful, but it has limits. What if you need to grant a specific user permission to edit just one document they don't own? Or grant a "Reviewers" group permission to view a single, specific draft article?
This requires a system that can assign permissions on a per-object basis. While you could build a complex system for this yourself using ManyToManyFields, a fantastic third-party package called django-guardian provides this functionality out of the box.
django-guardian for Object Permissions | django-unfold integration!
Let's start by understanding the problem that django-guardian solves. This introduction from the BugBytes channel clearly explains the difference between Django's default model-level permissions and true object-level permissions.
Watch the first three minutes of the video (00:00 - 02:56). Focus on the examples of sharing a single document or assigning a single task. This illustrates the need for a more granular permission system.
django-guardian integrates with Django's built-in permission framework but allows you to attach those permissions to individual object instances, not just to the entire model.
Let's see how to set it up and use it.
django-guardian for Object Permissions | django-unfold integration!
The same video provides a concise guide to installing, configuring, and using django-guardian.
Please watch the following key segments: Installation & Setup (02:56 - 04:57): Note the two main steps: adding 'guardian' to INSTALLED_APPS and adding its ObjectPermissionBackend to AUTHENTICATION_BACKENDS. Assigning Permissions (06:44 - 11:52): This is the core functionality. Pay close attention to the assign_perm function. It lets you link a permission (e.g., 'change_document'), a user/group, and a specific object together. Checking Permissions (11:52 - 13:34): See how the standard user.has_perm() method is now used with a second argument—the object—to check for the specific permission. Filtering QuerySets (21:00 - 22:18): django-guardian also provides a get_objects_for_user helper that is incredibly useful for list views, as it returns only the objects a user has a specific permission for.
Integrating django-guardian with DRF
The beauty of django-guardian is that it works seamlessly with DRF. DRF has a built-in permission class, DjangoObjectPermissions, which is designed specifically for this purpose.
When you add permissions.DjangoObjectPermissions to a view's permission_classes, its has_object_permission method automatically calls user.has_perm(perm, obj) for you. This means django-guardian's object-level permission checks are automatically applied to your API endpoints.
# In a views.py file
from rest_framework import generics, permissions
from .models import Document
from .serializers import DocumentSerializer

class DocumentDetail(generics.RetrieveUpdateDestroyAPIView):
    queryset = Document.objects.all()
    serializer_class = DocumentSerializer
    # This class will use django-guardian's backend automatically!
    permission_classes = [permissions.DjangoObjectPermissions]
Conclusion
You now have a powerful and flexible toolkit for managing permissions in your APIs.
Key Takeaways:
- Object-level permissions control access to specific model instances, not just entire views.
- The essential prerequisite for ownership checks is an
ownerfield on your model, which is typically populated usingperform_createin the view. - The
IsOwnerOrReadOnlycustom permission class is the standard DRF pattern for simple ownership-based rules, relying on thehas_object_permissionmethod. - For complex scenarios requiring per-object, per-user/group assignments,
django-guardianis the industry-standard solution. django-guardianprovides theassign_permfunction to grant permissions andget_objects_for_userto filter querysets. DRF'sDjangoObjectPermissionsclass integrates with it automatically.
Preview of the Next Lesson:
In our next module, we'll shift our focus to The Django Admin Interface. You'll learn how to register your models to get a powerful, auto-generated back-office for managing your application's data. We'll explore how to customize this interface to make it more user-friendly and efficient for data entry and moderation.