Hello! Welcome to the next lesson in our Django course.
So far, we have covered how to build the core components of a Django application: models, views, templates, and URLs. Now, we're moving into a crucial area of software development that ensures your application is reliable and maintainable: testing.
As a programmer, you know that writing code is only half the battle. Ensuring it works correctly, especially as the codebase grows and changes, is paramount. This is where automated testing comes in.
In this lesson, we'll focus on the foundation of our application's data layer. You will learn how to write unit tests for your Django models and any custom methods you've added to them. We'll be using Django's built-in testing framework, which is a powerful extension of Python's standard unittest library.
By the end of this lesson, you will be able to:
- Write unit tests for models and custom methods using Django's
TestCase. - Set up test data efficiently.
- Run your tests and interpret the results.
This is the first of several lessons on testing. We'll start with models here, and in subsequent lessons, we'll move on to testing views and API endpoints.
1. Why and What to Test in Django
Before we write any code, it's important to understand the philosophy behind testing in Django. The core principle is: test your own code, not the framework's.
Django is a well-tested framework. You don't need to write a test to confirm that a CharField stores a string or that models.Model can be saved to the database. Instead, you should focus on testing the parts of the application you designed and wrote.
Django Tutorial Part 10: Testing a Django web application
The Mozilla Developer Network (MDN) has an excellent guide on Django testing. Let's start by reading the section that clarifies what you should and shouldn't test.
Please read the section titled 'What should you test?'. Pay close attention to the example of the Author model and the reasoning for testing field labels and custom methods like get_absolute_url() and __str__().
A key goal when testing is to achieve good test coverage—a metric that measures what percentage of your code is executed by your test suite. A high percentage gives you more confidence that your code is working as intended. Tools can even generate reports that visually highlight which lines of code are not covered by tests.

2. The Anatomy of a Django Test
Django's testing infrastructure builds directly on Python's standard unittest library. Since you're proficient with Python's class-based structures, you'll find the concepts of test classes and inheritance familiar.
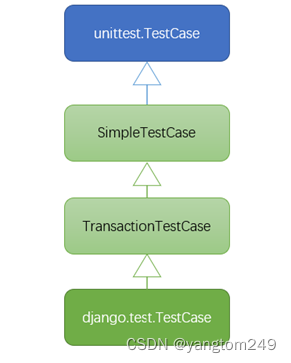
The most important class for us is django.test.TestCase. When you use it:
- Django creates a separate, temporary test database, so your tests don't interfere with your actual development data.
- Each test method is wrapped in a database transaction. This means each test starts with a clean slate, and any database changes made during the test are rolled back at the end.
Test Structure and Execution
Tests are typically placed in a tests.py file within your app, or for larger test suites, in a tests/ directory with multiple files (e.g., tests/test_models.py, tests/test_views.py).
A test suite is composed of:
- A test class that inherits from
django.test.TestCase. - Test methods within that class whose names start with
test_. - Assertion methods (e.g.,
self.assertEqual(),self.assertTrue()) inside the test methods that check if a condition is met.
You run your tests from the command line in your project's root directory:
python manage.py test
You can also run tests for a specific app:
python manage.py test your_app_name
3. Writing Model Tests
Let's get practical. Imagine we have a simple Post model in a blog app:
# blog/models.py
from django.db import models
from django.urls import reverse

class Post(models.Model):
    title = models.CharField("Post Title", max_length=200)
    content = models.TextField()
    author = models.ForeignKey('auth.User', on_delete=models.CASCADE)

    def __str__(self):
        return self.title

    def get_absolute_url(self):
        return reverse('post_detail', args=[str(self.id)])
We want to write tests for this model in blog/tests.py.
Setting Up Test Data Efficiently
Our tests will need a Post instance to work with. Creating this instance for every single test method can be slow. Django provides two methods to handle this, and understanding the difference is key to writing efficient tests.
Django Testing - Model Testing Introduction
This video from Very Academy clearly explains the difference between the setUp and setUpTestData methods for creating test data.
Watch the segment from 25:47 to 30:20. The presenter demonstrates how setUp re-creates data for every test, while setUpTestData creates it only once for the entire test class, making your tests much faster.
To summarize the video:
setUp(self): This method is run before every test method in the class. It's useful if each test needs a fresh, modified object.setUpTestData(cls): This is a class method (@classmethod) that runs only once when the test class is set up. The objects created here are shared across all test methods in the class. This is far more efficient for data that is not modified by the tests.
For testing models, setUpTestData is almost always the right choice.
Writing the Test Class
Here’s how we could structure our blog/tests.py file.
Django Tutorial Part 10: Testing a Django web application
The MDN tutorial provides excellent, commented code examples for testing various aspects of a model. We'll use this as our primary reference for writing the test code.
Read the section titled 'Models'. Focus on how the AuthorModelTest class is constructed. We will adapt these patterns to test our Post model.
Let's adapt the patterns from the MDN article to test our Post model.
# blog/tests.py
from django.test import TestCase
from django.contrib.auth.models import User
from .models import Post

class PostModelTest(TestCase):
    @classmethod
    def setUpTestData(cls):
        # Create a user for the foreign key relationship
        test_user = User.objects.create_user(username='testuser', password='password')

        # Create a Post object that won't be modified in the tests
        Post.objects.create(
            title='My Test Post',
            content='Some interesting content.',
            author=test_user,
        )

    def test_title_label(self):
        post = Post.objects.get(id=1)
        # Access the model's metadata to get the field's verbose_name
        field_label = post._meta.get_field('title').verbose_name
        self.assertEqual(field_label, 'Post Title')

    def test_title_max_length(self):
        post = Post.objects.get(id=1)
        max_length = post._meta.get_field('title').max_length
        self.assertEqual(max_length, 200)

    def test_object_name_is_title(self):
        post = Post.objects.get(id=1)
        expected_object_name = post.title
        self.assertEqual(str(post), expected_object_name)

    def test_get_absolute_url(self):
        post = Post.objects.get(id=1)
        # This tests that the URL resolves correctly.
        # It will fail if the URL pattern 'post_detail' is not defined.
        self.assertEqual(post.get_absolute_url(), '/blog/1/')
Breaking down the tests:
test_title_label&test_title_max_length: These tests inspect the model's metadata (_meta) to verify that we've configured ourtitlefield correctly. This protects against accidental changes to your model's definition.test_object_name_is_title: This is a unit test for our__str__method. It ensures that when we convert aPostobject to a string, we get the title, which is our intended business logic.test_get_absolute_url: This tests our customget_absolute_urlmethod. It verifies that thereverse()call is working with the correct URL name and arguments. This test is also a simple form of integration test, as it relies on the URL configuration being set up correctly.
Test your understanding!
Consider a Product model with a name field (CharField), a price field (DecimalField), and a custom method get_display_price() that returns a formatted string like "$12.99".
How would you write a test method named test_get_display_price to verify its functionality? Assume a product has already been created in setUpTestData with a price of 12.99.
Show answer
def test_get_display_price(self):
    # Retrieve the product created in setUpTestData
    product = Product.objects.get(id=1)

    # Define the expected output string
    expected_price_string = "$12.99"

    # Assert that the method's output matches the expected string
    self.assertEqual(product.get_display_price(), expected_price_string)
This test isolates the custom method, calls it, and asserts that its return value is exactly what's expected, confirming the formatting logic is correct.
Conclusion
In this lesson, we took our first steps into automated testing in Django. We've established a solid foundation for ensuring our data layer is robust and reliable.
Here are the key takeaways:
- Test your logic, not the framework's: Focus on testing your custom methods, field definitions, and model behaviors.
django.test.TestCaseis your primary tool for model testing: It provides an isolated test database and transaction management to keep tests independent.- Use
setUpTestDatafor efficiency: Create non-modified test data once per class to speed up your test suite. - Write descriptive tests: A test method like
test_object_name_is_last_name_comma_first_nameis much more informative upon failure thantest1.
Next Up
We've now successfully tested the "M" in MVT (Model-View-Template). In the next lesson, we will move up the stack to test the "V": Views. We'll learn how to use Django's test client to simulate browser requests, check HTTP status codes, and verify that the correct templates are being used.