Hello! Welcome to the first lesson in our module on the Django Admin Interface.
In the previous module, we dove deep into Django's Object-Relational Mapper (ORM). You learned how to define models, establish relationships, run migrations, and perform a full range of CRUD operations. We concluded by mastering Q objects to construct complex database queries with OR logic. Essentially, you now have a robust programmatic toolkit for managing your application's data.
But what if you need a quick, simple way to add, edit, or delete data without writing custom views or API endpoints? This is where Django's "killer feature" comes in. This lesson introduces the Django Admin, a built-in application that automatically generates a professional data management interface directly from your models.
Your goal for this lesson is to learn how to register your models with the admin site, making them instantly available for management through this powerful, ready-made user interface.
What is the Django Admin?
Before we make any code changes, it's important to understand what the Django admin is and what it's for. It's not intended to be your public-facing website; rather, it's a secure, internal tool for site administrators and content managers. Think of it as an automatically generated dashboard for the backend of your application.
To get a clear overview, let's start with a reading from the excellent Mozilla Developer Network (MDN) guides.
Django Tutorial Part 4: Django admin site
The article 'Django Tutorial Part 4: Django admin site' from MDN provides a great introduction to the admin application's purpose and its role in development and data management.
Please read the 'Overview' section. Focus on understanding why the admin site is useful (saving time, testing models) and its recommended use case (internal data management).
Gaining Access: Creating a Superuser
The admin interface is, by default, located at the /admin/ URL of your project. However, you can't access it yet. It's a protected area that requires a user account with special permissions. To log in, you first need to create a "superuser" account that has full access to the site.
This is done using one of Django's built-in management commands, similar to runserver and migrate. The video below provides a clear, step-by-step guide.
How to Use the Django Admin Site (create super user and login)
The video 'How to Use the Django Admin Site' by Tony Teaches Tech will walk you through creating your first superuser and logging into the admin site.
Watch from the beginning to 01:41. Follow the steps to run the python manage.py createsuperuser command in your terminal and then use those credentials to log into your project's admin area.
After following the video, you should be able to log in and see the admin dashboard. You'll notice it lists "Groups" and "Users" but not the models from your own app. Let's fix that.
The Registration Process
Django requires you to explicitly tell it which models should be managed through the admin interface. This is a deliberate design choice to give you full control. This registration happens in a specific file inside your app directory: admin.py.
The process is straightforward and, given your Python background, will feel very familiar. You simply import your model class and pass it to a registration function.
How to Register Models in Django Admin
This article from freeCodeCamp, 'How to Register Models in Django Admin', breaks down the registration process into a simple, two-step guide.
Please read 'Step 2: Register Your Model In Admin'. This section shows the exact code needed. Pay attention to the three lines: importing admin, importing your model, and calling admin.site.register().
Here is a visual representation of what the code in your admin.py file should look like:
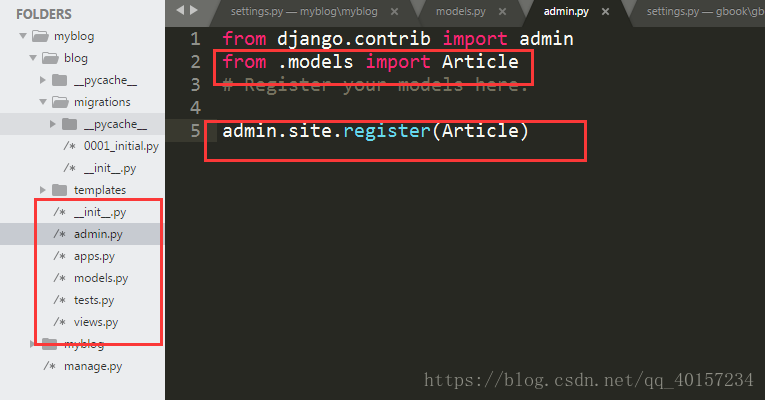
Once you've added this code and saved the admin.py file, your development server will automatically restart. If you now refresh your browser's admin page, you will see your model appear!

A Quick but Important Note on __str__
In the last module, you learned to add a __str__ method to your models. Now you'll see why it's so important. When you look at the list of objects in the admin, Django uses the __str__ method's return value to represent each object. Without it, you'd just see unhelpful text like Post object (1).
The freeCodeCamp article you just looked at has a great tip about this.
How to Register Models in Django Admin
Let's revisit the freeCodeCamp article for a quick but crucial tip that makes the admin interface much more user-friendly.
Read 'Step 1: Make Sure You Have a Model' and focus on the explanation of the __str__ method and the 'Quick tip' that follows.
Walkthrough: From Model to Admin Management
Now let's put it all together. The MDN tutorial provides a complete walkthrough, from registering multiple models to logging in and interacting with the data.
Django Tutorial Part 4: Django admin site
The 'Django Tutorial Part 4' article that we started with will now guide you through the full process of registering your models and using the admin interface to manage their data.
Please read the sections 'Registering models' and 'Logging in and using the site'. This will solidify the concepts by walking you through registering several models at once and then showing you how to use the interface to create, view, and edit records.
Test your understanding!
Suppose you have an e-commerce app named shop. Inside shop/models.py, you have defined two models: Product and Category.
What code would you write in shop/admin.py to make both of these models appear in the Django admin?
Show answer
You would need to import both models and register each one.
# inside shop/admin.py

from django.contrib import admin
from .models import Product, Category

# Register your models here.
admin.site.register(Product)
admin.site.register(Category)
Alternatively, you can register multiple models in one call by passing a list:admin.site.register([Product, Category])
Both approaches achieve the same result.
Common Pitfalls: "My Model Isn't Showing Up!"
It's a common experience: you've edited admin.py, but your model stubbornly refuses to appear in the admin. There are usually a few simple reasons for this.
How to Register Models in Django Admin
The freeCodeCamp article has a helpful FAQ that covers the most common reasons a registered model might not appear. This is worth reading to save yourself future debugging time.
Read FAQ #1: 'I added a model, but it’s not showing up in Admin. What happened?'. This provides a valuable checklist for troubleshooting.
The three most common culprits are:
- Forgetting to add your app's name to the
INSTALLED_APPSlist insettings.py. - Forgetting to run
makemigrationsandmigrateafter creating or changing the model. - A simple typo in
admin.py.
Conclusion
In this lesson, you've unlocked one of Django's most powerful and time-saving features. By adding just a few lines of code, you can generate a complete and secure interface for managing your application's data.
Key Takeaways:
- The Django Admin is an auto-generated interface for internal data management, not for your end-users.
- Access to the admin requires a superuser account, created with the
python manage.py createsuperusercommand. - Models must be explicitly registered in their app's
admin.pyfile to appear in the admin interface. - The core command for this is
admin.site.register(YourModel). - A well-defined
__str__method on your model is crucial for a readable admin interface.
You've now successfully enabled the data management interface for your models. In our next lesson, we will move beyond this basic registration and learn how to customize the admin display, such as controlling which fields appear in the model list view using list_display. This will give you more control over how you view and interact with your data.