Hello! Welcome to your next lesson in our journey to master sketching.
In our last session, we focused on giving our lines meaning by applying line weight variation to create depth, emphasis, and form. You learned the principles behind making your drawings look three-dimensional and intentional.
Today, we're going to shift gears to an exercise that is less about the final appearance of the line and more about training the connection between your eyes and your hand. Our goal is to draw continuous contour lines of simple objects without lifting the pencil. This is a fundamental practice for improving your observational skills, forcing you to slow down and truly see the subject in front of you, rather than drawing what you think is there. This skill is a cornerstone for accurately capturing any subject later, from still lifes to the human figure.
1. What is Continuous Contour Drawing?
At its core, continuous contour drawing is an exercise where you draw the subject's outlines (contours) using one single, unbroken line. You are allowed to look at your paper, but the main goal is to spend most of your time observing the subject.
This exercise is designed to:
- Strengthen hand-eye coordination: It trains your drawing hand to move in sync with your eye's movement.
- Improve observation: It forces you to notice the subtle curves, bumps, and details of an object's surface that you might otherwise overlook.
- Build confidence: By using a single, committed line, you learn to trust your marks and embrace imperfections.
To get a clear definition and understand where this exercise fits into the broader category of contour drawing, please read the following brief article.
How to Draw Contour Line Art: 4 Key Steps
The article 'How to Draw Contour Line Art' from PrepScholar provides a great definition of contour drawing and then introduces the specific exercise we're focusing on today.
First, read the introductory section 'What Is Contour Line Drawing?' to understand the basics. Then, jump to the 'Contour Line Drawing Practice Exercises' section and read exercise #4, 'Draw the Outline of an Object With One Continuous Line.' This will set the stage for our main activity.
It's important to remember that the goal here is the process, not a perfect product. The resulting drawings often have a unique, expressive quality, but their primary value is in the training they provide.
To further clarify the "rules" and mindset, let's turn to another resource that breaks down the parameters of this exercise.
Continuous Line Drawing - The Virtual Instructor
This article from The Virtual Instructor, 'Continuous Line Drawing,' clearly defines the exercise and its benefits. It also helps distinguish it from a related but more advanced exercise called 'blind' contour drawing.
Read the introduction, the section 'Why Create Continuous Line Drawings,' and 'The Rules for Continuous Line Drawing.' This will solidify your understanding of the exercise's purpose and how to approach it.
2. The Technique in Action
Now that you understand the "what" and "why," let's see "how" it's done. The following video provides an excellent step-by-step demonstration using one of the most accessible and challenging subjects available: your own hand.
Continuous Line Drawing Of Your Hand - Why This Is One Of The BEST Drawing Exercises You Can Do!
In 'Continuous Line Drawing Of Your Hand,' The Pencil Room Online channel gives a fantastic, real-time walkthrough of this exercise. The instructor does a great job explaining the mindset needed to 'see like an artist.'
Watch from the beginning to 03:36. Pay close attention to how the artist moves their eye and pen slowly and in sync, drawing both the outer edge and the inner details like wrinkles and fingernails without lifting the pen.
3. Practice Drills (35 minutes)
Time to put pen to paper. For these exercises, using a pen (like a ballpoint or a fineliner) is highly recommended. It prevents you from erasing and encourages you to commit to your lines. If you prefer a pencil, use a harder grade (like an H or HB) and resist the urge to sketch lightly or erase.
Drill 1: Simple Objects (10-15 minutes)
- Gather 2-3 simple objects from your desk or room. Good choices include a coffee mug, a computer mouse, a pair of scissors, a stapler, or a set of keys.
- Place the first object in front of you. Take 30 seconds to just look at it. Let your eyes trace its outer edges and any significant inner lines (like the handle opening on a mug).
- Choose a starting point on the object, place your pen on the paper, and begin to draw.
- Move your hand at the same slow, steady speed that your eye is moving along the object's contours.
- Draw everything you see with one single line. If you need to get from the outer edge to an inner detail, you must travel back over a line you've already drawn. Do not lift the pen.
- Spend about 3-5 minutes on each object. Remember, your drawing should reflect your observation, not a perfect, idealized version of the object.
Here are some examples of what continuous line drawings of simple objects can look like.
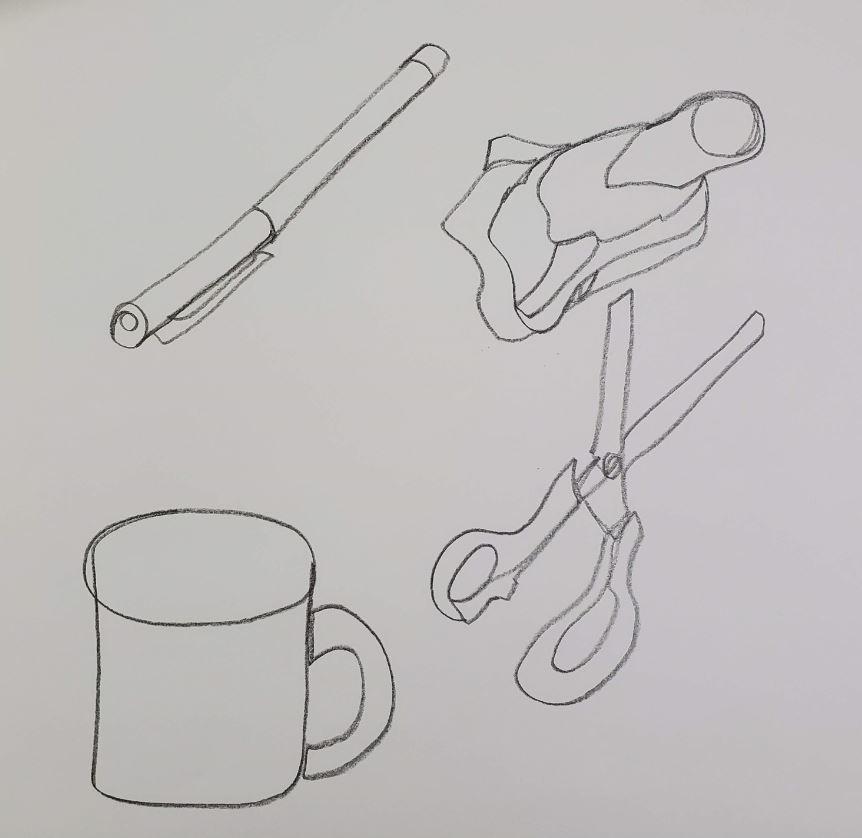
Drill 2: The Hand Study (20 minutes)
This is the classic exercise shown in the video and is one of the best ways to practice. Your hand is a complex subject with many curves and forms, making it an ideal model.
- Position your non-drawing hand on the table in a relaxed pose. You could lay it flat, make a loose fist, or create a 'peace' sign.
- Just as before, take a moment to observe. Pick a starting point (the wrist is often a good choice).
- Begin drawing, moving your eye and pen slowly along the outer silhouette of your hand and fingers.
- When you get to an inner detail, like a knuckle wrinkle or a fingernail, travel along the finger's edge to reach it, draw the detail, and travel back out to continue the main contour.
- Once you've completed one full drawing (which might take 5-10 minutes), change your hand to a new, different position and draw it again on the same page, perhaps overlapping the first drawing. Try to create at least two or three hand drawings.
Don't worry if the proportions are off. The purpose of this drill is to train your brain to translate direct observation into a physical mark.
Conclusion
Excellent work today. You've engaged in one of the most effective exercises for developing a keen artistic eye. You learned that drawing isn't just about what you put on the page, but also about the process of seeing.
Key Takeaways:
- Continuous contour drawing involves creating an image with a single, unbroken line.
- The primary goal is to improve hand-eye coordination and observational skills, not to create a perfect replica.
- The core technique is to move your drawing tool slowly and steadily, in sync with your eye's movement across the subject.
- It is crucial to look at the subject far more than you look at your paper (aim for a 90/10 split).
- Embracing the "imperfect" results is part of the process, as it reflects a genuine attempt at observation.
In our next lesson, we will conclude our first module by learning to identify and correct common line work mistakes like scratchiness and overworking. This will help you take the confidence and control you've been building and refine it for cleaner, more intentional final drawings.