Introduction
Welcome back! In our last lesson, you transformed your structural underdrawing into a clean, confident piece of line art. You now have a solid "container" for your drawing, but it still exists as a flat outline on the page.
Today, we will take the most significant step toward making your drawing feel three-dimensional. You will learn how to apply a base layer of value to establish the main light and shadow pattern. This process, often called "blocking in," is the foundation upon which all realistic rendering is built.
Think of this step in terms of binary logic. For any point on your subject, the first and most important question is: is it in light, or is it in shadow? By making this clear separation, you create a powerful and immediate illusion of form.
1. The Two Families: Light and Shadow
Before we can shade, we need to understand how light behaves. The key to effective shading is to simplify what you see into two main groups or "families": the light family and the shadow family. Every part of your subject will belong to one of these two families.
Go From Flat to Realistic Shading! Here’s How
Let's start with a video from Proko that introduces this fundamental concept. He explains why this simple organization of values is the most crucial first step in communicating form.
Watch the first two minutes of the video (00:00 - 02:07). Focus on the core idea of separating the object's surface into planes belonging to either the 'light family' or the 'shadow family'.
This clear separation between light and shadow is what gives a drawing its initial "punch" and sense of reality. Within these two families, there are specific named parts that describe how light and shadow behave on a form. Understanding this terminology will help you observe and draw more accurately.
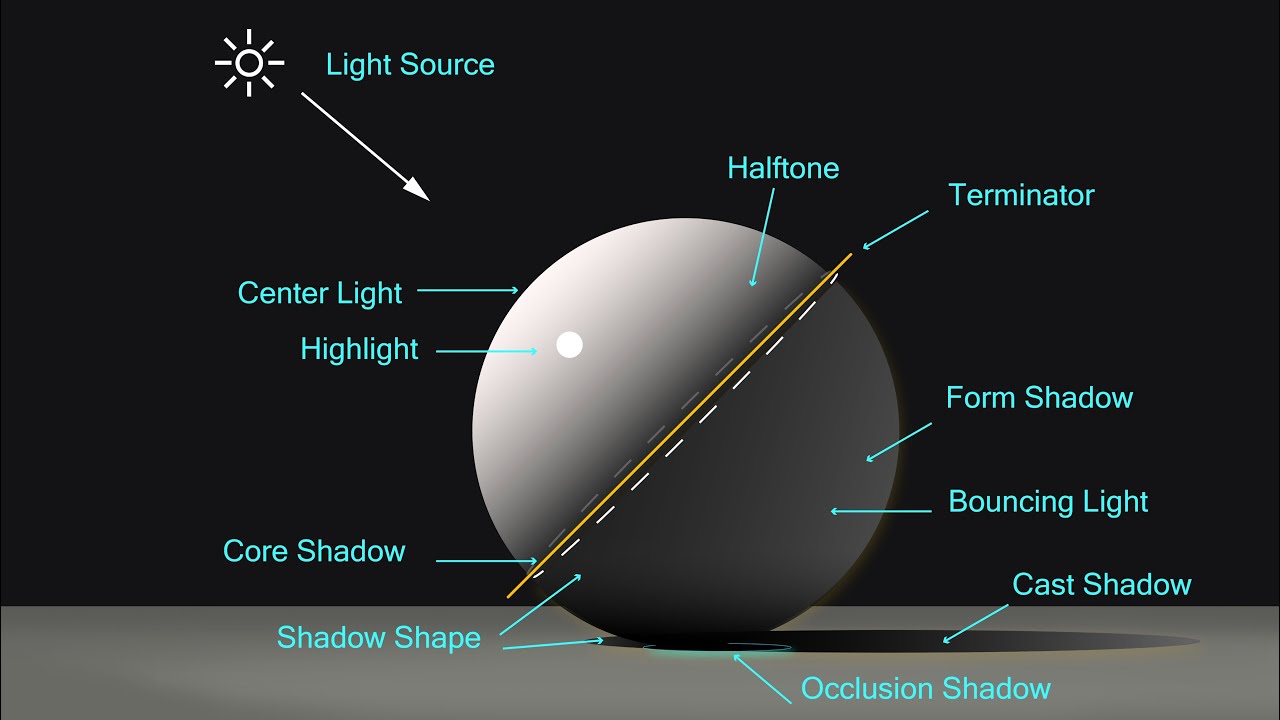
Now, let's have Proko walk us through these terms in more detail.
Go From Flat to Realistic Shading! Here’s How
This next segment of the same video breaks down the anatomy of light and shadow, defining terms like terminator, core shadow, and reflected light.
Watch the section from 02:20 to 04:13. Don't worry about memorizing every term perfectly right now. The goal is to understand that there is a predictable structure to how light falls on an object.
For today's lesson, the most important takeaway is this: everything on the shadow side of the terminator, including the cast shadow, belongs to the shadow family. Our goal is to group all of these shadow parts into a single, unified shape.
2. The Block-In: Establishing Your Value Foundation
"Blocking in" means identifying the entire shadow shape and filling it in with one flat, even tone. This is not about creating smooth gradients or rendering details; it's about making a clear, simple statement that separates light from dark.
This process establishes your drawing's value composition—the arrangement of light and dark patterns. A strong composition is built on clear, readable shapes.
So, how do we translate the complex values we see in reality into these simple, blocked-in shapes?
Tonal Values 101: Understanding Light and Dark in Art
The article "Tonal Values 101" provides an excellent, straightforward guide to this process. We'll focus on the specific step of blocking in the main tones.
Read 'Step 3: Sketch and block in the main tones' within the 'Step-by-Step Guide' section. Pay close attention to the advice about focusing on big, simple areas and the powerful trick of squinting to simplify what you see.
By squinting, you filter out overwhelming detail and color, and the world flattens into abstract shapes of light and dark. This is precisely what you want to capture in your block-in.
The image below is a perfect example of the goal for today. Notice how on each object, all the shadows (both on the form and cast by it) are massed together into one simple, flat shape.

3. Practical Exercise: From Line Art to Value Block-In
Estimated Time: 25-30 minutes
It's time to apply this to your own drawing. You will take the clean line art you created in the previous lesson and establish its foundational value structure.
Part A: Warm-Up - Forcing the Decision (5 minutes)
This quick exercise, inspired by a technique from artist Will Kemp, will train your eye to see in terms of light and shadow only. Using a pen or marker forces you to make a binary choice—there are no mid-tones.
- Find a simple object (like an apple, mug, or a piece of fruit) and light it with a single, strong light source (like a desk lamp).
- On a scrap piece of paper, do a quick contour drawing of the object.
- Now, using a pen or marker, identify the line of the terminator and the outline of the cast shadow.
- Fill in the entire shadow side with hatched lines or a solid tone. Don't worry about making it pretty. The goal is to create a sketch with only two values: the white of the paper (light) and the black of your pen (shadow).
How to Shade a Drawing (Light & Shadow : Part 2 of 3)
To see this warm-up exercise in action, quickly look at the images in the article "How to Shade a Drawing" from Will Kemp Art School.
Scroll through the section titled 'Simplifying your drawings by mapping the shadows'. You don't need to read it in depth, just observe the images to see how he uses a pen to map out and fill in the shadow shapes before starting the 'real' drawing.
Part B: Main Exercise - Blocking in Your Drawing (20 minutes)
Now, let's apply this to the refined line art you created in the last lesson.
- Analyze Your Reference: Look at the reference you used for your drawing. Clearly identify the direction of the light source.
- Identify the Shadow Shapes: Squint your eyes at the reference until you see the light and dark areas as simple, connected shapes.
- Map the Shadows: Using a light pencil (like a 2H) or very light pressure with your regular pencil, gently draw the outline of the main shadow shapes onto your drawing. This includes the terminator on the object itself and the edge of the cast shadow on the ground plane.
- Block-In the Value:
- Choose a mid-tone value. This should be a light-to-medium grey—dark enough to be clearly different from the white of the paper, but not your darkest black.
- Using the side of your pencil lead to make broad strokes, fill in the entire shadow area you just mapped out.
- Work to create a single, flat, even tone across the whole shadow family. The form shadow and cast shadow should flow into one another.
- Crucial Rule: The lightest part of your shadow area should still be darker than the darkest part of your light area (which, for now, is just the white of the paper).
The step-by-step images of the apple drawing in Will Kemp's article (from the "How to draw a three-dimensional Apple" section onwards) are an excellent visual guide for this process. Notice how he maps the shadows first, then fills them in with a consistent tone.
Conclusion
Excellent work. You have now established the most critical element of a realistic drawing: the value structure. By clearly separating the world into light and shadow, you've created a solid foundation that communicates form and light with clarity and power.
Key Takeaways:
- All shading begins by dividing the subject into two families: light and shadow.
- The block-in process involves filling the entire shadow family with a single, flat value to establish the drawing's core value structure.
- The form shadow and cast shadow are part of the same family and should be massed together in the initial block-in.
- Squinting is your best tool for simplifying a complex scene into readable shapes of light and dark.
Preview of the Next Lesson:
Your drawing now has a clear light and shadow pattern, but the shadows are flat. In our next lesson, "Build up form and texture using appropriate shading and rendering techniques," we will learn how to go inside these big shadow shapes and create smooth transitions (gradients) to make your forms look truly round and three-dimensional. We'll explore techniques like hatching, cross-hatching, and controlling your pencil pressure to bring your drawing to a new level of realism.