Hello! Welcome back to your mandala design course.
In our last lesson, we focused on building texture within a round using post stitches, clusters, and shells. We learned to think of these stitches as ways to add depth and dimension to the main fabric of our design. Today, we're shifting our focus to the very edge of a round. You'll learn how to design decorative edges, such as picots and scallops, while maintaining flatness.
Think of a round in your mandala as a container element in web design, like a <div>. The stitches inside are the content. The edge we're designing today is like applying a border property in CSS. It doesn't change the content, but it defines the element's boundary and gives it a finished, polished look. A simple edge might be border: 1px solid black;, while a more complex one could involve gradients, rounded corners, or even a border-image. Our goal is to learn the crochet equivalents of these finishing touches and understand the math needed to apply them without "breaking the layout" by causing the fabric to ripple or curl.
1. The Scalloped (or Shell) Edge: Creating Bold Curves
One of the most popular and beautiful edgings is the scallop or shell edge. We touched on shells in the last lesson as a way to create texture; now we'll look at them specifically as a finishing border. A shell is simply a group of stitches worked into the same point to create a fan shape.
The core challenge with scallops is that they are a powerful form of localized increase. A 5 dc shell adds five stitches where there was previously only one stitch or space. To prevent the edge from ruffling out of control, these increases must be balanced by skipping stitches.
To see the basic technique in action, let's watch a segment of this helpful video on crochet borders.
5 Go-To Borders Every Crocheter Should Know 🧶
The '5 Go-To Borders' video from Play Hooky with Me demonstrates a classic scalloped edge. Pay attention to the basic repeat and how the creator talks about 'fudging' the count to make it fit.
Please watch from 01:12 to 04:19. Notice the rhythm of the pattern: work a shell, skip stitches, anchor with a slip stitch, skip stitches, and repeat. This concept of anchoring and skipping is key to controlling the shape.
The Math of a Flat Scallop
As the video mentions, you can't always follow a rigid formula; sometimes you need to adjust by eye. However, understanding the underlying math gives you a much better starting point.
The key is to balance the "footprint" of the motif (the number of stitches it uses from the previous round) with the number of stitches it creates.
- Motif: Let's analyze a common scallop pattern:
(sl st in next st, skip 1 st, 5 dc in next st, skip 1 st). - Footprint: This motif uses
1 + 1 + 1 + 1 = 4stitches from the round below. - Stitches Created: It creates
1(the slip stitch) +5(the double crochets) =6stitches.
Since this motif turns 4 stitches into 6, it creates a significant increase. If repeated around a circle, it will cause a pronounced, wavy ruffle. This can be a beautiful effect! But if your goal is a flatter finish, you need to adjust.
How can you adjust?
- Skip more stitches:
(sl st, skip 2, 5 dc, skip 2). Now the footprint is1+2+1+2 = 6stitches, and you create 6 stitches. This is a 1-to-1 replacement and will lie much flatter. - Change the shell size: A smaller shell, like one made with 3 dc, adds fewer stitches and will be less prone to ruffling.
The following video is excellent for understanding how to adapt the shell size to the space you have, which is crucial when working in a circle where the edge is continuous.
How to Crochet: Scalloped Edging (Right Handed)
In this video from Moogly, Tamara Kelly explains how to be flexible with your shell stitch borders, adjusting the number of stitches to fit your project's needs and to navigate corners (which is directly applicable to a continuous curve).
Watch from 02:13 to 05:27. First, you'll see how to create a bigger shell (7 dc) to span a larger gap. Then, she demonstrates how to work a large shell to get around a corner, which is conceptually the same as spreading stitches around the curve of a circle to keep it flat.
As a designer, you have control. A slight increase in stitches will create a gentle, decorative wave, while a major increase will create a dramatic ruffle. For a completely flat edge, the total number of stitches in your edging round should only be slightly more than the previous round, following the standard increase rules we learned in Module 1.
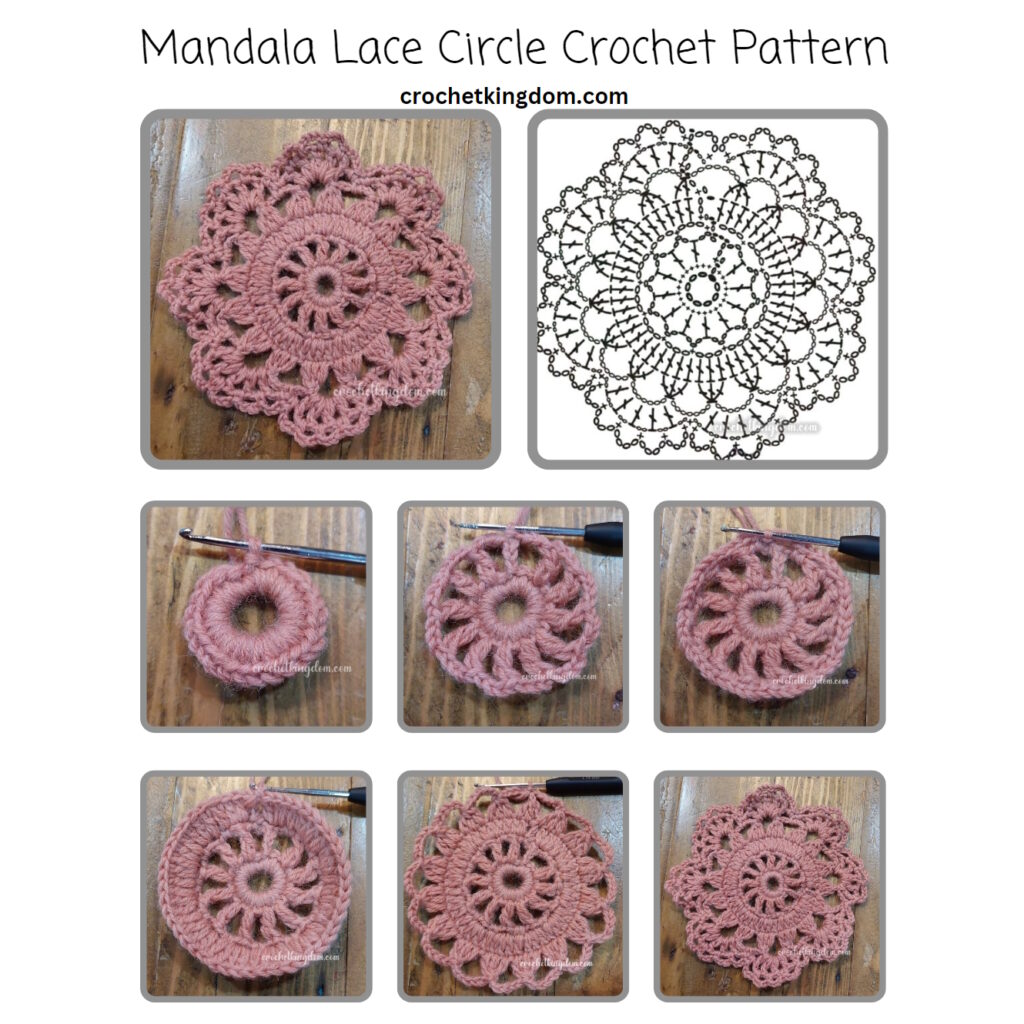
2. The Picot Edge: Creating Delicate Points
If scallops are a bold, curvy border, picots are their delicate, pointy counterparts. A picot is a small knot or loop, usually made from 3 chain stitches, that sits on top of another stitch. They add a subtle, decorative texture without dramatically altering the shape of the round.
This makes them much simpler from a mathematical standpoint. Since a picot is an embellishment on top of a stitch (usually a single crochet), it doesn't add stitches to the round's circumference. Therefore, a round of single crochet with picots added will naturally lie flat. Your main design decision is spacing.
Let's return to the "5 Go-To Borders" video to see how picots are made.
5 Go-To Borders Every Crocheter Should Know 🧶
This segment clearly demonstrates the picot stitch. The creator shows how simple it is to make and explains that you can easily change the look by adjusting the spacing between them.
Watch from 00:12:37 to 00:15:35. Observe the sequence: work a few single crochets, then create the picot (ch 3, slip stitch into the base). The number of single crochets between each picot determines how dense or sparse the final edge looks.
Common Picot Patterns:
- Dense:
(sc in next st, picot)repeated. - Standard:
(sc in each of next 2 sts, picot)repeated. - Sparse:
(sc in each of next 4 sts, picot)repeated.
Because picots don't affect flatness, your choice is purely aesthetic. This is analogous to using a border-style: dotted versus border-style: dashed in CSS—you're changing the appearance, not the layout.
For a clear written guide on both shell and picot edgings, the following article is a great reference.
5 Crochet Edges That'll Beautifully Finish Any Project
This Craftsy article, '5 Crochet Edges That'll Beautifully Finish Any Project,' provides concise written instructions for both shell and picot edgings. It's a great text-based companion to the videos we've watched.
Please read the sections titled 'Shell Edging' and 'Picot Edging'. Note the stitch multiples given for the shell edging, which reinforces the math we've been discussing.
Test your understanding!
You are designing a decorative edge for a round that has 120 stitches. Your goal is to add a scallop edge that creates a gentle, decorative wave, not a tight ruffle or a perfectly flat edge.
Propose a scallop motif (the repeating stitch pattern). Explain:
- The stitches in your motif.
- The motif's "footprint" (how many stitches it uses from the 120-stitch round).
- How many times you will repeat it.
- What the final stitch count of your edging round will be and why it achieves the "gentle wave" effect.
Show answer
Here is one possible solution:
- Motif:
(sc in next st, skip 2 sts, 7 dc in next st, skip 2 sts) - Footprint: The motif uses
1 + 2 + 1 + 2 = 6stitches from the round below. - Repeats: The round has 120 stitches.
120 / 6 = 20. The motif will be repeated exactly 20 times. - Final Stitch Count: Each motif creates
1(the sc) +7(the dc) =8stitches. The final stitch count will be20 repeats * 8 stitches = 160 stitches.
A standard increase for a flat DC-height round would be around 12 stitches, taking you from 120 to ~132. By creating 160 stitches, we are adding significantly more than needed for flatness, which will produce the desired gentle, decorative wave.
3. Other Edging Options
Scallops and picots are just the beginning. The "5 Go-To Borders" video and the Craftsy article introduce a few other interesting options you can explore:
- Crab Stitch (Reverse Single Crochet): Described in the Craftsy article, this involves working single crochet stitches backward (from left to right for a right-hander). It creates a beautiful, simple corded edge that lies perfectly flat.
- Lacy Chain-Loop Edge: Shown in the "5 Go-To Borders" video (09:55 - 12:37), this edge is made of
ch-3loops. It's light, airy, and a great way to finish a lacy mandala.
Conclusion
You now have the fundamental tools to add a polished, professional finish to any round of your mandala. You've learned not just how to make these edges, but more importantly, why they behave the way they do.
Key Takeaways:
- Decorative edges are the final touch that defines a round's boundary.
- Scallops/Shells are high-impact edgings that add significant stitches. Their tendency to ruffle must be controlled by carefully balancing the shell size against the number of skipped stitches.
- Picots are low-impact embellishments that add texture without affecting flatness. Your main design choice is their spacing.
- The final effect—flat, wavy, or ruffled—is a design choice that you control through simple mathematics.
In our next and final lesson for this module, we'll put theory into practice. You'll learn how to swatch and adjust a single round's design, ensuring it lies flat and meets your design intent. This is the crucial "testing" phase where you take your design from paper to yarn and make the final tweaks.