Hello again! Welcome to the final lesson in our module on crafting individual rounds.
So far in this module, we've explored the building blocks of a single, beautiful round: incorporating stitch patterns, creating texture with post stitches and clusters, and finishing with decorative edges. We've been the architect, drawing up the blueprints. Today, we become the engineer and the quality assurance tester. Our focus is to swatch and adjust a single round's design to ensure it lies flat and meets the design intent.
In your frontend development work, you wouldn't push a new UI component to production without testing it first. You'd build it in isolation, check that it renders correctly across different scenarios, and debug any layout issues. Swatching in crochet design serves the exact same purpose. It's our "unit test" to verify that our designed round is mathematically sound (it lies flat) and aesthetically pleasing (it meets our design intent) before we commit to crocheting it into a larger piece.
This lesson is all about that crucial testing and debugging process. Let's get our hooks ready!
1. What is a Swatch and Why is it Essential?
Before we start troubleshooting, let's clarify what a swatch is and why it's a non-negotiable step for any serious designer. A swatch is a small sample of your crochet work, created to test your yarn, hook, and stitch pattern combination.
For many projects, the main goal of swatching is to check gauge—the number of stitches and rows in a set area (e.g., a 4x4 inch square). While gauge is important for sizing, in mandala design, our primary concern for a swatch is to test for flatness, drape, and stitch definition.
To get a comprehensive overview of swatching, let's look at an article that explains these concepts in detail.
The article 'How to Gauge Swatch' from Crochet Highway is a fantastic resource. We'll focus on the sections most relevant to designing mandalas.
Please read the following sections: 'What is gauge and why does it matter?': To understand the core concept. 'What is a gauge swatch?': To get a formal definition. 'Should I crochet my gauge swatch flat or in the round?': Focus on the advice for projects worked in the round, as this is directly applicable to our mandalas. 'Should I block my swatch?': This is a critical step that reveals the true nature of your fabric. 'How do I adjust my gauge?': This section is the heart of what we're learning today—the 'adjust' part of our goal.
The key takeaway for our purposes is that a swatch for a mandala round isn't a separate square. The swatch is the first attempt at your round, usually worked onto a small, plain circular base of 3-4 rounds. This provides a realistic environment to see how your new, complex round behaves.
2. Debugging Your Round: Ruffling and Cupping
When you lay your test round down, you will almost always encounter one of two issues. Think of these as common bugs in your code.
- Ruffling (or Waving): The edge of your circle looks like a potato chip or a piece of lettuce. The fabric doesn't lie flat and has excess material.
- Cupping (or Bowling): The circle starts to curl upwards at the edges, forming a bowl or cup shape.
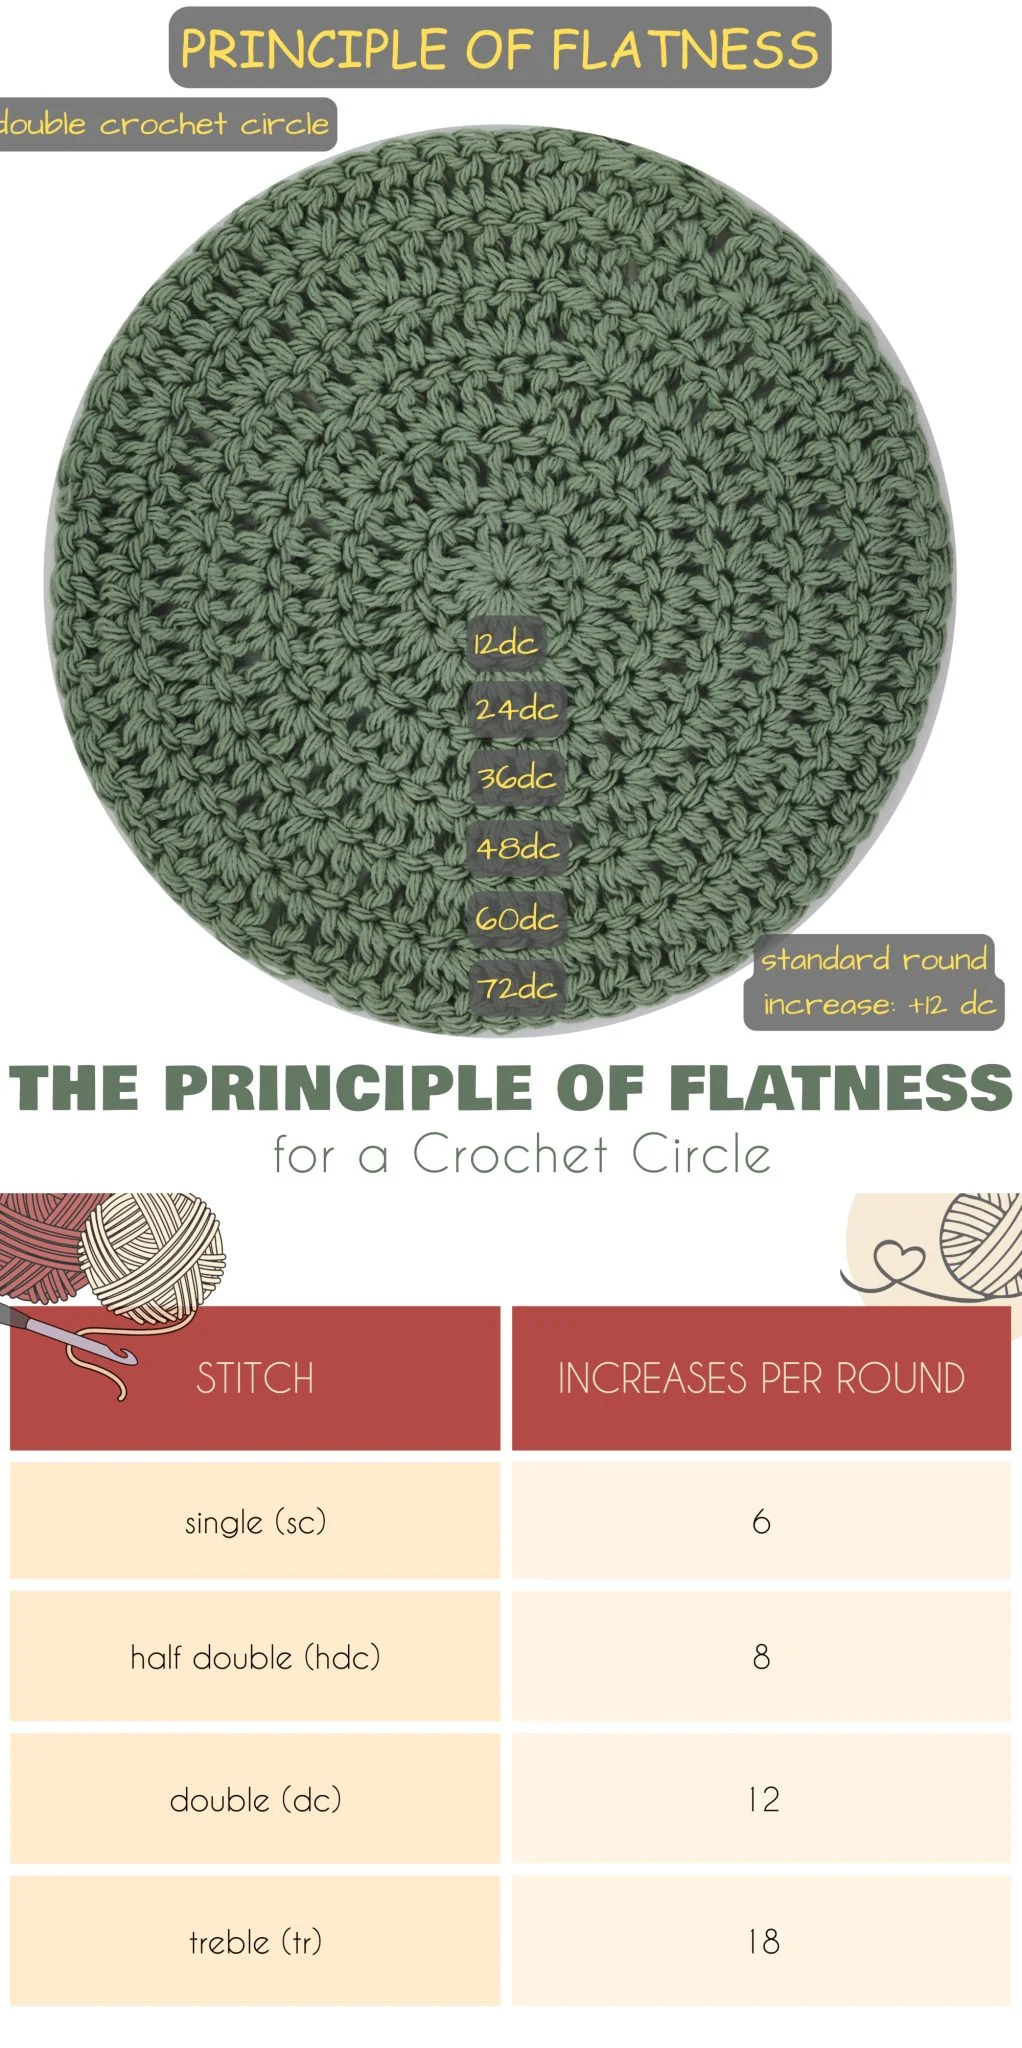
The cause of these issues is simple: a mismatch between the circumference of the previous round and the number of stitches you've added in your new round.
Let's watch a video that gives a great visual demonstration of these two problems and their primary causes.
CROCHET A FLAT CIRCLE - 📝 Troubleshooting Crocheting in the Round - Part 1
This video from The Stitch Queen Crochet quickly and clearly shows what ruffling and cupping look like, and explains the fundamental reason for each.
Watch from 00:29 to 04:24. The first part covers ruffling (too many stitches) and the second covers cupping (too few stitches). Pay close attention to the visual examples and the two main solutions offered for each problem: changing the stitch count and changing the hook size.
As the video demonstrates:
- Ruffling = Too many stitches. You've added too many stitches for the available space, forcing the fabric to buckle.
- Cupping = Too few stitches. You haven't added enough stitches to allow the circle to expand, so it's pulling inwards and upwards.
Now that you can visually identify the problems, let's explore the practical steps to fix them.
3. The Adjustment Process: From Theory to Practice
Fixing a round that doesn't lie flat is an iterative process of adjusting and re-testing. This is where you'll "frog" (rip-it, rip-it) your work, but don't see it as a failure! See it as a necessary step in refining your design.
The following article gives excellent, practical advice on how to make these adjustments on the fly.
The Secret Crochet Circle Formula (and how to tweak it)
The article 'The Secret Crochet Circle Formula (and how to tweak it)' by Shelley Husband has a brilliant, visual section on fixing these exact problems. It shows you what to do right when you spot an issue.
Please read the section titled 'How to fix your circle when it isn’t flat'. It provides clear before-and-after pictures and explains exactly how to modify your stitch count to correct ruffling and cupping as you work.
Let's consolidate what we've learned from these resources into a systematic debugging workflow:
If Your Round is Ruffling (Too Many Stitches):
- Primary Solution: Reduce the stitch count.
- Examine your round's stitch pattern. Where are the increases?
- If you have a repeating motif like
(cluster, ch 1, sc), the increases are happening in the cluster and chain spaces. - To reduce stitches, you could either remove one full repeat of the motif (if your math allows) or, more subtly, remove an increase within the repeats. For example, instead of increasing in every repeat, you could do a round where you alternate between an increase repeat and a "plain" repeat.
- Secondary Solution: Go down a hook size.
- As explained in the "How to Gauge Swatch" article, a smaller hook creates smaller, tighter stitches. This can sometimes tame a mild ruffle without having to recalculate your stitch counts. This is often a good first thing to try if the ruffling is minor.
If Your Round is Cupping (Too Few Stitches):
- Primary Solution: Increase the stitch count.
- This is the opposite of the ruffling fix. You need to add more increases.
- Look for opportunities to add an extra increase repeat. For example, if you were up to
(2 dc, inc)in a standard circle, maybe you need to repeat that round's increase pattern instead of moving on to(3 dc, inc). - In a more complex textural round, you might add an extra stitch to your clusters or add an extra
ch-1space between motifs.
- Secondary Solution: Go up a hook size.
- A larger hook creates looser, larger stitches, which can help a cupping circle relax and flatten out. This is a quick fix for minor cupping.
Test your understanding!
You've designed a new round for your mandala. The previous round has 120 stitches. Your design for the new round consists of 15 repeats of a motif: (Shell of 5 dc in one stitch, skip 3 stitches, sc in next stitch, skip 3 stitches).
- Calculate the footprint of the motif. Does it divide evenly into 120 stitches?
- Calculate the final stitch count for this round.
- Based on your calculation, do you predict this round will lie flat, ruffle, or cup? Explain your reasoning.
- If it doesn't lie flat, what is one specific adjustment you would make to the motif to fix it?
Show answer
- Footprint: The motif uses
1 (for the shell) + 3 (skipped) + 1 (for the sc) + 3 (skipped) = 8 stitches. Yes,120 / 8 = 15, so it divides evenly. - Final Stitch Count: Each motif creates
5 dc + 1 sc = 6 stitches. The final count is15 repeats * 6 stitches = 90 stitches. - Prediction: The round will cup severely. We are going from 120 stitches down to 90 stitches. This is a significant decrease, which will cause the fabric to pull inward.
- Adjustment: To fix the cupping, we need to add many more stitches. A simple fix would be to reduce the number of skipped stitches. For example:
(Shell of 5 dc, skip 1 st, sc, skip 1 st).- New Footprint:
1+1+1+1 = 4stitches.120 / 4 = 30repeats. - New Stitch Count:
30 repeats * 6 stitches = 180 stitches. - This would likely cause ruffling! The art of design is finding the balance. A better adjustment might be
(Shell of 5 dc, skip 2, sc, skip 2). This has a footprint of 6 stitches (120/6=20repeats) and creates a final count of20 * 6 = 120stitches. This would be much flatter.
- New Footprint:
4. Meeting the Design Intent
Finally, remember that flatness is only half the goal. Your swatch must also meet your design intent. As you test and adjust, ask yourself:
- Does the texture created by the post stitches or clusters look as bold as I wanted?
- Is the negative space in my lacy sections creating the open feel I envisioned?
- Does the color I chose work well with this stitch pattern?
- Does the decorative edge flow nicely from the main body of the round?
Sometimes, a round lies perfectly flat but just doesn't look right. This is where you might decide to change the stitch type (e.g., from double crochet to half double crochet to make it denser), change your yarn, or rethink the motif entirely. This is the subjective, artistic side of the "testing" process.

Conclusion
Congratulations on completing this module! You now possess the skills to design a complete, mathematically sound, and texturally interesting round from start to finish.
Key Takeaways:
- Swatching is your testing environment. For mandalas, your swatch is an early version of the round itself, built on a small base.
- The two main "bugs" are ruffling (too many stitches) and cupping (too few stitches).
- You can "debug" your round by adjusting the stitch count (primary fix) or your hook size (secondary fix).
- The process is iterative: design, swatch, assess, adjust, repeat.
- Always check that the final, flat round also meets your aesthetic design intent.
You are now ready to zoom out from the single round and look at the bigger picture. In our next module, "Composing the Full Mandala," we will begin with a lesson on developing a cohesive design plan for a multi-round project, taking your skills from crafting a single component to orchestrating a complete work of art.