Hello! Welcome back to our study of Ray Optics.
In our last lesson, we built our foundational vocabulary, defining key terms like the pole (P), center of curvature (C), radius of curvature (R), principal focus (F), and focal length (f). We also established the crucial Cartesian Sign Convention for making our calculations consistent.
Today, we will take the next logical step and derive the fundamental relationship that connects a mirror's geometry (its radius of curvature) to its optical properties (its focal length). Your goal for this lesson is to derive the relation for spherical mirrors. This formula is simple, yet it's the cornerstone for much of what follows in our study of reflection. Given your background in calculus and geometry, you'll find the logic behind this derivation quite satisfying.
1. The Geometric Derivation of
The relationship between the focal length and the radius of curvature is not an arbitrary rule; it emerges directly from the law of reflection and the geometry of a circle.
To begin, let's visualize the setup. The diagram below shows a ray of light parallel to the principal axis striking a concave mirror and reflecting through the principal focus. It also shows the equivalent for a convex mirror.
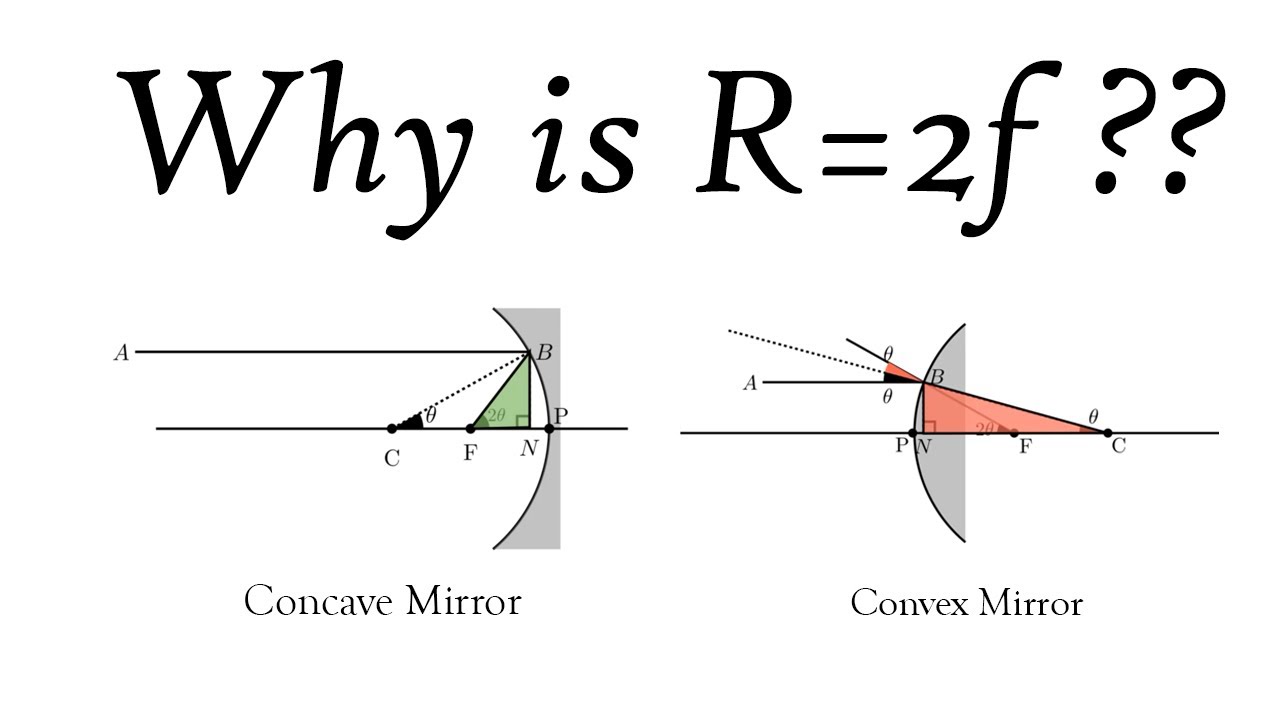
For our derivation, we will make a critical assumption known as the paraxial approximation. This means we consider only rays that are very close to the principal axis and strike the mirror near the pole. This has two important consequences:
- The angles of incidence and reflection are very small.
- The curved section of the mirror where the ray strikes can be approximated as being nearly flat, and the point of incidence, M, is very close to the pole, P.
Let's walk through the derivation step-by-step. To help visualize this process, please watch the following video, which provides a clear, animated walkthrough of the proof for a concave mirror.
Relation between f and R derivation I f = R/2 I ray Optics Derivations Class 12th Physics
This video from RADHIKA CLASSES provides an excellent step-by-step geometric proof for the relationship f = R/2. Pay close attention to how the law of reflection and properties of parallel lines are used.
Watch the video from 00:00 to 07:21. The presenter will build the diagram and use geometry to arrive at the final formula. Focus on understanding the justification for each geometric step and the role of the 'small aperture' approximation.
Now, let's formalize the steps you saw in the video using our diagram.
Step-by-Step Derivation:
- Setup: Consider a ray AM parallel to the principal axis, striking the concave mirror at point M. According to the definition of the principal focus, this ray will reflect through F.
- The Normal: The line CM connects the center of curvature C to the point of incidence M. For a spherical surface, any line from the center to the surface is a radius and is therefore perpendicular (normal) to the surface at that point. Thus, CM is the normal at M.
- Law of Reflection: The angle of incidence is the angle between the incident ray (AM) and the normal (CM). Let's call this . The angle of reflection is the angle between the reflected ray (MF) and the normal (CM). Let's call this . By the law of reflection, .
- Geometric Relations:
- Since the incident ray AM is parallel to the principal axis PC, the line CM acts as a transversal. Therefore, the alternate interior angles are equal: .
- Let's label . Then from the previous point, we also have .
- Isosceles Triangle: Now look at the triangle . We have established that two of its angles, and , are equal (). A triangle with two equal angles is an isosceles triangle. Therefore, the sides opposite to these equal angles must also be equal:
- The Paraxial Approximation: Here is the key step. We assume the ray AM is paraxial, meaning it is very close to the principal axis. This implies that the point of incidence M is very close to the pole P. When M is very close to P, the length of the segment FM is approximately equal to the length of the segment FP.
- Final Combination: Combining the results from steps 5 and 6, we get:
This tells us that the principal focus F lies almost exactly halfway between the center of curvature C and the pole P.
We know the distance from the pole to the center of curvature is the radius of curvature, . We also know that can be written as the sum of and : Substituting into this equation gives: By definition, and (the focal length). Therefore, we arrive at our final relationship:
This derivation is fundamental and a common requirement in examinations.
2. An Alternative Derivation using Small-Angle Approximation
Given your interest in mathematical rigor, let's explore a slightly different but equivalent method that relies on trigonometry and the small-angle approximation. This approach is detailed in the NCERT textbook.
RAY OPTICS AND OPTICAL INSTRUMENTS
The NCERT textbook provides a concise derivation using trigonometry. This will reinforce the concept and show you an alternative way to think about the problem.
Please read section 9.2.2, 'Focal length of spherical mirrors'. Focus on the part that starts just below Figure 9.3 and uses Figure 9.4 to derive the equation f = R/2. Pay attention to how tanθ is used.
Let's summarize the logic from the textbook resource:
- Setup: As shown in their Figure 9.4, a perpendicular MD is dropped from M to the principal axis.
- Angles: Let . Since the exterior angle of a triangle is the sum of the interior opposite angles, for , we have . Since and (from law of reflection and alternate interior angles), we get .
- Trigonometry: In the right-angled triangles and , we can write:
- Small-Angle Approximation: For paraxial rays, the angle is very small. For small angles measured in radians, we know that and . Applying this, our equations become:
- Substitution: We can substitute the first expression for into the second one: Cancelling from both sides gives:
- Final Step: Again, for paraxial rays, the point D is very close to the pole P. So, we can approximate and . This gives us our final result:
Both derivation methods rely on the paraxial approximation, but they use slightly different geometric and algebraic tools to arrive at the same crucial conclusion.
Test your understanding!
You are given a convex mirror with a focal length of +20 cm.
- What is the radius of curvature of this mirror?
- Where is the center of curvature located relative to the pole of the mirror?
- Why is the focal length given as a positive value?
Show answer
- Using the relation , the radius of curvature is .
- The center of curvature (C) is located 40 cm from the pole. For a convex mirror, C is behind the reflecting surface.
- The focal length is positive based on the Cartesian Sign Convention we learned. For a convex mirror, the principal focus (F) is a virtual point behind the mirror. Distances measured from the pole in the direction of reflected/transmitted light (in this case, behind the mirror, to the right) are considered positive.
Conclusion
In this lesson, we have successfully derived the fundamental relationship between a spherical mirror's focal length () and its radius of curvature ():
- Key Takeaway: For a spherical mirror, . The principal focus lies exactly halfway between the pole and the center of curvature.
- Crucial Condition: This relationship is an approximation that holds true for paraxial rays—rays that are close to the principal axis and make small angles with it. For rays far from the axis, this simple relationship breaks down, leading to a phenomenon called spherical aberration, which causes blurry images.
You now have the two essential pieces of information for analyzing mirrors: the definitions of the key points (P, F, C) and the geometric relationship between them.
Preview of the Next Lesson:
With this foundation in place, we are now ready to tackle a core skill in ray optics: constructing ray diagrams. In the next lesson, you will learn the three "principal rays" whose paths are easy to predict. By drawing these rays, you will be able to determine the location, size, and nature (real or virtual, upright or inverted) of the image formed by any object placed in front of a concave or convex mirror.