Hello! In our last lesson, you crafted a complete voiceover script, perfectly timed and structured to match your animation's storyboard. You now have the definitive narrative blueprint for your project. Today, we bring that script to life.
This lesson is all about transforming your written words into a polished audio track using a powerful AI voice generation tool. You'll learn how to select a voice that fits your story's tone, direct the AI's performance to add emotion and pacing, and generate the final audio files. This is the last step in building your project's foundation before we dive into the world of visual animation.
1. Introducing Your AI Voice Actor: ElevenLabs
For this task, we will use a tool called ElevenLabs. It's a leader in AI-driven text-to-speech (TTS), renowned for creating exceptionally realistic and expressive voices. Since your goal is a streamlined, AI-only workflow, this platform is an ideal choice. It allows you to go far beyond robotic text reading and act as a "director" for your AI voice actor, guiding its emotional delivery and timing.
2. Getting Set Up
Your first step is to create an account and familiarize yourself with the platform. The free plan is quite generous and will be more than enough for you to experiment and generate the audio for your entire animation.
ElevenLabs Tutorial: A Beginner's Guide (2026)
This guide from Feisworld provides a quick and clear overview of getting started. We'll follow a similar process.
Focus on the first step in the "Step-by-Step ElevenLabs Tutorial" section. Read the part about account setup. Sign up for a free account on the ElevenLabs website.
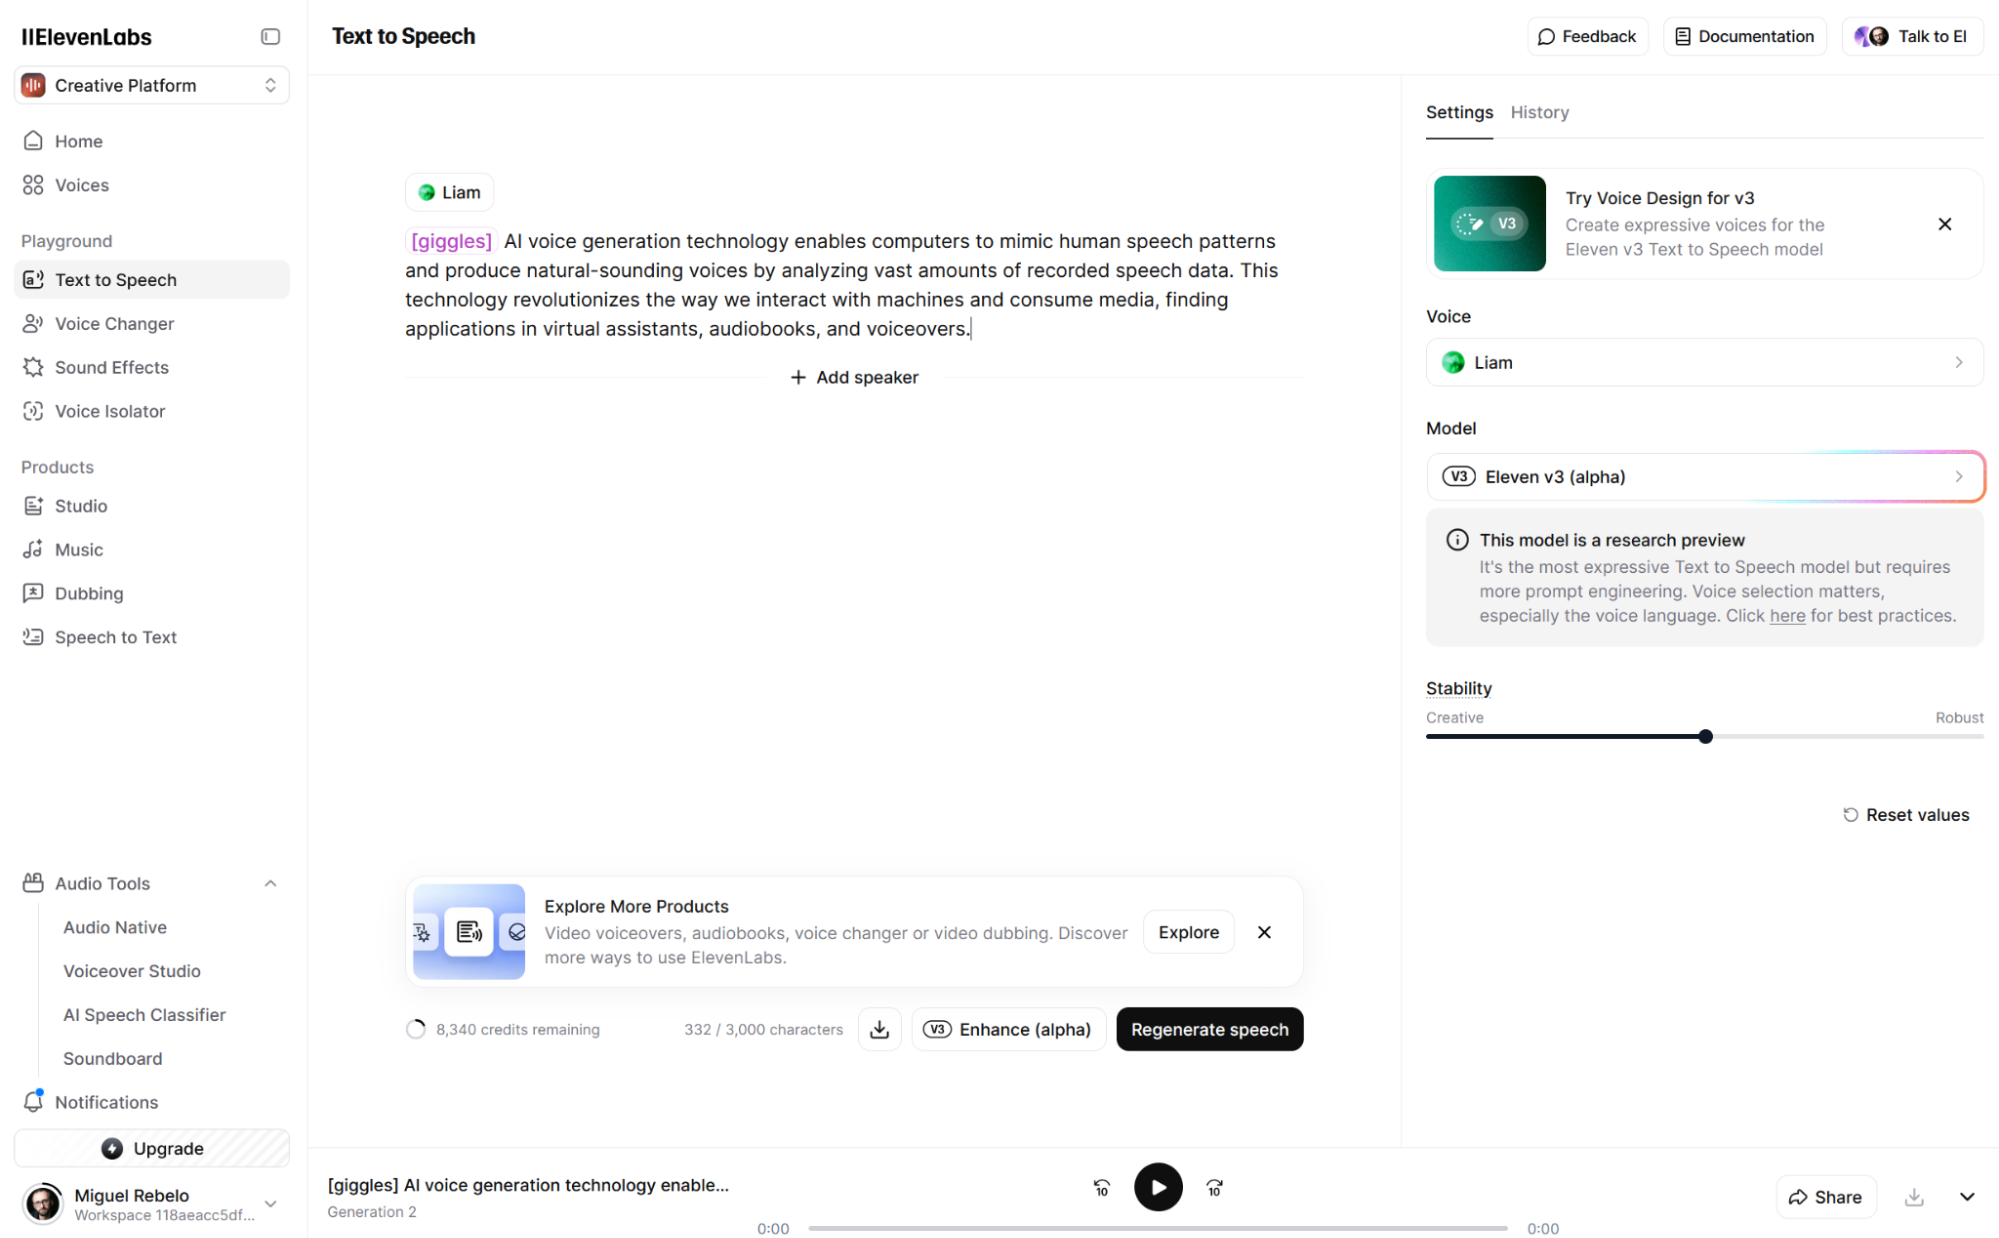
Once you've created your account and logged in, you'll land on the main dashboard. The primary tool we'll be using is called Text to Speech (it may also be labeled "Speech Synthesis"). This is where you'll input your script, choose your settings, and generate the audio.
3. Generating Your First Voiceover
Let's walk through the process of generating a piece of audio. We will focus on the most modern and expressive model ElevenLabs offers, which gives you incredible control over the performance.
The following official tutorial video from ElevenLabs gives an excellent overview of the two main models. We'll be focusing on the Eleven v3 model it introduces.
How to make AI Voiceovers that sound Human (2025 ElevenLabs Text to Speech Tutorial)
Watch this video to understand the fundamental difference between the models and see how to generate and download audio.
First, watch the brief introduction to see the interface in action here. Next, pay close attention to the explanation of the different models, particularly the description of 11v3 Alpha from this section. This expressive model is what we will use. Finally, skip to the end to see the simple process for downloading your audio. You will be doing this for every scene.
As the video explains, the key to using the 11v3 model effectively is not through sliders, but through "audio tags" written directly into your script.
4. Directing the AI's Performance
This is where the real magic happens. By adding simple instructions to your script, you can direct the AI's delivery, controlling its emotion, tone, and pacing. This turns you from a simple user into a voice director.
Adding Emotion and Tone with Audio Tags
You can guide the AI's performance by putting descriptive words in square brackets [] before a line of text. The AI will not speak the words in the brackets, but will use them as a cue for how to deliver the line that follows.
For example, if your script says:"I can't believe we made it."
You could direct the performance like this:[with a sigh of relief] "I can't believe we made it."
Or like this:[whispering excitedly] "I can't believe we made it."
The video below demonstrates this technique clearly.
How to make AI Voiceovers that sound Human (2025 ElevenLabs Text to Speech Tutorial)
This section of the ElevenLabs video shows exactly how to use audio tags to transform a flat reading into an expressive one.
Watch the segment from this point to see a live demonstration of audio tags like [laugh] and how they can be combined to create nuanced performances.
Controlling Pacing with Pauses
Timing is critical in animation. The voiceover must leave space for visual actions to occur. You can control this by telling the AI exactly where and for how long to pause.
- Simple Pauses: Often, just using an em dash (—) or an ellipsis (...) in your script will create a natural-sounding pause.
- Precise Pauses: For more control, you can use a specific command.
The following video explains how to insert timed breaks.
How to Use ElevenLabs - Best Text to Speech AI Voices (FULL GUIDE)
This tutorial provides a clear explanation of how to add precise pauses to your script.
Focus on the section on "pointers as to how to get a better output." Watch from this point to learn the syntax for creating timed pauses, such as <break time="1.5s" />. This is invaluable for matching your voiceover to your storyboard's timing.
5. Practical Task: Generate Your Full Voiceover Track
Now it's time to apply these techniques and produce the audio for your animation. The key to success is to work methodically, scene by scene. Do not try to generate all 7-10 minutes of audio in one go.
Step 1: Open Your Script and Choose a Voice
Have the script you finalized in the last lesson ready. In ElevenLabs, navigate to Text to Speech. The first step is to choose a voice.
- Click the voice selection dropdown.
- Make sure you choose a voice from the "Best voices for V3" category for the best results with audio tags.
- Listen to a few samples and pick one that matches the narrator's persona you envision for your story.
Step 2: Generate Audio Scene by Scene
Working with one scene at a time makes the process manageable and helps you organize your files.
- Copy the narration for your first scene and paste it into the ElevenLabs text box.
- Read through the text and add audio tags
[like this]to inject emotion where needed. Refer to the emotional cues in your storyboard. - Add pauses using dashes or the
<break time="Xs" />command where your storyboard indicates a moment for visual action.
Step 3: Generate, Listen, and Refine
- Click the Generate button.
- Listen carefully to the result. Does the emotion feel right? Is the pacing correct?
- This is an iterative process. Adjust your audio tags, tweak the punctuation, or even rephrase a sentence, then click Generate again. Continue until the audio for the scene sounds exactly as you want it.
Step 4: Download and Organize
- Once you are happy with the audio for a scene, click the download icon to save it as an MP3 file.
- Crucially, name your files systematically. A good convention is
Scene_01_VO.mp3,Scene_02_VO.mp3, and so on. This will be incredibly important when we assemble the final animation.
Step 5: Repeat for All Scenes
Continue this process—paste, direct, generate, refine, and download—for every scene in your script until you have a folder of neatly named audio files covering your entire animation.
Conclusion
Congratulations! You have now completed the entire audio foundation for your animation. You've transformed your written script into a set of professionally produced, emotionally rich audio files.
Key Takeaways:
- ElevenLabs is a powerful tool for creating realistic AI-generated voiceovers.
- The Eleven v3 model allows for highly expressive speech directed through audio tags.
- You can control emotion with
[descriptive tags]and timing with punctuation and<break>commands. - A systematic, scene-by-scene workflow is the most effective way to generate, refine, and organize your audio files.
You are now finished with the planning and audio phase. With your storyboard, script, and final voiceover tracks complete, you are ready to start creating the visuals.
In our next lesson, we will begin Module 2 by exploring the exciting world of AI animation platforms. You will learn how to choose the right tool to turn your static images and powerful voiceover into a moving story.