Welcome back. In our last lesson, we focused on CO₂ tolerance tables, a method designed to train your resilience to the primary driver of the urge to breathe: rising carbon dioxide. We saw how this training works by desensitizing your body's chemoreceptors to hypercapnia. Today, we shift our focus to the other critical variable in apnea: oxygen.
This lesson addresses the physiological limit of a breath-hold. You will learn to perform an O₂ depletion table and understand its underlying principle of progressive hypoxia. While CO₂ tables train your tolerance to discomfort, O₂ tables train your body to function more efficiently and safely as oxygen levels decline. This is a fundamental skill for extending your breath-hold capacity and understanding your body's ultimate physiological boundaries.
The Principle of Progressive Hypoxia
During any breath-hold, your body consumes oxygen from its finite stores in the lungs, blood, and tissues. This consumption leads to a gradual decrease in the partial pressure of oxygen in your blood (PaO₂), a state known as hypoxia.
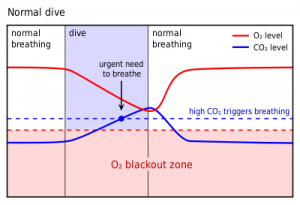
As you can see in the "Normal dive" graph, the critical limit for a safe breath-hold is determined by oxygen levels. A hypoxic blackout occurs when the brain's oxygen supply drops below the threshold required to maintain consciousness. The goal of hypoxic training is not to push yourself to this point, but to train your body to adapt and become more resilient to low-oxygen states.
An O₂ depletion table achieves this through the principle of progressive hypoxia. The structure is the inverse of a CO₂ table:
- Recovery time between holds is kept constant.
- The duration of each breath-hold is progressively increased.
By keeping the recovery time constant, you allow your CO₂ levels to return near baseline before each hold. This minimizes the urge to breathe from hypercapnia, allowing you to push the duration of the hold further and expose your body to a more significant, yet controlled, hypoxic stimulus with each repetition.
The adaptations to this training are multifaceted. Physiologically, it can:
- Enhance the oxygen-carrying capacity of the blood.
- Improve the efficiency of oxygen utilization at the cellular level.
- Potentially strengthen the body's cardiovascular responses to hypoxia, such as the mammalian dive reflex.
Hypoxic Blackout in Serial Freediving – Protective ...
To build a deeper understanding of the physiology, this doctoral thesis offers a high-level overview of hypoxia and the body's oxygen stores. It provides the scientific context for why O₂ tables are effective.
Please review the following sections: Read the introduction to Hypoxia and Hypoxemia (p. 16-17). Focus on how breath-holding depletes oxygen reserves and the factors that influence the severity of hypoxia. Note the distinction made between oxygen stores in the lungs, blood, and tissues. In the discussion, review the subsection "Desaturation rate as a surrogate of oxygen consumption" (p. 83-84). This section is key. It explains that the rate at which your blood oxygen saturation (SpO₂) drops is an indicator of your oxygen consumption (V̇O₂). The goal of hypoxic training is essentially to improve the balance between your oxygen stores and your metabolic rate.
The Structure of an O₂ Table
As we just established, an O₂ table uses progressively longer holds with constant rest periods. If you recall the image from our last lesson showing both training table types, the O₂ table (on the right) clearly illustrates this structure. The increasing duration of the apnea is the key variable that progressively deepens the hypoxic stimulus.
This contrasts directly with a CO₂ table, where the decreasing rest period is the variable that drives the progressive hypercapnic stimulus.
Examining the Evidence
Your background in clinical trials makes it essential to examine the data behind these training methods. A 2024 pilot study published in Sports provides an excellent demonstration of an O₂ table protocol and its effects.
The Effect of Static Apnea Diving Training on ...
This study investigates the impact of an eight-week static apnea program on athletes and sedentary individuals. The protocol they use is a classic O₂ depletion table, providing a robust research context for the training you are about to perform.
As you review this paper, focus on the methodology and the quantitative outcomes: Start with the Abstract. Note the key findings: apnea training led to a significant increase in maximum breath-hold time and a significant decrease in the minimum oxygen saturation (SpO₂) reached. This is the core adaptation of hypoxic training. Next, go to the "Breathing Exercise" subsection within "Materials and Methods." The protocol described is a textbook O₂ table: progressively increasing apnea durations (by 30s) with a constant recovery period (60s). This is the intervention design. Now, analyze the data in Table 1. This is the raw data you appreciate. Look at the "SpO2 (%)" and "Apnea (s)" rows for the "All Participants" column. You'll see a pre-intervention average minimum SpO₂ of ~91.4% (calculated average of the three groups) dropping to ~85.4% post-intervention, while the average apnea time increased by about 15.8%. The training enabled participants to hold their breath longer and tolerate a lower level of oxygen saturation. The p < 0.05 notation confirms the statistical significance of these changes. Finally, read the Conclusions. The authors state that the training resulted in "remarkable changes in maximal apnea duration and significant reductions in... SpO2 values," suggesting benefits across different groups.
This study provides clear, quantitative evidence that a training protocol based on progressive hypoxia leads to measurable improvements in breath-hold duration and resilience to low oxygen states.
Performing an O₂ Depletion Table
Now it's time to put this into practice. The following video provides a complete, guided O₂ table session. Find a comfortable place to lie down, just as you did for the CO₂ tables. Remember, this training must be done on land in a safe, relaxed position. Never practice these tables in water alone.
At-Home Breath Hold Training for Freedivers - C02 and 02 Tables
This video from freediver Josh Munoz, titled "At-Home Breath Hold Training for Freedivers," includes a full, real-time O₂ table workout. It's an excellent way to experience the protocol firsthand.
First, watch the brief explanation of what an O₂ table is from the definition. This will reinforce the concept. Then, prepare to follow along with the guided workout, which begins at the O₂ table session. The instructor uses a protocol of 1.5-minute recovery periods with holds that increase by 15 seconds each round, starting from 1 minute. Relax and follow the cues. The goal is not to push to your absolute limit, but to complete the table while remaining as relaxed as possible.
A More Precise Way to Train: Counting Breaths
The time-based tables we've covered are the classic approach. However, for someone with your goal of deconstructing and re-engineering protocols, it's worth considering a more precise way to manage the recovery period.
Gas exchange (expelling CO₂ and taking in O₂) is a function of the volume of air you breathe, not the time you spend breathing. In a timed recovery, especially as you get fatigued, there is a tendency to breathe rapidly, which can lead to over-breathing (hyperventilation) and psychological stress. A more advanced approach is to count recovery breaths instead of recovery time.
How To Make Your Freedive Training Tables Feel EASIER & Be More EFFECTIVE
In this video, "How To Make Your Freedive Training Tables Feel EASIER & Be More EFFECTIVE," freediving coach Nathan Vinski explains the rationale behind using breath counts for recovery.
Watch the video to understand this powerful concept: The Premise: The main idea is that you can make training more demanding physiologically yet feel easier psychologically by counting recovery breaths instead of time. The Physiological Reason: Gas exchange is driven by the amount of air breathed, not the duration. By fixing the number of breaths, you more accurately control the gas exchange between holds, making the training stimulus more consistent. The Psychological Reason: Counting breaths removes the stress of a ticking clock. This reduces anxiety and promotes relaxation, which lowers the perceived urge to breathe for any given level of CO₂ or hypoxia. How to Apply It: Instead of a 90-second recovery, you might decide on a 5-breath recovery. You take those five breaths slowly and calmly, taking as much time as you need to feel relaxed before the next hold. As you progress, you could reduce the recovery to 4 breaths or add more rounds to the table. This gives you another, more precise, parameter to manipulate in your custom protocols.
Conclusion
You have now explored the two fundamental pillars of static apnea training. CO₂ tables increase your tolerance to the urge to breathe, while O₂ tables improve your body's ability to function with less oxygen.
Key Takeaways:
- The Principle: O₂ depletion tables work on the principle of progressive hypoxia, using increasingly long holds to train the body's adaptation to low oxygen levels.
- The Protocol: The classic O₂ table consists of a series of breath-holds with increasing duration and constant recovery periods.
- The Adaptation: This training can lead to a longer maximum breath-hold time and an improved ability to tolerate lower levels of blood oxygen saturation (SpO₂), a sign of increased hypoxic resistance.
- A Refined Parameter: For more precise control over your training stimulus, consider replacing timed recoveries with a fixed number of slow, deliberate recovery breaths.
- Safety Is Paramount: Always perform this training on land, in a relaxed and safe environment. Never practice alone in water. Listen to your body and prioritize relaxation over pushing to extreme limits.
In our previous module, we deconstructed breathwork into its core parameters. With this lesson, we conclude our exploration of specific training methodologies from freediving. In the next module, we will begin the synthesis. We will create a comparative framework to map various techniques—from Pranayama to the Wim Hof Method—back to these fundamental parameters and physiological effects, bringing you one step closer to your goal of designing your own protocols.