Hello! Welcome to the first lesson in your journey to becoming a full-stack developer.
This course begins with frontend development, and to build great websites, it's essential to first understand what happens behind the scenes. Today's lesson will pull back the curtain on web browsers.
Our goal is to explain how web browsers request and display web pages. We'll trace the entire journey from the moment you type a website address and press Enter to the instant a fully formed page appears on your screen. This foundational knowledge will provide context for everything you learn about HTML, CSS, and JavaScript.
Let's begin by looking at the big picture of how the web works.
The Client-Server Model
At its core, the web operates on a client-server model.
- Client: This is the web browser you use (like Chrome, Firefox, or Safari) on your computer or phone. Its job is to request web pages and display them.
- Server: This is a powerful computer somewhere in the world that stores website files (code, images, videos, etc.). Its job is to listen for requests from clients and send back the appropriate files.
Our lesson today follows the conversation between your browser (the client) and a web server. This process can be divided into two main parts:
- The Request: How the browser asks for a web page.
- The Rendering: How the browser turns the server's response into a visual page.
Part 1: The Request - Asking for the Page
Everything starts when you ask your browser to go to a web page. You do this by typing a URL (Uniform Resource Locator), like https://www.google.com, into the address bar. But how does your browser know where to find google.com?
To understand this initial part of the journey, please watch a few short clips from the following video.
How The Web Works - The Big Picture
This video from Academind provides a clear, high-level overview of how a browser finds and requests information from a server.
Please watch from 01:45 to 04:37. This segment covers two key concepts: DNS Lookup (01:45 - 02:58): How domain names are translated into IP addresses. Request & Response (03:08 - 04:37): The basic concept of a browser sending a request and a server sending a response.
As the video explained, the request phase involves a few key steps:
-
DNS Lookup: Computers on the internet find each other using numerical IP addresses (e.g.,
142.250.187.206), not human-friendly domain names (e.g.,google.com). The Domain Name System (DNS) acts like the internet's phone book, translating the domain name you type into the correct IP address so the browser knows which server to contact. -
TCP/TLS Handshake: Before sending the request, the browser must establish a reliable and secure connection with the server.
- It first performs a TCP (Transmission Control Protocol) handshake. This is a three-step process (SYN, SYN-ACK, ACK) that ensures both the client and server are ready to communicate. Think of it as a formal "hello" to open a communication line.
- For secure sites (
https://), a TLS (Transport Layer Security) handshake happens next. This process encrypts the data that will be sent between your browser and the server, ensuring that no one can eavesdrop on your connection.
-
HTTP Request: With a secure connection established, the browser sends an HTTP (Hypertext Transfer Protocol) request. This is a formatted message that formally asks the server for the web page's content. A common type of request is a
GETrequest, which simply asks to retrieve data.
Part 2: The Rendering - Displaying the Page
Once the server receives the HTTP request, it locates the necessary files (or generates them dynamically) and sends them back to the browser in an HTTP response. This response primarily contains the code for the website, most importantly an HTML file.
Now, the browser's main job begins: turning that code into the visual page you interact with. This is called the rendering process.
The following diagram provides a great visual summary of the entire flow.
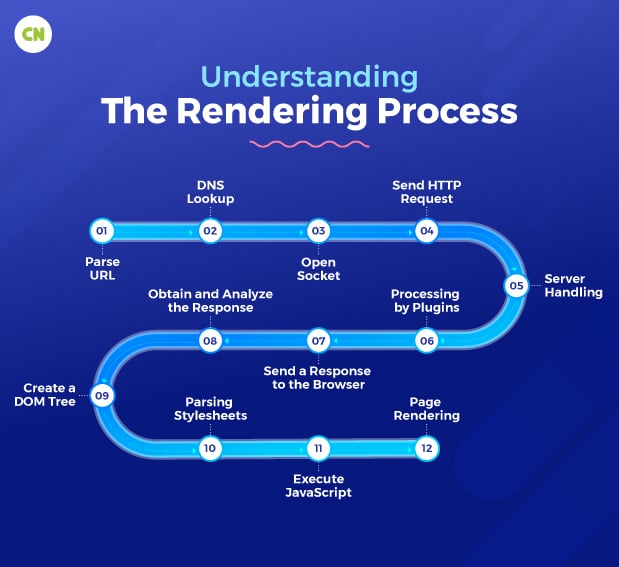
To get a clear, step-by-step list of this process, the summary from the article "Exploring the browser rendering process" is an excellent resource.
Exploring the browser rendering process | Little Things
This article provides fantastic interactive demos of the rendering process. For now, let's focus on its concise summary to solidify our understanding of the sequence of events.
Please scroll to the end of the article and read only the 'Summary' section. It lists the key stages from DNS lookup all the way to painting the pixels.
Now that you have a list of the steps, let's watch a video that visualizes the most complex part: turning code into pixels.
The following clip from the 'How Web Browsers Work' video does a great job of illustrating how the browser constructs the page from the code it receives.
Watch the segment from 2:55 to 5:44. It explains how the browser parses HTML, creates the necessary 'trees' (DOM and Render Tree), calculates the layout, and finally paints the page.
Let's break down those core rendering steps:
-
Parsing (DOM and CSSOM Creation): The browser doesn't understand raw HTML and CSS code directly. It needs to parse it into a structure it can work with.
- It parses the HTML to create the Document Object Model (DOM) tree. This is a tree-like representation of all the HTML elements on the page and their relationships (e.g., which elements are inside other elements). The DOM is the fundamental structure of the page.
- It parses the CSS to create the CSS Object Model (CSSOM) tree. This tree represents the styles associated with each element in the DOM.
-
Render Tree Creation: The browser combines the DOM and CSSOM into a Render Tree. This tree includes only the elements that will actually be visible on the page. For example, elements hidden with a CSS rule like
display: none;are not included in the Render Tree. -
Layout (or Reflow): The browser walks through the Render Tree and calculates the geometry of each element—its exact size and position on the screen. This stage is like creating a blueprint for the page, determining where every box goes and how big it is.
-
Painting: Finally, the browser takes the blueprint from the layout stage and "paints" the pixels to the screen. It fills in the colors, text, images, and borders for every element, creating the visual representation you see.
Conclusion
And that's the entire journey! What seems like an instantaneous event is actually a rapid and complex sequence of steps.
To summarize, we've covered two main phases:
- The Request: Your browser finds the correct server through a DNS lookup, establishes a secure TCP/TLS connection, and sends an HTTP request for the page content.
- The Display (Rendering): The browser receives the server's response, parses the code to build the DOM and CSSOM trees, combines them into a Render Tree, calculates the Layout, and finally Paints the pixels to your screen.
Understanding this process is the first step toward mastering web development. You now have a mental model of what the browser is doing with the code you'll soon be writing.
In our next lesson, we will dive into the three core technologies that the browser uses to build pages: HTML, CSS, and JavaScript. We'll explore the specific role each one plays in this rendering process.