Welcome to the next lesson in our series on essential IP services. In our previous session, we delved into the theory behind DHCP, exploring the four-step DORA process that enables a client to automatically obtain an IP address. You learned how a client discovers a server, receives an offer, requests an address, and finally gets an acknowledgment.
This lesson bridges that theory with the hands-on skills you need for your project. We will now focus on the server side of the equation. Your goal is to learn how to configure a Cisco router to function as a DHCP server, a fundamental task in network administration. By the end of this lesson, you will be able to set up a router to automatically distribute IP addresses and other crucial network information to clients, and you'll know how to verify that it's working correctly.
DHCP Server Configuration Steps
Configuring a Cisco router as a DHCP server involves a few logical steps. While some are optional, following this process ensures a robust and well-managed configuration. At a high level, you will:
- Exclude addresses you want to reserve for static assignment.
- Create a named DHCP pool for a specific subnet.
- Define the network range and subnet mask for the pool.
- Specify the default gateway and DNS server for clients.
- Optionally, set other parameters like the lease duration.
This structured approach helps prevent conflicts and makes the network easier to manage.
Configure Cisco router as DHCP server
This article from Study-CCNA.com provides a concise, step-by-step list of the configuration process.
Read the numbered list from step 1 to 7 at the beginning of the article. This gives you a clear mental map of the commands we are about to use. Don't worry about the example configuration just yet; focus on understanding the purpose of each step.
Practical Configuration Walkthrough
Now, let's see these steps in action. The following video provides a clear, practical demonstration of configuring a router as a DHCP server. It ties directly back to the steps outlined in the article you just reviewed.
Free CCNA | DHCP | Day 39 | CCNA 200-301 Complete Course
This segment from Jeremy's IT Lab, "Free CCNA | DHCP," will guide you through the full configuration and verification process on a Cisco router.
Watch the section from DHCP server configuration. Pay close attention to how each command maps to the configuration goals: ip dhcp excluded-address: Reserving IPs for static devices. ip dhcp pool: Creating the address pool. network: Defining the subnet for the pool. default-router and dns-server: Providing essential network info to clients. lease: Setting the address lease time. show ip dhcp binding: The key verification command.
As you saw in the video, the configuration is done within a special DHCP configuration mode, which you enter after creating a pool. Here is a static image of the core commands for your reference.
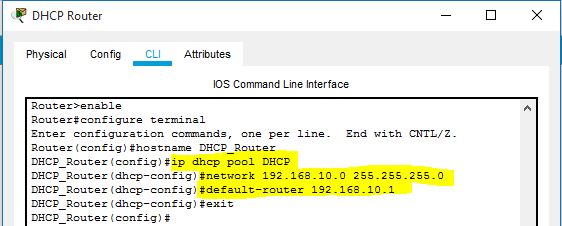
The key commands from the video are:
- Exclude Addresses:
ip dhcp excluded-address 192.168.1.1 192.168.1.10- This reserves the first ten usable addresses, which you might use for your router, switches, or servers.
- Create Pool:
ip dhcp pool MY_LAN_POOL- This creates a pool named
MY_LAN_POOLand enters DHCP config mode.
- This creates a pool named
- Define Network:
network 192.168.1.0 255.255.255.0- This tells the router to lease addresses from the
192.168.1.0/24subnet.
- This tells the router to lease addresses from the
- Set Gateway:
default-router 192.168.1.1- This tells clients to use
192.168.1.1as their default gateway.
- This tells clients to use
- Set DNS:
dns-server 8.8.8.8- This provides clients with a DNS server address.
Verifying the DHCP Configuration
Configuration is only half the battle. You must always verify that your setup works as intended. As shown in the video, the primary command for this is show ip dhcp binding. This command shows you which IP addresses have been leased to which clients (identified by their MAC addresses).
R1# show ip dhcp binding
IP address      Client-ID/              Lease expiration        Type
                Hardware address
192.168.1.11    01a2.b3c4.d5e6          Apr 20 2024 05:30 PM    Automatic
In the output above, you can see that the IP address 192.168.1.11 has been automatically assigned to a client with the MAC address a2b3.c4d5.e6.
Another useful command is show ip dhcp pool, which provides statistics about your address pools.
Configure Cisco router as DHCP server
Let's return to the Study-CCNA article to better understand the output of the verification commands.
Read the final part of the article, starting from the section that begins with "To view information about the currently leased addresses...". Focus on the explanations for the show ip dhcp binding and show ip dhcp pool commands and what each piece of information in their output signifies.
Command Summary
To help you with your project and future study, here is a quick reference table of the commands covered in this lesson.
Configuring and verifying DHCP client and relay
This resource from DTI-Techs provides an excellent command summary.
Review the table section titled "2.1. Configure a Cisco router as a DHCP server (with examples)". This serves as a great cheat sheet for all the commands and their syntax.
Conclusion
In this lesson, you have moved from DHCP theory to practical application. You now have the skills to configure a Cisco router to act as a DHCP server, a critical function for automating IP address management in any network you build.
Key Takeaways:
- DHCP Server Configuration Flow: First, exclude addresses, then create a pool, define the network, and finally, set necessary options like the default router and DNS server.
- Key Configuration Commands: The core commands are
ip dhcp excluded-address,ip dhcp pool,network,default-router, anddns-server. - Verification is Crucial: Always verify your configuration. The
show ip dhcp bindingcommand is your primary tool to see active leases, whileshow ip dhcp poolgives you statistics on address usage.
Now that you can configure a DHCP server on a local network segment, what happens when clients are on a different subnet from the DHCP server? In our next lesson, we will address this common scenario by learning how to configure a Cisco router as a DHCP relay agent using the ip helper-address command.