Hello! In our last lesson, we focused on configuring a Cisco router to act as a DHCP server for its local network. You learned how to create address pools and provide clients with all the necessary IP configuration details automatically.
This lesson tackles a very common and practical scenario: what happens when your DHCP clients are on a different network segment from your DHCP server? As you know, routers don't forward broadcast traffic between subnets, and the initial DHCP discovery process relies on broadcasts. This is where the DHCP relay agent comes in.
Today, you will learn how to configure a Cisco router as a DHCP relay agent using the ip helper-address command. This essential skill allows a centralized DHCP server to serve multiple subnets, which is a standard design in most enterprise networks and directly relevant to the complex topologies you'll be building for your project.
1. The Problem: Broadcasts Don't Cross Routers
As a quick refresher, the DHCP process starts with a client sending a broadcast DHCPDISCOVER message to find a DHCP server. Since this is a Layer 2 and Layer 3 broadcast, a router will, by default, drop the packet rather than forwarding it to other networks. This effectively isolates the client from any DHCP server that isn't on its exact same subnet.
This creates a significant challenge. Without a solution, you would need a separate DHCP server in every single subnet or VLAN, which is inefficient and difficult to manage.
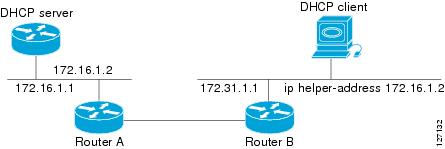
To understand how a relay agent solves this, let's read a short explanation.
Configuring and verifying DHCP client and relay - IT Networking Skills
This article from the ITNetworkingSkills blog provides an excellent overview of the DHCP relay function.
Read the section titled "DHCP relay". Pay close attention to the diagram and the description of how a broadcast DHCPDISCOVER message is converted into a unicast message by the relay agent (R1) and forwarded to the server (SRV1).
The key takeaway is that the router interface configured as a relay agent "catches" the DHCP broadcast and forwards it as a normal unicast packet, addressed directly to the DHCP server.
2. Configuration: The ip helper-address Command
The solution is a single, powerful command: ip helper-address.
You configure this command on the router interface that receives the broadcast from the DHCP clients. This is a crucial point—it's configured on the interface facing the clients, not the one facing the server.
The command syntax is:Router(config-if)# ip helper-address [ip-address-of-dhcp-server]
Let's watch a concise video that walks through the entire process, from identifying the problem to the complete solution.
Configure the Router as a DHCP Relay Agent - CCNA
This video from the danscourses channel provides a clear, step-by-step demonstration of configuring a DHCP relay agent.
Watch the video from the demonstration. As you watch, focus on these four key stages: The Problem: The video first shows the client failing to get an IP address because it's on a different network from the server. The Relay Configuration: Note how the ip helper-address command is applied to the router interface connected to the client's network (fa0/0). The Server Configuration: This is a critical and often-missed step. The DHCP server must be configured with a separate address pool for the client's remote network. The relay agent tells the server which network the request came from, so the server knows which pool to use. Verification: The final part shows the client successfully obtaining an IP address from the correct pool.
This video perfectly illustrates the end-to-end workflow. You've now seen how the ip helper-address command on the router works in tandem with the DHCP server's configuration to serve clients on remote networks.
3. A Deeper Look at the Relay Process
Now that you know the "how," let's dive a bit deeper into the "what." What exactly is the relay agent doing with the DHCP packets?
The following video provides a more detailed conceptual explanation and a look at the packets themselves. This will reinforce your understanding of the underlying mechanics.
DHCP and DHCP Relay | Cisco CCNA 200-301
This video, "DHCP and DHCP Relay" by Keith Barker, offers an excellent explanation of the relay mechanism.
Please watch the following segments: First, watch the conceptual explanation. The speaker uses a great analogy of a "helper" in the room who forwards messages. This part explains why relay is needed and what it does conceptually. Next, watch the configuration example. This shows the same ip helper-address command being applied, but this time on Switch Virtual Interfaces (SVIs) for different VLANs, which is a very common use case you'll encounter. Finally, watch the recap at the end, which summarizes the entire process from broadcast problem to unicast solution. For extra insight, the section between the configuration and the recap analyzes Wireshark captures, showing exactly how the packet headers change. While optional, your background in IT might make this part particularly interesting.
A key piece of information the relay agent adds to the forwarded packet is the Gateway IP Address (giaddr). This field is populated with the IP address of the router interface that received the client's broadcast. The DHCP server uses this giaddr field to determine which subnet the request originated from and, therefore, which address pool to use when making an offer.
4. Verification and Command Summary
To verify your configuration, you have a few commands at your disposal:
- On the client PC: Use
ipconfig(Windows) orifconfig(Linux/macOS) to confirm it has received an IP address, subnet mask, default gateway, and DNS server from the correct pool. - On the relay router: Use
show ip interface <interface_name>to verify that the helper address is correctly configured.
R1# show ip interface gigabitethernet 0/1
...
  Helper address is 192.168.10.10
...
For a quick reference for your project work, the command is straightforward.
Configuring and verifying DHCP client and relay - IT Networking Skills
Let's return to the ITNetworkingSkills article for a handy command summary.
Find the section titled "2.2. Configure a Cisco router as a DHCP relay agent". It provides a clean, concise summary of the command syntax and an example.
Conclusion
In this lesson, you've learned how to overcome a fundamental limitation of DHCP in routed networks. By configuring a router as a DHCP relay agent, you can now support clients across multiple subnets from a single, centralized DHCP server. This is not only efficient but also a cornerstone of scalable network design.
Key Takeaways:
- DHCP
DISCOVERmessages are broadcasts and are blocked by routers by default. - The
ip helper-address [server-ip]command, configured on the client-facing interface, enables a router to act as a DHCP relay agent. - The relay agent converts DHCP broadcast requests into unicast packets and forwards them to the specified DHCP server.
- The DHCP server must have an address pool configured for the remote client's subnet. It identifies the correct pool to use based on the gateway address (
giaddr) inserted into the packet by the relay agent. - Verification involves checking the client's IP configuration and using
show ip interfaceon the relay router.
In our next lesson, we will continue exploring essential IP services by configuring the Network Time Protocol (NTP), which is vital for synchronizing clocks across all your network devices for accurate logging and security event correlation.