Welcome to the next lesson in our journey through Network Address Translation. In our previous session, we laid the groundwork by understanding why NAT is essential and defined the crucial terminology: Inside Local, Inside Global, Outside Local, and Outside Global addresses. You should now be comfortable identifying these different address types in a network diagram.
Building directly on that foundation, this lesson moves from theory to practice. We will focus on configuring and verifying Static NAT. This is the simplest form of NAT, creating a permanent, one-to-one mapping between a private internal IP address and a public external IP address. This skill is particularly useful when you need to make an internal device, like a web server, consistently accessible from the internet, a common requirement in network projects.
What is Static NAT?
Static NAT creates a fixed translation. A specific private IP address on your internal network (the inside local address) is always mapped to the same public IP address (the inside global address). Think of it as giving a private device its own permanent public-facing identity.
This one-to-one relationship is powerful but doesn't conserve public IP addresses; you need one public IP for every internal device you want to map. Its primary use case is for servers or other devices inside your private network that must be reachable from the outside world at a consistent, predictable address.
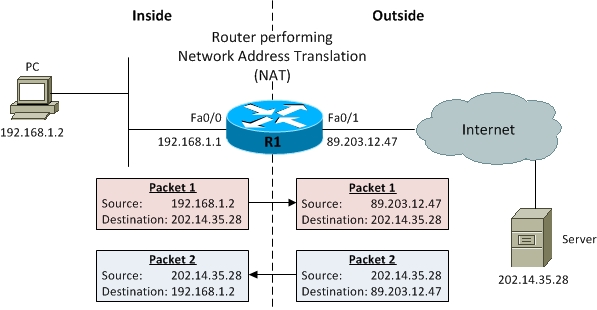
The 3-Step Configuration Process
Configuring static NAT on a Cisco router is a straightforward process that involves three main steps:
- Define the Inside Interface: Tell the router which interface is connected to your internal, private network.
- Define the Outside Interface: Tell the router which interface is connected to the external, public network (e.g., the internet).
- Create the Static Mapping: Define the specific one-to-one mapping between the inside local and inside global addresses.
Let's watch a clear demonstration of these steps in action.
Free CCNA | NAT (Part 1) | Day 44 | CCNA 200-301 Complete Course
The video "Free CCNA | NAT (Part 1)" by Jeremy's IT Lab, which we used in the last lesson, also contains a perfect walkthrough of the static NAT configuration commands.
Please watch the segment from configuring static NAT. Pay close attention to the three key commands used: ip nat inside (on the internal interface) ip nat outside (on the external interface) ip nat inside source static [inside-local-ip] [inside-global-ip] (in global configuration mode)
Verifying Your NAT Configuration
Configuration is only half the battle. You must verify that the translations are occurring as expected. There are two primary commands for this.
show ip nat translations: This is your most important verification command. It displays the NAT translation table. For static NAT, you will see your configured mappings listed permanently. When traffic that matches a mapping flows through the router, a more detailed dynamic entry will also appear temporarily, showing the full conversation, including the outside addresses and port numbers.show ip nat statistics: This command provides a summary of NAT operations, including the number of active translations, which interfaces are defined as inside/outside, and a count of "hits" (packets that were successfully translated).
Let's return to the video to see how to use these commands and interpret their output.
Free CCNA | NAT (Part 1) | Day 44 | CCNA 200-301 Complete Course
Continue with the same video from Jeremy's IT Lab.
Watch the portion covering NAT verification. Focus on: The difference between the permanent static entries and the temporary dynamic entries in the show ip nat translations output. How the four NAT terms (Inside Global, Inside Local, Outside Local, Outside Global) map directly to the columns in the translation table. The purpose of the clear ip nat translation * command.
Practical Application: Static NAT Lab
Now, let's put all this together and walk through a complete lab scenario. This will help solidify the entire process, from initial testing to final verification, which is exactly what you'll do in your project.
Free CCNA | Static NAT | Day 44 Lab | CCNA 200-301 Complete Course
The companion lab video, "Free CCNA | Static NAT | Day 44 Lab," provides a hands-on demonstration that mirrors a real-world task.
Watch the following segments to see the end-to-end process: Before NAT: Observe the failed ping before configuration. This confirms why NAT is needed. Configuration: Watch the configuration of the inside/outside interfaces and the creation of the static mappings. Verification: See how to check the NAT table before traffic is sent. Testing and Analysis: Observe the successful pings after configuration and how the NAT translation table populates with dynamic entries for the active traffic. Clearing Translations: Finally, see the clear command in action to remove dynamic entries.
For a quick textual reference of the commands and concepts, you can review the following guide. It's a useful summary to bookmark for your project work.
10-2 Static NAT Configuration & Verification - Free CCNA Study Guide
This guide from Free CCNA Study Guide concisely lays out the configuration and verification process.
Scan through the sections "Static NAT Configuration" and the verification steps using show ip nat translations and show ip nat statistics. This reinforces the commands you just saw in the videos.
Conclusion
In this lesson, you have moved from NAT theory to hands-on implementation. We've focused on configuring and verifying static NAT, a fundamental skill for controlling how your private network interacts with the public internet.
Key Takeaways:
- Static NAT creates a permanent, one-to-one mapping between an inside local address and an inside global address.
- Configuration is a three-step process: define the inside interface, define the outside interface, and create the static mapping rule.
- The command is
ip nat inside source static <private_ip> <public_ip>. - Verification is critical. Use
show ip nat translationsto view the NAT table andshow ip nat statisticsto see a summary of NAT activity. - Static NAT is ideal for making internal servers or devices accessible from the internet at a fixed public IP address.
In our next lesson, we will explore Dynamic NAT. Unlike the one-to-one mapping of static NAT, dynamic NAT uses a pool of public IP addresses that are assigned on a first-come, first-served basis to internal devices needing to access the internet. This introduces a different approach to address conservation and management.