Hello! Welcome back to the "Mixing Framework" module.
In our last lesson, we built the foundation of our mix—the static mix—by carefully setting volume levels. We also briefly touched on panning as a way to start creating separation.
Today, we're going to dive much deeper into that second tool. This lesson is entirely focused on how to use panning to position elements in the stereo field and create a sense of width and separation. We'll move beyond just "left" and "right" and start thinking about the mix as a three-dimensional space. You'll learn professional strategies to place your instruments on a virtual stage, making your mixes sound wide, clear, and engaging. As always, we'll anchor these concepts in practical techniques you can use immediately in FL Studio.
1. Visualizing the Stereo Field
Before we start turning knobs, it's essential to have a mental model of what we're trying to achieve. Think of your mix not as a list of tracks, but as a three-dimensional stage.
- Width (Left to Right): This is controlled by panning. It's where an instrument sits between the speakers.
- Depth (Front to Back): This is controlled by volume and effects like reverb. Louder, drier sounds feel closer; quieter, more reverberant sounds feel farther away.
- Height (Up and Down): This is controlled by frequency (EQ). Low-frequency sounds like kicks and basses form the foundation (bottom), while cymbals and high-frequency sounds feel like they are "on top."
Today, our focus is squarely on the width dimension. A well-panned mix gives each instrument its own space, preventing sounds from masking each other and creating a "muddy" center.
FL STUDIO | Mixing Basics - Stereo Field
The official FL Studio channel has a great video that introduces this concept. Let's watch the beginning to understand why the stereo field is so crucial for clarity.
Watch from 01:00 to 02:15. The video explains what the stereo field is and uses a simple audio example to demonstrate how spacing sounds out with panning makes them much easier to distinguish.
2. Foundational Panning Strategies
Now that we have a mental picture of the stage, where do we place the performers? While there are no absolute rules, some conventions have developed because they simply work.
The Solid Center
As we discussed in the last lesson, the most important elements of your track provide the anchor. These almost always live in the center of the mix to give it focus and power.
- Lead Vocals
- Kick Drum
- Snare Drum
- Bass
Placing these elements in the center ensures they are the main focus and that the track's low-frequency foundation is solid and balanced.
The LCR (Left-Center-Right) Approach
With the center established, where do we put everything else? A powerful and surprisingly simple technique used by many top mixers is LCR Panning. The idea is to limit your panning positions to only three spots:
- L - Hard Left (100%)
- C - Center (0%)
- R - Hard Right (100%)
This might seem restrictive, but it forces you to make bold decisions. By avoiding the "in-between" spots, you create maximum separation and clarity. Instruments aren't vaguely "a little to the left"; they have a definite position.
Stereo Balance in Mixing: The Complete Guide
Let's read a short section from the article 'Stereo Balance in Mixing' that explains these foundational techniques, including LCR panning.
Please read the section titled 'Basic Panning Techniques'. Pay close attention to the subsections 'Center the Essentials' and 'LCR (Left-Center-Right) Panning'.
Here is a helpful visual guide showing common placements. Notice how it follows the principles we've discussed: core elements are central, and supporting elements are spread out.

3. Panning in Practice: Creating Width and Dynamics
Panning isn't just about static placement; it's a dynamic tool that can evolve throughout your song to add excitement and support the arrangement.
A common technique is to use panning to create contrast between different song sections. For example:
- Verses: Keep the panning relatively narrow to create a sense of intimacy and focus.
- Choruses: Pan elements much wider (e.g., hard-panned double-tracked guitars or synths) to make the chorus feel bigger and more explosive.
Let's watch a professional mixer, Warren Huart, demonstrate these concepts in a real-world session.
Panning Basics - Warren Huart: Produce Like A Pro
In this video from 'Produce Like A Pro', you'll see how these panning strategies are applied to drums, guitars, and vocals to build a wide and dynamic mix.
Watch from 01:23 to 11:55. This is a longer clip, but it's packed with practical insights. Focus on: Drums (01:23 - 06:22): How he pans the drum kit from an 'audience perspective' and uses the overhead mics as a guide. Note how the kick and snare stay dead center. Guitars (07:33 - 11:55): Pay close attention to how the guitars are panned wider in the chorus to create a huge impact compared to the verse. Vocals (06:22 - 07:33 & 11:15 onwards): He reaffirms keeping the lead vocal in the center and then shows how background vocals and harmonies are panned wide to create space around the lead.
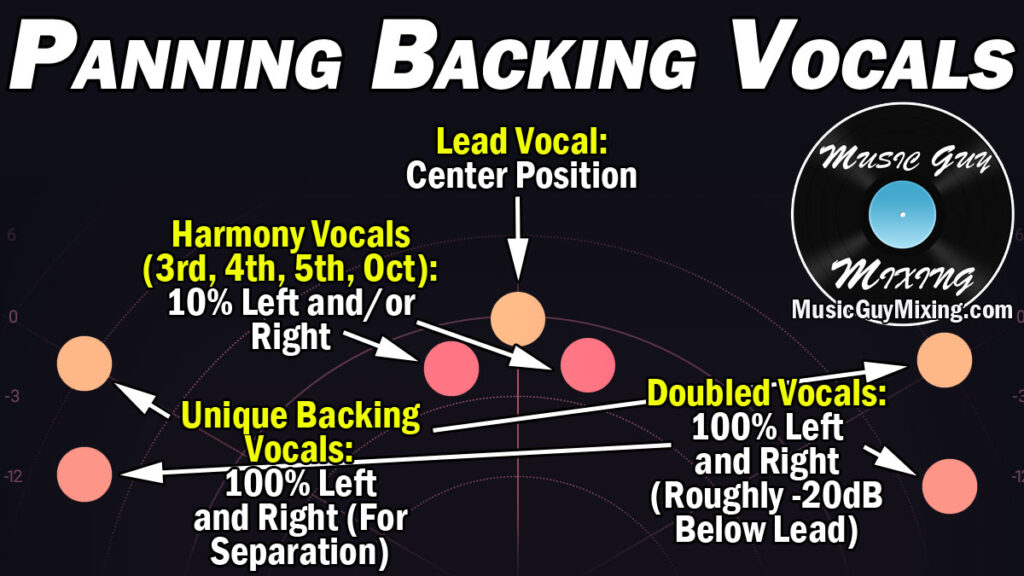
Since you're interested in vocal production, here's another visual guide specifically for panning vocals. The principle is the same: the lead is your central anchor, and you use doubles and harmonies panned wide to create a sense of size and space.
Test your understanding!
You are mixing a pop-rock song. The verse contains a lead vocal, bass, kick, snare, and a single keyboard pad. The chorus adds two heavy, distorted rhythm guitars and two harmony vocal parts.
How would you pan these elements to create a contrast between the intimate verse and the explosive chorus?
Show answer
Verse Panning:
- Lead Vocal, Bass, Kick, Snare: Center.
- Keyboard Pad: This is a stereo pad, so you would leave its panning centered to let its inherent stereo width provide a sense of space without being distracting. The verse would feel focused and relatively narrow.
Chorus Panning (applying LCR):
- Lead Vocal, Bass, Kick, Snare: Remain in the Center.
- Rhythm Guitar 1: Pan Hard Left.
- Rhythm Guitar 2: Pan Hard Right.
- Harmony Vocal 1: Pan Hard Left.
- Harmony Vocal 2: Pan Hard Right.
This arrangement would make the chorus explode in width. The hard-panned guitars and harmonies would create a massive wall of sound on the sides, leaving the center clear for the core groove and lead vocal.
4. The All-Important Mono Check
You've spent all this time carefully creating a wide, beautiful stereo image. Now, it's time to destroy it—temporarily!
Checking your mix in mono (collapsing the left and right channels into one) is one of the most critical steps in mixing. Why?
- Translation: Many playback systems are effectively mono or have poor stereo separation (e.g., phone speakers, Bluetooth speakers, some club sound systems). You need to ensure your mix still sounds good on them.
- Phase Issues: Certain stereo effects can cause "phase cancellation" when summed to mono, making instruments sound thin, hollow, or even disappear entirely.
If your mix sounds good in mono, it will sound great in stereo.
Stereo Balance in Mixing: The Complete Guide
This short article section explains the importance of the mono check clearly.
Please read the subsection 'Checking in Mono'. It highlights why this is a 'big secret' to effective stereo balance.
How to Check in Mono in FL Studio
This is very easy to do. On your Master mixer track:
- Find the Stereo separation knob. It's located just below the pan knob.
- Turn it all the way to the right (100% merged). This sums your mix to mono.
- Listen for any problems. Do the vocals get quieter? Does a guitar lose its body? If so, you may need to revisit your panning or stereo widening effects.
- Remember to turn it back to the center position (100% stereo) to continue working.
The Pan and Stereo Separation knobs on an FL Studio mixer track. For the mono check, turn the bottom knob (Stereo separation) fully to the right.
Conclusion
Today we've transformed panning from a simple left/right control into a powerful artistic tool for creating space, clarity, and dynamics. You've learned how to build a mix on a virtual stage, giving every instrument a home.
Key Takeaways:
- Think of your mix as a 3D stage: panning controls the width.
- Anchor your mix with a solid center: kick, snare, bass, and lead vocals.
- Use the LCR (Left-Center-Right) method to create maximum separation and clarity.
- Use panning dynamically to create contrast between song sections, like making choruses feel wider than verses.
- Always check your mix in mono to ensure it translates well and to catch phase issues.
In our next lesson, we will continue organizing our mix. Now that our instruments are balanced and positioned, we'll learn how to group related tracks together using buses (or subgroups). This will allow us to process entire sections of our mix (like all the drums or all the vocals) together for a more cohesive sound and an efficient workflow.