Hello! Welcome back to the course.
In the last lesson, we explored how to use chorus and stereo widening to add thickness and create a sense of space in your mix. These tools are fantastic for making elements feel bigger and wider.
Today, we'll dive into two related effects: phasers and flangers. While they are also modulation effects, their primary role is to create movement, texture, and dynamic interest rather than just static width. Your goal for this lesson is to learn how to apply phaser and flanger effects to create movement and texture. These are powerful creative tools used to add psychedelic swirls, jet-engine whooshes, and subtle, evolving character to your sounds, especially vocals and synths.
1. Phasers vs. Flangers: What's the Difference?
At first listen, phasers and flangers can sound similar—they both create a sweeping, swooshing motion. However, they are built differently and have distinct sonic characters. Understanding this difference is key to choosing the right tool for the job.
To get a clear, practical understanding of how they each work and sound, let's start with a fantastic video that builds them from scratch.
Chorus vs Flanger vs Phaser EXPLAINED ✅
The video 'Chorus vs Flanger vs Phaser EXPLAINED' by Cableguys does an excellent job of visually and audibly demonstrating the core principles of these effects.
Please watch from 03:11 to 08:19. The video will first break down the flanger and then the phaser. Pay close attention to: Flanger (03:11 - 04:58): Notice the very short delay time and the 'comb filtering' effect. Listen for the 'metallic' or 'jet plane' character, especially when feedback is increased. Phaser (04:58 - 07:41): Notice that this effect is built with 'all-pass filters' that create notches in the frequency spectrum. Listen for the 'swirling' or 'watery' character, which is often described as more subtle or psychedelic than a flanger. Summary (07:41 - 08:19): The conclusion provides a perfect, concise summary of when to reach for each effect.
To summarize the key takeaways from the video:
- Flanger: Creates its sound by mixing the original signal with a copy that is delayed by a very small amount (typically under 20ms). A Low-Frequency Oscillator (LFO) continuously changes this delay time, creating sharp peaks and nulls in the frequency spectrum (comb filtering). This results in a distinctive, resonant, "whooshing" sound.
- Phaser: Creates its sound by splitting the signal and running one path through a series of "all-pass filters." These filters shift the phase of certain frequencies. When this phase-shifted signal is mixed back with the original, it creates notches that an LFO sweeps through the frequency spectrum. The result is a more subtle, "swirling" effect.
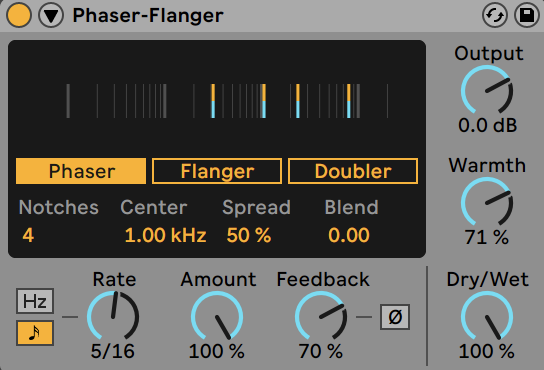
2. Controlling the Movement: Key Parameters
Now that you know the difference, let's look at the common controls you'll find in phaser and flanger plugins, like FL Studio's own Fruity Flanger and Fruity Phaser. Mastering these knobs is what allows you to go from an overwhelming, messy effect to a tasteful, musical texture.
The article "The ultimate guide to modulation effects" provides a great breakdown of these deeper parameters.
The ultimate guide to modulation effects: phasers, chorus ...
Let's read a short section from the MusicRadar article, 'The ultimate guide to modulation effects', to understand the most important parameters you'll be using.
Read the section titled 'Deeper parameters in modulation effects'. Focus on the definitions for 'Rate', 'Feedback', 'Notches', 'Centre', 'Spread', and 'Width'.
Here are the most critical parameters to focus on:
- Rate (or Speed): This controls the speed of the LFO, which determines how fast the "swoosh" or "swirl" happens. Slow rates create a gentle, evolving texture, while fast rates produce a rapid, warbling effect.
- Depth (or Amount): This sets the intensity of the effect. A low depth will create a subtle movement that blends into the sound, while a high depth will result in a much more dramatic and obvious sweep.
- Feedback (or Resonance): This feeds the output of the effect back into its input. In both phasers and flangers, increasing feedback makes the resonant peaks of the sweep much more pronounced and intense. A little goes a long way here!
- Mix (or Wet/Dry): This is your most important control for blending. It determines the balance between the original, unprocessed signal (dry) and the affected signal (wet). For subtle texture, you might use a low mix level (e.g., 10-30%). For a dramatic special effect, you might push it to 100%.
3. Practical Applications: Adding Texture and Movement
Knowing what the knobs do is one thing; using them musically is the real skill. Phasers and flangers are often used not as "always-on" effects, but as creative tools to add interest to specific parts of a song or to add a unique texture to effect sends.
This next video is perfect for your hands-on learning style, as it demonstrates several practical, creative ways to use these effects in a mix, with a focus on vocals.
Modulation is KEY! Vocal Sauce : Flangers / Phasers / Chorus /// Arturia plugins
The video 'Modulation is KEY! Vocal Sauce : Flangers / Phasers / Chorus' by 2probeats offers excellent real-world examples of how to apply these effects creatively.
Watch the following segments to see these effects in action: On a Delay Send (01:42 - 04:46): See how a flanger is placed on a send track after a delay. This makes the delay tails themselves move and evolve, which is far more interesting than a static delay. Notice the different texture when the flanger is placed before the delay. On a Reverb Send (06:29 - 09:20): Similar to the delay, see how a flanger or phaser can add a huge, signature texture to a reverb, separating it from the dry vocal. On Breaks & Transitions (09:20 - 11:36): This is a classic production trick. Watch how the effect is applied to just the beat or vocals during a short break to create a dramatic moment of change and tension before the main section comes back in.
These techniques are directly applicable in FL Studio. You can set up a send track from your vocal, put a delay like Fruity Delay 3 on it, and follow it with a Fruity Phaser or Fruity Flanger to replicate the effect.
Test your understanding!
You're working on a track where the background vocals sound a bit static and boring. You want to give them some subtle, evolving movement to help them sit in their own space without distracting from the lead vocal.
How would you use a phaser to achieve this? Which parameters would you focus on, and what kind of settings would you use?
Show answer
- Insert the Phaser: Add
Fruity Phaserto the background vocal bus/track. - Set the Parameters:
- Rate: Use a very slow rate (e.g., below 0.5 Hz). This will create a slow, gentle sweep that isn't immediately obvious but gives the vocals a sense of evolution over time.
- Depth: Keep the depth relatively low. You want subtle movement, not a full-on psychedelic effect.
- Feedback: Use little to no feedback to keep the effect from sounding too resonant or metallic.
- Mix: This is the most important part. Set the Mix knob to a low value (e.g., 15-40%). This will blend just enough of the phased signal in with the dry vocals to create texture without overpowering them. The goal is to feel the movement more than you hear it.
Conclusion
Today you've learned to wield two powerful creative effects. You now understand the fundamental difference between the delay-based "whoosh" of a flanger and the filter-based "swirl" of a phaser, and you have a solid grasp of the controls needed to tame them.
Key Takeaways:
- Flangers use a modulated short delay to create a metallic, "jet plane" sound through comb filtering.
- Phasers use all-pass filters to create sweeping notches for a more subtle, "swirling" texture.
- The key to musical use lies in controlling the Rate, Depth, Feedback, and Mix levels.
- Creative applications include adding movement to delay and reverb sends and creating dramatic interest in instrumental or vocal breaks.
In our previous lessons, we've explored adding character with saturation, width with chorus, and now movement with phasers and flangers. The final step in this module is to make these effects truly dynamic. In our next lesson, we'll learn how to automate effect parameters to create changes and build excitement throughout your song.