Welcome to the first lesson of your Canva ebook design masterclass! Our goal today is to get you set up and comfortable within the Canva environment. We will start by creating your free account and then take a tour of the main dashboard, which will be your starting point for every project in this course. This initial step is essential for building a solid foundation before we dive into the hands-on design work you're eager to begin.
Creating Your Canva Account
First things first, you need a Canva account. It's free, and it's where all of your designs, including your future ebooks, will be stored. The process is straightforward and offers several ways to sign up.
To guide you, we'll use an article from Brafton that breaks down the process into simple steps.
How To Use Canva: A Beginner-Friendly Guide
This guide provides a clear, step-by-step walkthrough for setting up your account.
Please read the section titled "Setting Up Your Canva Account: 6 Steps." Focus on the six steps described. When you reach Step 5, you can select either "Personal" or "Student" as your user type.
When signing up, you will see a screen with several options, similar to the one below. Using your Google, Apple, or email account are all excellent choices.

Now, please take a moment to go to canva.com and create your account following the steps you just read. We will be using the free version of Canva throughout this course, so there is no need to sign up for a Pro trial.
Navigating the Main Dashboard
Once you have created your account and logged in, you will land on the Canva dashboard. This is your central hub for starting new designs, finding templates, and organizing all your past work. Think of it as your digital design studio.
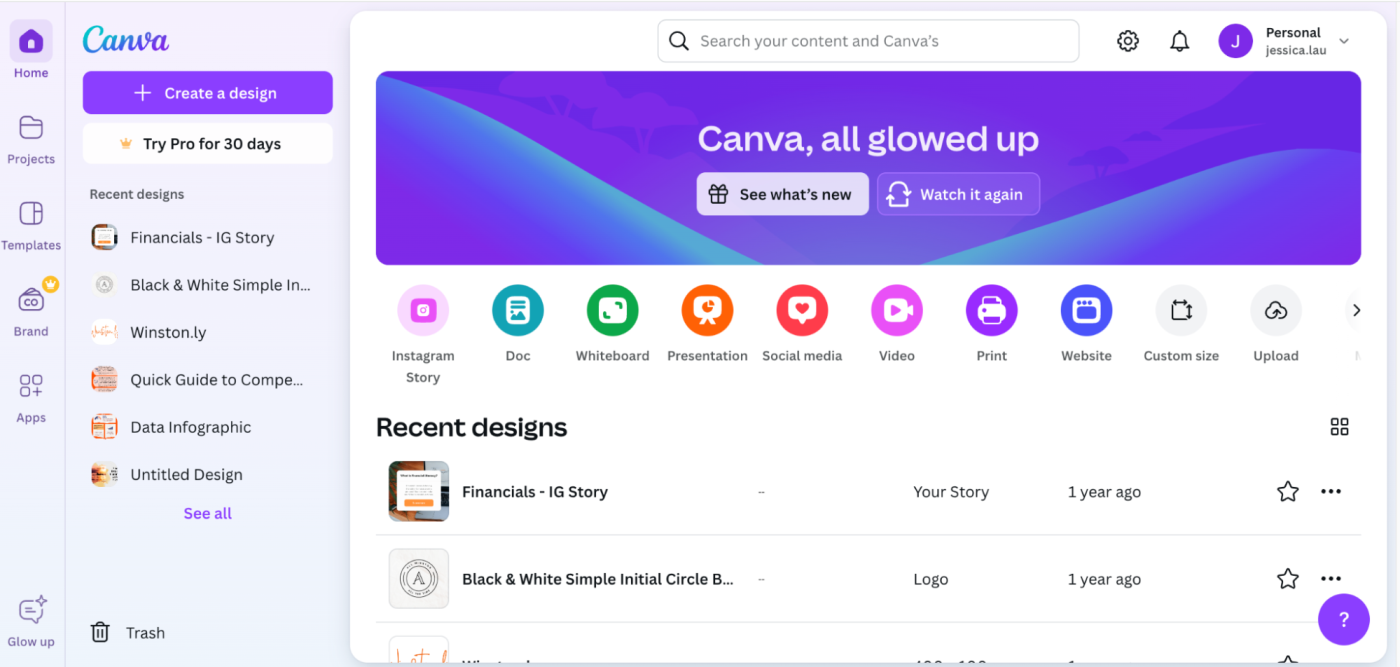
To help you get your bearings, we'll review the key areas of the dashboard. The following reading from a Zapier guide provides an excellent overview of the main navigation panel on the left side of your screen.
How to use Canva: A beginner's guide
This reading will introduce you to the essential parts of the dashboard so you know where everything is located.
In the article, find the section "How to navigate your Canva dashboard." Please read the descriptions for each of the main tabs: Home, Projects, Templates, Brand, and Apps.
Let's quickly recap the most important areas for our ebook design journey:
- Home: This is your starting point, where you can quickly access recent designs and shortcuts to create new ones.
- Projects: This is perhaps the most important tab for you. It acts as your personal library where every design you create, including all your ebook drafts and covers, will be saved and organized.
- Create a design: This prominent button at the top of the left panel (or in the center of the homepage) is how you will start every new project, including the very first page of your ebook in our next lesson.
- Templates: While we will focus on building your skills from the ground up, the Templates tab is a vast library of pre-made designs. It's a fantastic resource for inspiration, and we will learn how to use templates effectively later in the course.
If you prefer a visual walkthrough, this short video gives a great tour of the homepage and its main features.
2024 Canva Tutorial | The Ultimate Guide for Beginners
This video from the "Design with Canva" channel provides a clear, guided tour of the main dashboard, pointing out all the key areas you'll need.
Watch the section from the homepage tour. The presenter will walk you through the top menu, the left-side panel, and the central area of the screen.
Take a few minutes to click around the dashboard on your own. Try to locate the Projects tab, the Templates tab, and the purple Create a design button. Getting comfortable here is the first step toward mastering Canva.
Conclusion
In this lesson, you have successfully created your Canva account and familiarized yourself with the main dashboard. You now know where to find your projects, explore templates, and most importantly, how to start a new design. You have set up the workspace where you will bring your ebook ideas to life.
In our next lesson, we will put this knowledge into action. We will click that "Create a design" button and learn how to set up a new project with custom dimensions specifically tailored for an ebook.