Hello! Welcome back to our series on building resilient microservices.
In our last lesson, you learned how to implement the Circuit Breaker pattern to protect your services from cascading failures when a dependency is completely unavailable. This is a powerful technique for handling "hard" failures.
However, not all problems are so clear-cut. What if a service is just temporarily glitchy, or uncharacteristically slow? Tripping the circuit breaker might be too aggressive for these situations. This lesson addresses that gap by focusing on our next learning outcome: Configure retry and timeout mechanisms for resilient service calls.
You'll learn how to build a more nuanced, multi-layered defense against failures:
- The Retry pattern to automatically handle transient, intermittent errors.
- The Timeout pattern to prevent your service from getting stuck waiting for a slow dependency.
By the end of this ~60-minute lesson, you will be able to configure and apply both retry and timeout mechanisms using Resilience4j, understand how they interact with each other, and how they complement the circuit breaker pattern.
1. The First Line of Defense: The Retry Pattern
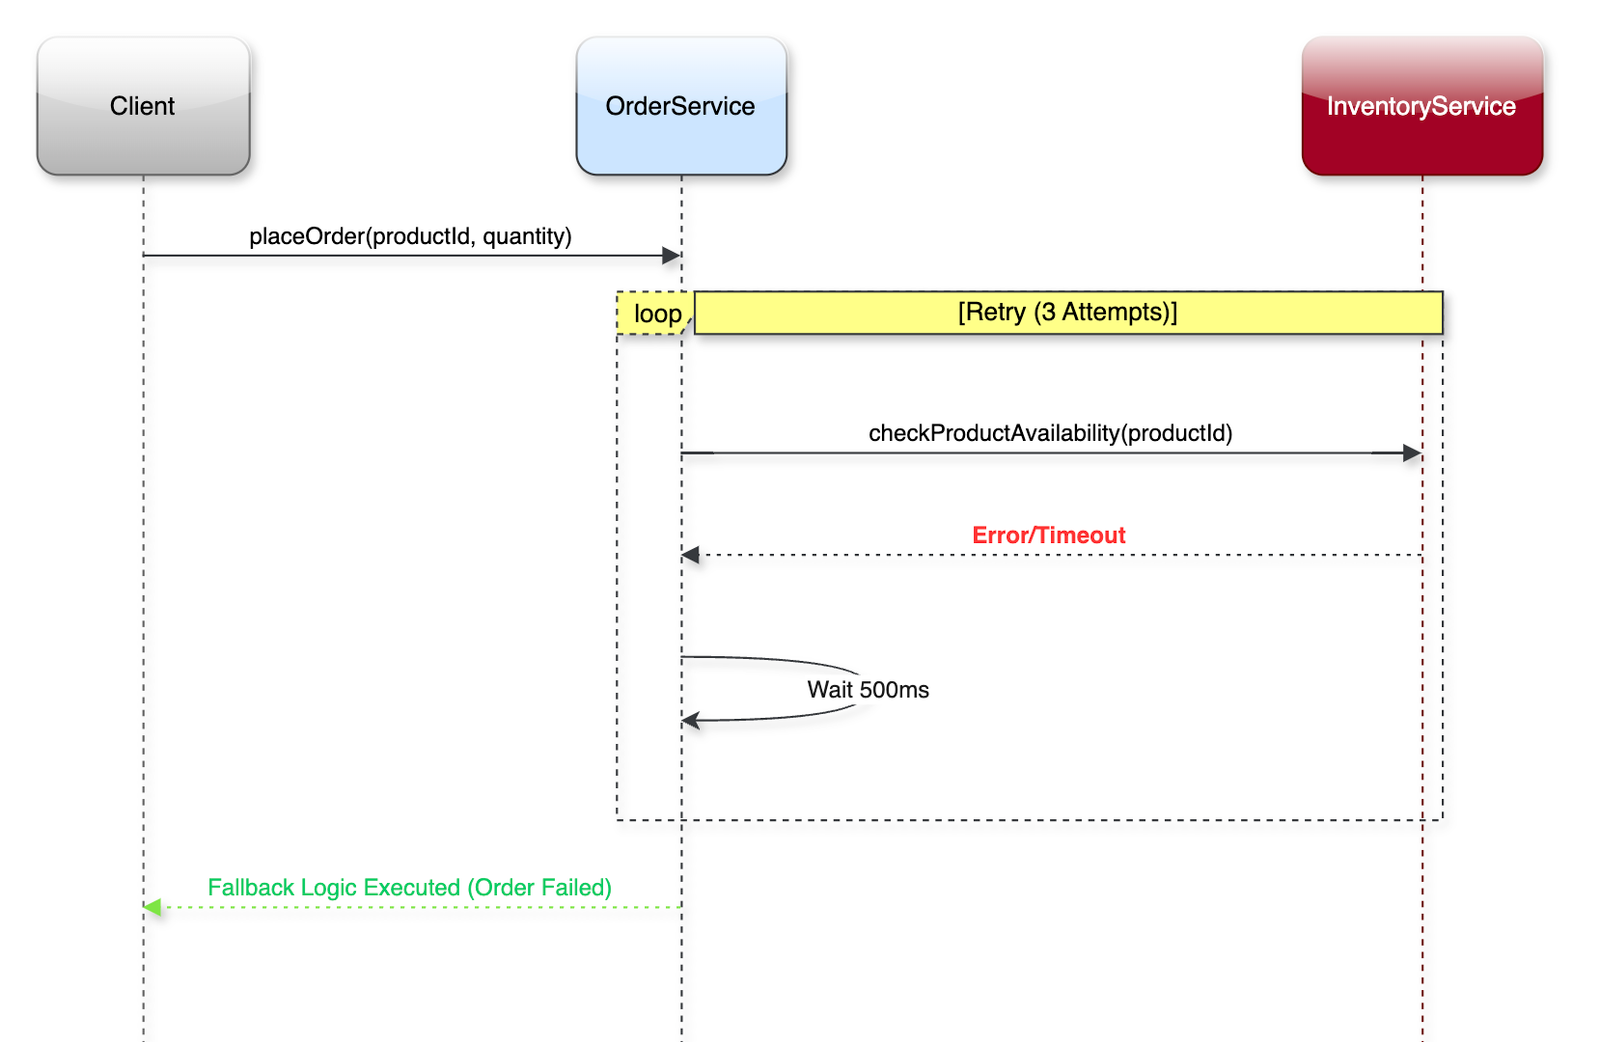
Imagine you're calling a friend, but the line is busy. You don't give up immediately; you hang up and try again a minute later. The Retry pattern works on the same principle. It's designed to handle transient failures—temporary issues like a brief network hiccup, a momentary database deadlock, or a service restarting. Instead of failing immediately, the calling service automatically re-attempts the operation a few times.
To understand the scenarios where this is useful, let's watch a short conceptual explanation.
Microservice | Resilience4J Retry Module Implementation With Spring Boot | JavaTechie
The video 'Microservice | Resilience4J Retry Module' from the Java Techie channel provides an excellent overview of why the retry pattern is essential in a distributed system.
Watch from the beginning to 01:58. The video explains common causes of transient failures, such as network issues or temporary unavailability of a dependency, and introduces the core idea of the retry pattern.
1.1. Implementing Retry with Resilience4j
Just like the Circuit Breaker, Resilience4j makes implementing the Retry pattern straightforward. The required dependencies (resilience4j-spring-boot2, spring-boot-starter-aop) are the same, so we can jump straight to configuration.
Step 1: Configure the Retry Instance
In your application.yml, you define a named retry instance.
# In application.yml

resilience4j:
  retry:
    instances:
      # This is the name of our retry instance
      inventoryService:
        maxAttempts: 3
        waitDuration: 2s
        retryExceptions:
          - java.util.concurrent.TimeoutException
          - java.io.IOException
        ignoreExceptions:
          - com.myapp.exceptions.InvalidRequestException
Let's break this down:
maxAttempts: 3: The operation will be attempted a maximum of 3 times (1 initial call + 2 retries).waitDuration: 2s: It will wait for 2 seconds between each attempt.retryExceptions: A list of specific exceptions that should trigger a retry. If this is not specified, it defaults to retrying on all exceptions. It's a good practice to be explicit.ignoreExceptions: A list of exceptions that should not trigger a retry. For example, a400 Bad Requesterror indicates a problem with the client's request, and retrying it will just yield the same error.
Step 2: Apply the @Retry Annotation
Now, you apply the annotation to the method you want to make resilient. The name must match the instance you configured in application.yml. You should also specify a fallbackMethod to execute if all retry attempts fail.
import io.github.resilience4j.retry.annotation.Retry;
import org.springframework.stereotype.Service;

@Service
public class OrderService {

    private final InventoryClient inventoryClient;

    // ... constructor ...

    @Retry(name = "inventoryService", fallbackMethod = "fallbackForCheckAvailability")
    public boolean checkProductAvailability(String sku) {
        // This call might fail due to a temporary network issue
        return inventoryClient.isInStock(sku);
    }

    // Fallback method executed after all retries fail
    public boolean fallbackForCheckAvailability(String sku, Throwable t) {
        System.err.println("All retries failed for SKU: " + sku + ". Error: " + t.getMessage());
        // Assume unavailability as a safe default
        return false;
    }
}
The following article provides a clear, textual walkthrough of these steps.
Retry with Spring Boot and Resilience4j
The article 'Retry with Spring Boot and Resilience4j' on reflectoring.io details the implementation process, including how to handle specific exceptions and implement a fallback.
Read the sections 'High-level Overview', 'Using the Spring Boot Resilience4j Retry Module' (up to 'Conditional Retry'), and 'Fallback Method'. These sections cover the core implementation steps we just discussed, providing a solid reference.
1.2. Advanced Retry: Exponential Backoff
Constantly retrying every 2 seconds might not be the best strategy. If a downstream service is struggling under heavy load, repeated rapid-fire retries can make the problem worse (this is known as the "thundering herd" problem).
A better approach is exponential backoff. With this strategy, the wait time between retries increases exponentially (e.g., 1s, 2s, 4s, 8s...). This gives the struggling service progressively more time to recover.
You can enable this easily in your configuration:
resilience4j:
  retry:
    instances:
      inventoryService:
        maxAttempts: 4
        waitDuration: 500ms # Initial wait duration
        enableExponentialBackoff: true
        exponentialBackoffMultiplier: 2 # Multiplies the wait duration by 2 for each subsequent retry
With this configuration, the retries would occur after approximately 500ms, then 1000ms (1s), then 2000ms (2s).
2. Guarding Against Slowness: The Timeout Pattern
Retries handle transient failures, but what about a service that isn't down but is just very slow? Without a timeout, the thread making the call could be blocked indefinitely, consuming resources and impacting the performance of your entire service.
A timeout sets a maximum duration you are willing to wait for a response. If the response doesn't arrive in time, the call is aborted, and an exception is thrown, freeing up the thread.
2.1. Implementing Timeout with @TimeLimiter
Resilience4j provides the @TimeLimiter annotation for this purpose. However, there's a crucial requirement: the decorated method must be asynchronous and return a CompletableFuture. This is because terminating a synchronous, blocking call from another thread is complex and risky in Java.
Step 1: Configure the Timeout Instance
# In application.yml

resilience4j:
  timelimiter:
    instances:
      inventoryService:
        timeoutDuration: 3s
        cancelRunningFuture: true # Tries to cancel the underlying task on timeout
Step 2: Apply the @TimeLimiter Annotation
You must wrap your potentially slow, synchronous call inside a CompletableFuture.supplyAsync() block.
import io.github.resilience4j.timelimiter.annotation.TimeLimiter;
import java.util.concurrent.CompletableFuture;

@Service
public class OrderService {
    // ...

    @TimeLimiter(name = "inventoryService", fallbackMethod = "fallbackForCheckAvailabilityFuture")
    public CompletableFuture<Boolean> checkProductAvailabilityAsync(String sku) {
        return CompletableFuture.supplyAsync(() -> inventoryClient.isInStock(sku));
    }

    public CompletableFuture<Boolean> fallbackForCheckAvailabilityFuture(String sku, Throwable t) {
        System.err.println("Timeout calling inventory for SKU: " + sku + ". Error: " + t.getMessage());
        return CompletableFuture.completedFuture(false);
    }
}
The reflectoring.io article on timeouts provides a great example of this asynchronous implementation.
Timeouts with Spring Boot and Resilience4j
The article 'Timeouts with Spring Boot and Resilience4j' explains how to use the @TimeLimiter annotation and its asynchronous nature.
Read the 'High-level Overview', 'Basic Example', and 'Specifying a Fallback Method' sections. Pay close attention to how the remote call is wrapped in a CompletableFuture—this is the key to using @TimeLimiter.
2.2. A Simpler Alternative: Client-Level Timeouts
While @TimeLimiter is powerful, requiring CompletableFuture can add complexity. A more common and often simpler approach is to configure timeouts directly on the HTTP client itself (e.g., RestTemplate, WebClient, or RestClient).
This approach is synchronous and doesn't require any changes to your service method signatures. Here's how you can do it with Spring's RestClient, which you might use to build a client.
import org.springframework.context.annotation.Bean;
import org.springframework.context.annotation.Configuration;
import org.springframework.web.client.RestClient;
import java.time.Duration;

@Configuration
public class MyRestClientConfig {

    @Bean
    public RestClient inventoryRestClient() {
        return RestClient.builder()
                .baseUrl("http://inventory-service")
                .setConnectTimeout(Duration.ofSeconds(2)) // Max time to establish a connection
                .setReadTimeout(Duration.ofSeconds(5))    // Max time to wait for data after connection
                .build();
    }
}
In this scenario, if the inventory service doesn't respond within 5 seconds, the RestClient will throw an exception. This failure can then be handled by the @Retry mechanism or counted by the @CircuitBreaker.
The following video demonstrates this practical approach.
Spring Boot Microservices Tutorial - Part 9 - Circuit Breaker with Resilience4J
The 'Spring Boot Microservices Tutorial' by Programming Techie shows how to configure timeouts directly on a REST client, as well as how retry and timeouts fit into the larger resilience picture.
Watch two segments: 13:27 - 14:33: This short clip explains the Resilience4j timeoutDuration configuration, conceptually similar to what the @TimeLimiter does. 29:50 - 32:20: This part is key. It shows the alternative, practical method of setting connectionTimeout and readTimeout directly when configuring a RestClient builder. This is a very common industry practice.
Test your understanding!
You are calling a service that is occasionally slow, taking up to 10 seconds to respond. You want to implement a resilience strategy. Which of the following is the most direct way to prevent your application from waiting more than 4 seconds for a response?
- Use
@Retry(maxAttempts = 3, waitDuration = "4s"). - Use
@CircuitBreaker(failureRateThreshold = 50). - Configure a
readTimeoutof 4 seconds on your HTTP client (RestClientorRestTemplate). - Use
@TimeLimiteron a method that returns a simpleString.
Show answer
The correct answer is 3. Configure a readTimeout of 4 seconds on your HTTP client.
A readTimeout is specifically designed to abort a call that takes too long to return data.
@Retryis for re-attempting failed calls, not for limiting wait time.@CircuitBreakeris for stopping calls to a failing service altogether.@TimeLimitercould work, but it requires the method to be asynchronous (CompletableFuture), making option 3 the most direct and simplest solution for a synchronous call.
3. The Complete Resilience Strategy
Retry, Timeout, and Circuit Breaker are not isolated patterns; they work together to create a robust, multi-layered defense. Here’s the typical order of operations for a single remote call:
- The Call is Made: A
RestClientattempts to call a downstream service. - Timeout Check: The HTTP client's
readTimeoutis active. If the service doesn't respond within the configured duration (e.g., 3 seconds), the client throws aTimeoutException. This is counted as one failure. - Retry Logic: If the call fails (either from a timeout or another error like
IOException), the@Retrymechanism kicks in. It waits for thewaitDurationand re-attempts the call. This happens up tomaxAttempts. - Circuit Breaker Monitoring: The
@CircuitBreakeris watching all of this. It counts each definitive failure (i.e., a failure after all retries are exhausted, or a failure from a non-retriable exception). - Opening the Circuit: If the rate of these definitive failures exceeds the
failureRateThreshold, the circuit breaker trips to theOPENstate, and all subsequent calls are immediately rejected, invoking the fallback logic without even attempting a network call.
This combination ensures you can handle everything from a momentary glitch (retry) to a slow service (timeout) to a complete outage (circuit breaker).
Conclusion
You have now added two more essential tools to your microservice resilience toolkit. By combining these patterns, you can build applications that are not just functional but are also robust and can gracefully handle the inevitable failures of a distributed environment.
Key Takeaways:
- The Retry pattern is your first line of defense against transient, intermittent failures. Use
@Retrywith a sensible number of attempts and consider exponential backoff. - The Timeout pattern is crucial for preventing your application from getting stuck on slow dependencies. You can implement it directly on your HTTP client (e.g.,
RestClient) or use@TimeLimiterfor asynchronous operations. - Retry, Timeout, and Circuit Breaker work together as a multi-layered resilience strategy. Retries handle glitches, timeouts handle slowness, and circuit breakers handle major outages.
What's Next?
With patterns like circuit breakers and retries, a single user request can trigger a complex series of events across multiple services. How do you trace and debug a request that failed after three retries and then tripped a circuit breaker? In our next and final lesson of this module, you will learn how to implement distributed tracing with Spring Cloud Sleuth and Zipkin, giving you the visibility needed to monitor and understand these complex interactions.