Hello! Welcome back to our journey into building robust microservices.
In our last lesson, we successfully enabled our services to communicate with each other using Spring Cloud OpenFeign. This was a huge step, but it also introduced a critical vulnerability: cascading failures. If a downstream service (service-a) becomes slow or unavailable, any service calling it (service-b) will be blocked, consuming resources. If enough requests pile up, service-b could fail too, causing a domino effect across your entire system.
This lesson directly addresses that problem, focusing on the learning outcome: Implement the Circuit Breaker pattern using Resilience4j to prevent cascading failures. You'll learn how to build resilient systems that can gracefully handle failures in their dependencies.
By the end of this ~60-minute lesson, you will be able to:
- Explain the purpose and mechanics of the Circuit Breaker pattern.
- Implement a circuit breaker in a Spring Boot application using Resilience4j.
- Configure the circuit breaker's behavior, including failure thresholds and timeouts.
- Provide a fallback mechanism for graceful degradation.
- Monitor the state of your circuit breaker using Spring Boot Actuator.
Let's make our services failure-proof.
1. Understanding the Circuit Breaker Pattern
The Circuit Breaker pattern is named after the electrical component in your home. When an electrical circuit overloads, the breaker trips, stopping the flow of electricity to prevent damage. In software, a circuit breaker does the same thing: it monitors calls to a remote service, and if that service starts failing repeatedly, the breaker "trips" and stops sending requests to it for a while.
This has two main benefits:
- Fail Fast: The calling service gets an immediate error or a fallback response instead of waiting for a timeout, freeing up its own resources.
- Give It a Break: The failing service gets a "cool-down" period, relieving it of request load so it has a chance to recover.
The Three States of a Circuit Breaker
A circuit breaker operates as a state machine with three states: CLOSED, OPEN, and HALF-OPEN.
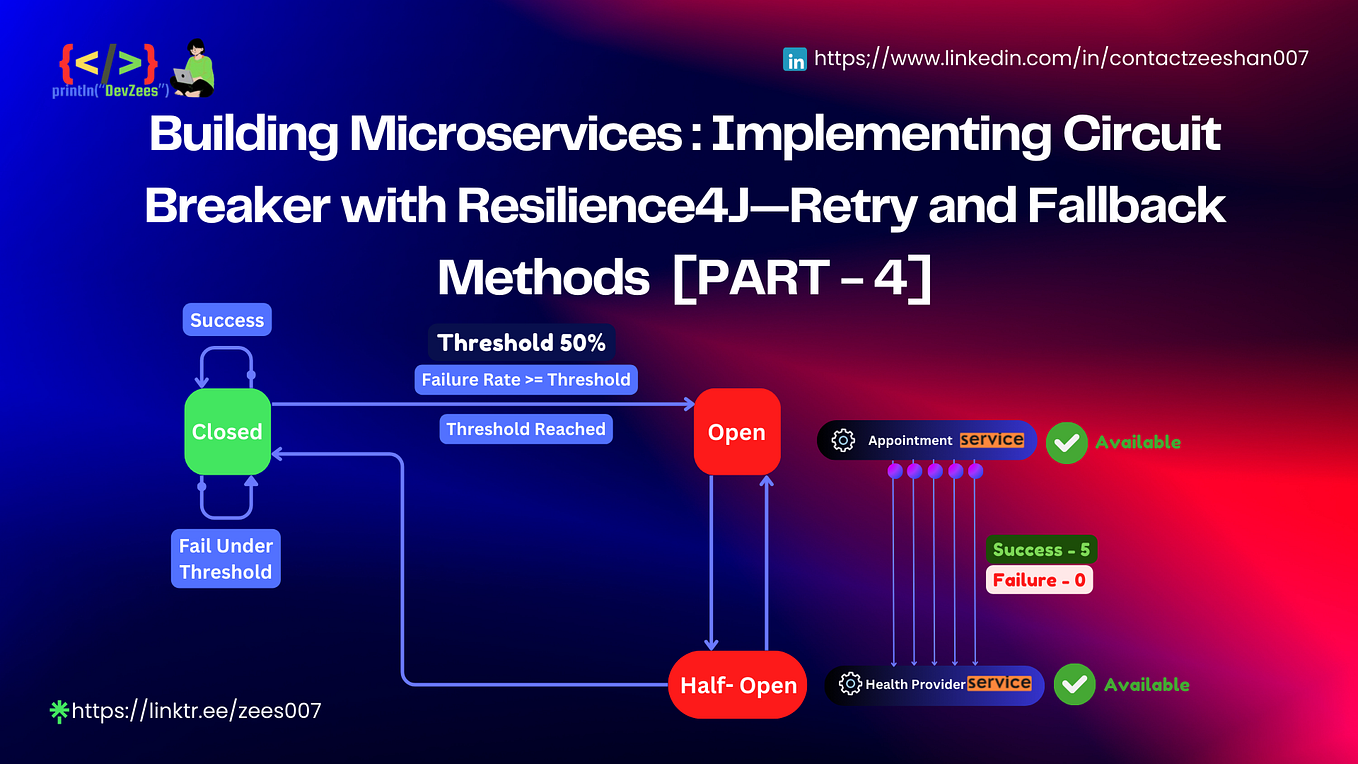
-
CLOSED: This is the normal state. All requests are allowed to pass through to the remote service. The circuit breaker monitors these calls for failures. If the failure rate exceeds a configured threshold (e.g., 50% of the last 10 calls fail), the breaker trips and moves to theOPENstate. -
OPEN: In this state, the circuit breaker immediately rejects all requests to the remote service without even trying to call it. This is the "tripped" state. For each rejected request, it executes a fallback logic (e.g., returning cached data or a default error message). After a configured waiting period (waitDurationInOpenState), it transitions toHALF-OPEN. -
HALF-OPEN: After the wait time, the breaker allows a limited number of "probe" requests to go through to the remote service to check if it has recovered.- If these probe requests succeed, the breaker assumes the service is healthy again and transitions back to
CLOSED. - If any of the probe requests fail, it trips again and moves back to the
OPENstate, restarting the timer.
- If these probe requests succeed, the breaker assumes the service is healthy again and transitions back to
Microservice | Resilience4J Circuit Breaker Implementation on Spring Boot | JavaTechie
To see a dynamic explanation of this pattern and its states, watch the introductory segment of the 'Resilience4J Circuit Breaker' video from Java Techie.
Watch from 00:49 to 04:51. The video uses a clear scenario with a User, Catalog, and Discount service to explain how the states change based on failures and timeouts. This will give you a solid conceptual foundation before we dive into the code.
2. Implementing a Circuit Breaker with Resilience4j
Resilience4j is a lightweight, fault-tolerance library that has become the standard for implementing circuit breakers in modern Spring Boot applications, replacing the older Netflix Hystrix. We will now integrate it into a service to protect a call made with a Feign client.
Step 1: Add Dependencies
To use Resilience4j, you need to add three dependencies to your pom.xml:
resilience4j-spring-boot2: The core Resilience4j library and its Spring Boot auto-configuration.spring-boot-starter-aop: Resilience4j uses Aspect-Oriented Programming (AOP) to wrap your methods with circuit breaker logic. This dependency is required for the annotations to work.spring-boot-starter-actuator: This allows you to monitor the state and metrics of your circuit breakers via REST endpoints.
<dependency>
    <groupId>io.github.resilience4j</groupId>
    <artifactId>resilience4j-spring-boot2</artifactId>
</dependency>
<dependency>
    <groupId>org.springframework.boot</groupId>
    <artifactId>spring-boot-starter-aop</artifactId>
</dependency>
<dependency>
    <groupId>org.springframework.boot</groupId>
    <artifactId>spring-boot-starter-actuator</artifactId>
</dependency>
Step 2: Configure the Circuit Breaker
Next, you configure the behavior of your circuit breaker in your application.yml file. You can define multiple circuit breaker "instances," each with its own settings.
# In application.yml

# Enable actuator endpoints to monitor the circuit breaker
management:
  health:
    circuitbreakers:
      enabled: true
  endpoints:
    web:
      exposure:
        include: health # Expose the /actuator/health endpoint

resilience4j:
  circuitbreaker:
    instances:
      # This is the name of our circuit breaker instance
      catalogService:
        registerHealthIndicator: true
        slidingWindowType: COUNT_BASED
        slidingWindowSize: 10
        failureRateThreshold: 50
        minimumNumberOfCalls: 5
        waitDurationInOpenState: 5s
        permittedNumberOfCallsInHalfOpenState: 3
Let's break down these key properties:
slidingWindowSize: 10: The circuit breaker will make its decision based on the outcome of the last 10 calls.minimumNumberOfCalls: 5: The circuit won't even consider tripping until at least 5 calls have been made within the sliding window. This prevents it from opening on just one or two initial failures.failureRateThreshold: 50: If 50% or more of the calls in the sliding window fail (and the minimum number of calls has been met), the circuit will open.waitDurationInOpenState: 5s: The circuit will stay open for 5 seconds before transitioning to half-open.permittedNumberOfCallsInHalfOpenState: 3: In the half-open state, it will allow 3 test calls to see if the downstream service has recovered.
Implementing Circuit Breaker with Resilience4j in Spring Boot
For a detailed textual explanation of each configuration property, refer to the following article. It provides a clear breakdown of what each setting does.
Read section 'Basic Configuration for Circuit Breaker'. Focus on the descriptions for each property, such as slidingWindowSize, failureRateThreshold, and waitDurationInOpenState. This will reinforce your understanding of how to tune the circuit breaker's behavior.
Step 3: Apply the Annotation and Implement a Fallback
Now, you apply the @CircuitBreaker annotation to the method you want to protect. This is typically a method in your service layer that calls a Feign client or RestTemplate.
Let's assume you have a UserService that calls a CatalogService via a Feign client.
import io.github.resilience4j.circuitbreaker.annotation.CircuitBreaker;
import org.springframework.stereotype.Service;
import java.util.Collections;
import java.util.List;

@Service
public class UserService {

    private final CatalogClient catalogClient;

    public UserService(CatalogClient catalogClient) {
        this.catalogClient = catalogClient;
    }

    // Protect this method with a circuit breaker
    @CircuitBreaker(name = "catalogService", fallbackMethod = "fallbackForGetProducts")
    public List<Product> getAllProducts() {
        // This call might fail if the Catalog service is down
        return catalogClient.fetchAllProducts();
    }

    // This is the fallback method
    public List<Product> fallbackForGetProducts(Throwable t) {
        // Log the error
        System.err.println("Error calling catalog service: " + t.getMessage());
        // Return a default or cached response
        return Collections.singletonList(new Product("Default Product", "N/A"));
    }
}
Key points here:
@CircuitBreaker(name = "catalogService", ...): Thenameattribute must match the instance name you defined inapplication.yml(catalogService).fallbackMethod = "fallbackForGetProducts": This specifies the name of the method to call when the circuit is open or the call fails.- The fallback method (
fallbackForGetProducts) must have a compatible signature. It should accept the same parameters as the original method, plus an optionalThrowableparameter at the end to capture the exception that caused the failure. It must return the same type as the original method.
Test your understanding!
Consider the following protected method signature:public Order getOrderDetails(String orderId, String customerId)
What would be a valid signature for its fallback method, which also needs access to the exception that was thrown?
Show answer
A valid fallback method signature would be:public Order fallbackForGetOrderDetails(String orderId, String customerId, Throwable t)
It has the same return type (Order), accepts the same parameters in the same order (String orderId, String customerId), and includes the optional Throwable at the end.
3. Putting It All Together: A Complete Walkthrough
Theory is great, but seeing it in action is better. The following video provides a complete, hands-on demonstration of everything we've discussed: adding dependencies, configuring application.yml, applying the @CircuitBreaker annotation, and—most importantly—testing the entire flow by shutting down the downstream service and watching the state transitions via the Actuator endpoint.
Microservice | Resilience4J Circuit Breaker Implementation on Spring Boot | JavaTechie
This video from Java Techie will walk you through a full implementation from start to finish. Following along will solidify all the concepts and steps.
Watch from 09:41 to 24:42. This is the core practical part of the lesson. 09:41 - 13:46: Shows adding dependencies, the @CircuitBreaker annotation, and the fallback method. 13:46 - 17:15: Explains the configuration in application.yml. 17:15 - 24:42: The live demo! See how to test the circuit breaker by stopping the dependent service and monitoring its state changes (CLOSED -> OPEN -> HALF-OPEN) using the /actuator/health endpoint. This is a crucial visualization of the pattern in action.
Conclusion
Congratulations! You've just implemented one of the most critical patterns for building resilient, production-ready microservices. By preventing cascading failures, you ensure that a problem in one part of your system doesn't bring down the entire application.
Key Takeaways:
- Cascading failures are a significant risk in distributed systems, and the Circuit Breaker pattern is the primary solution.
- A circuit breaker acts as a state machine with three states:
CLOSED,OPEN, andHALF-OPEN. - Resilience4j is the modern library for implementing circuit breakers in Spring Boot.
- Implementation requires adding dependencies, configuring properties in
application.yml, and using the@CircuitBreakerannotation with a fallback method. - The Spring Boot Actuator
/actuator/healthendpoint is essential for monitoring the circuit breaker's real-time state and verifying its behavior.
What's Next?
The Circuit Breaker pattern is excellent for handling services that are down for a period of time. But what about temporary, transient failures, like a brief network glitch? Opening the circuit might be too aggressive. In our next lesson, we will explore another feature of Resilience4j: configuring retry and timeout mechanisms. You'll learn how to automatically retry failed operations a few times before giving up, which can handle intermittent issues without ever needing to trip the circuit breaker.