Hello! Welcome back to our module on Advanced Database Operations & Transactions.
In our last lesson, we established the theoretical foundation of database transactions, focusing on the essential ACID properties (Atomicity, Consistency, Isolation, and Durability). You learned why transactions are critical for maintaining data integrity when performing multi-step operations.
Today, we'll put that theory into practice. Our goal is to learn how to manage database transactions declaratively using the @Transactional annotation in Spring Boot. You'll see how Spring abstracts away the manual COMMIT and ROLLBACK logic we discussed, allowing you to ensure data integrity with a single, powerful annotation. This approach, where you declare the what (this method should be transactional) rather than the how, is a cornerstone of the Spring Framework's philosophy.
1. The Problem: Partial Success and Inconsistent Data
Let's revisit the core problem that transactions solve. Imagine a service method responsible for a single business operation that involves multiple database writes. For example, creating a new employee and simultaneously creating an associated address record for them.
- Operation 1: Save the new
Employeeto the database. - Operation 2: Save the new
Addressfor that employee.
What happens if an unexpected NullPointerException or another error occurs after Operation 1 but before Operation 2 completes? The Employee record is already saved, but the Address is not. The database is now in an inconsistent state, holding partial data. This is exactly the scenario we want to avoid.
The following resource walks through a practical example of this problem.
Spring Boot - Transaction Management - Using ...
The article from GeeksforGeeks, "Spring Boot - Transaction Management - Using ...", provides a clear demonstration of this issue.
Please read the section titled "Problem Without Transaction Management". Pay close attention to the code example where the Address object is intentionally made null to cause an exception, and the description of the resulting database state.
As the article demonstrates, without proper transaction management, the application happily commits the employee data before the error, leading to data inconsistency.
2. The Solution: Declarative Transactions with @Transactional
Spring's solution is elegant and simple: the @Transactional annotation. By adding this annotation to a method, you are telling Spring that the method's entire execution should be wrapped in a single database transaction.
Let's see how this solves the problem from the previous step.
Spring Boot - Transaction Management - Using ...
Now, let's look at the correct implementation using the @Transactional annotation in the same GeeksforGeeks article.
First, review the code in "Step 6: Create a Service Layer", focusing on the EmployeeService and the @Transactional annotation on the addEmployee method. Then, read the section "Applying Transaction Management" to see how this annotation fixes the data inconsistency problem. Finally, note the mention of @EnableTransactionManagement in "Step 8", which is required to enable this feature (though Spring Boot's JPA starter often auto-configures this for you).
By placing @Transactional on the addEmployee method, the behavior changes completely:
- When the method is called, Spring starts a new transaction.
- The
employeeRepository.save(employee)call executes within this transaction. - An exception is thrown before the address can be saved.
- Because an unhandled exception occurred, Spring automatically performs a rollback. The employee record that was saved in the first step is undone.
- The result: the database remains in its original, consistent state, as if the method was never called.
If the method had completed without any exceptions, Spring would have automatically performed a commit, making both the new employee and address records permanent.
3. How Does @Transactional Work Under the Hood?
You've expressed interest in what Spring does "under the hood," and this is a perfect topic for that. The "magic" behind @Transactional is not magic at all, but a powerful programming paradigm called Aspect-Oriented Programming (AOP).
Here’s a simplified breakdown:
- When your application starts, Spring scans for beans with
@Transactionalmethods. - Instead of giving you the actual
EmployeeServicebean directly, Spring creates a proxy object that wraps your bean. - When your controller calls the
addEmployeemethod, it's actually calling the method on the proxy, not your original object. - This proxy contains a piece of logic called a Transaction Interceptor. The interceptor "catches" the method call, starts a transaction with a
TransactionManager, and then calls the actualaddEmployeemethod on your original bean. - After your method finishes, the interceptor catches the return. If an exception was thrown, it tells the
TransactionManagerto roll back. If it completed successfully, it tells the manager to commit.
This flow ensures that transaction logic (begin, commit, rollback) is handled around your business logic, without cluttering your code.
The following sequence diagram provides a great visual of this process.
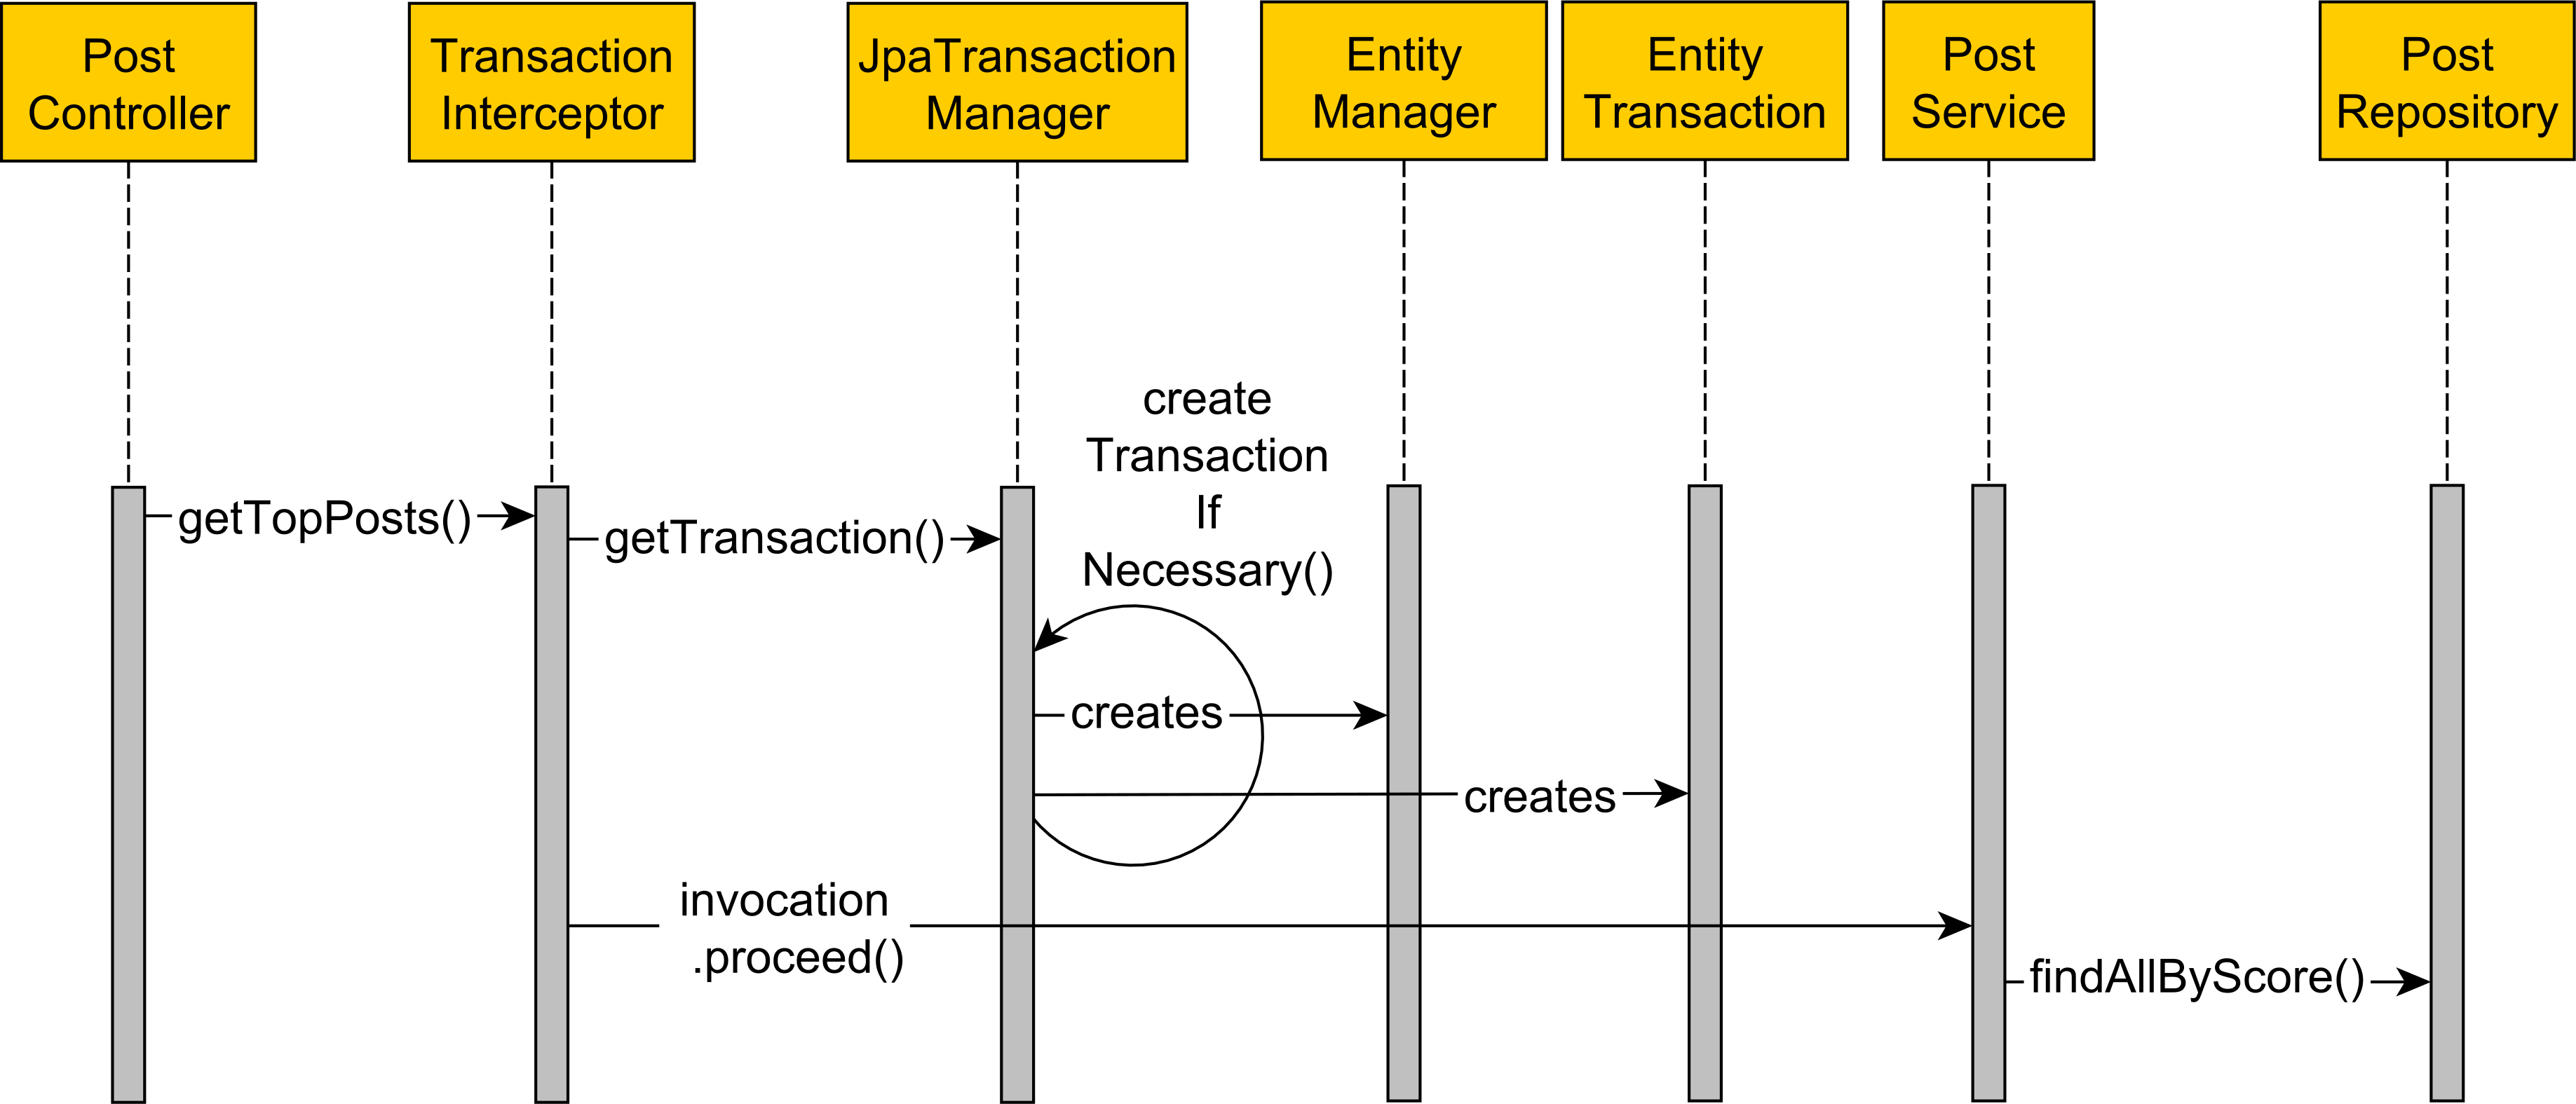
To manage the transaction, Spring uses a PlatformTransactionManager. This is an interface, and Spring Boot automatically configures the correct implementation for you based on your dependencies (e.g., JpaTransactionManager when using Spring Data JPA).

4. Customizing Transactional Behavior
The default behavior of @Transactional is often what you need, but you can customize it with several attributes.
Rollback Rules
By default, Spring only rolls back transactions for unchecked exceptions (RuntimeException and its subclasses) and Errors. It does not roll back for checked exceptions (any Exception that doesn't inherit from RuntimeException).
You can override this behavior using the rollbackFor and noRollbackFor attributes.
Look at the EmployeeService code from the GeeksforGeeks article again:
@Transactional(rollbackFor = Exception.class)
public Employee addEmployee(Employee employee) throws Exception {
    // ... logic
}
Here, rollbackFor = Exception.class tells Spring to roll back the transaction if any exception is thrown, including checked ones. This is a common and safe practice.
Conversely, you could use noRollbackFor to prevent a rollback for a specific unchecked exception that you want to handle differently.
Test your understanding!
You have a service method annotated with @Transactional. Inside the method, you call an external payment gateway which can throw a checked PaymentFailedException. You want the transaction to be rolled back if this exception occurs. How should you annotate your method?
public void processOrder(Order order) throws PaymentFailedException {
    // 1. Save order to database
    // 2. Call payment gateway
}
Show answer
You should use the rollbackFor attribute:
@Transactional(rollbackFor = PaymentFailedException.class)
public void processOrder(Order order) throws PaymentFailedException {
    // ...
}
Without rollbackFor, Spring would not roll back the transaction because PaymentFailedException is a checked exception, and the new order would remain in the database even though the payment failed.
Propagation Behavior
What happens if a method marked with @Transactional calls another method that is also marked with @Transactional? This is controlled by the propagation attribute.
Let's look at the two most common settings. You can dive deeper into this topic by reviewing the "Transaction Propagation" section in the CodeGym resource (LINK).
PROPAGATION_REQUIRED(Default): If a transaction is already running, the method will join it. If no transaction is running, a new one will be started. This is what you'll use 95% of the time. It ensures all work is done within one single physical transaction.PROPAGATION_REQUIRES_NEW: This is more specific. The method will always start its own new, independent physical transaction. If an existing transaction is running, it will be suspended until the new transaction completes. This is useful for tasks that must succeed or fail on their own, regardless of the outer context (e.g., logging an audit record to the database).
Read-Only Transactions
If a method only reads data and does not modify it (like a getEmployeeById method), you can give a hint to the database provider by marking the transaction as read-only:
@Transactional(readOnly = true)
public Employee getEmployeeById(Long id) {
    return employeeRepository.findById(id);
}
This can enable performance optimizations at the JPA provider and database level. It also acts as a safeguard; attempting a write operation inside a read-only transaction will cause an exception.
5. Important Considerations and "Gotchas"
Because @Transactional relies on AOP proxies, there are two common pitfalls to be aware of.
-
Method Visibility: The annotation should only be used on
publicmethods. Since the proxy object wraps your class, it cannot override and add transactional behavior toprivate,protected, or package-private methods. Calls to such methods won't be intercepted, and no transaction will be started. -
Self-Invocation: This is the most common mistake. If you call a
@Transactionalmethod from another method within the same class, the call bypasses the proxy and the transactional logic will not be applied.@Service public class MyService { public void mainMethod() { // This call bypasses the proxy! No transaction for helperMethod. this.helperMethod(); } @Transactional public void helperMethod() { // ... database work ... } }The call to
this.helperMethod()is an internal call within the original object. The proxy, which is what holds the transaction logic, never sees it.
Conclusion
In this lesson, we bridged the gap between transaction theory and practice. You learned how to use Spring's @Transactional annotation to declaratively manage database transactions, ensuring your application's data remains consistent and reliable.
Key Takeaways:
- The
@Transactionalannotation tells Spring to wrap a method in a database transaction. - This mechanism is powered by AOP proxies that intercept method calls to manage the transaction lifecycle (commit/rollback).
- By default, transactions are rolled back for unchecked exceptions but not for checked exceptions. This can be configured with the
rollbackForattribute. - The
propagationattribute controls how a method behaves when called from within an existing transaction. - Marking read operations with
readOnly = trueis a good practice for performance and safety. - Be mindful of the limitations related to method visibility (use
public) and self-invocation (calls within the same object bypass the proxy).
What's Next?
Now that you have a solid grasp on managing transactions for individual operations, our next lesson will address a different kind of database challenge: handling large datasets. We will explore how to implement pagination and sorting using Spring Data JPA's Pageable and Sort features to build efficient and user-friendly APIs.