Hello again! Welcome to the third lesson in our journey into Java backend development.
In the last lesson, we established the crucial role of the Servlet Container. We saw how it manages the servlet lifecycle, handles concurrent requests, and acts as the bridge between the web and your Java code.
Today, we move from theory to practice. You'll write your very first Java Servlet. This lesson directly addresses the learning outcome: implement a basic Java Servlet to handle HTTP GET and POST requests. We'll cover the fundamental differences between these two HTTP methods and then build a complete, working servlet from scratch, configure it, and see it in action. This is the first practical step toward building the backend logic you'll need for web and mobile applications.
Understanding GET vs. POST
Before we write any code, it's essential to understand the "what" and "why" of doGet() and doPost(). These methods correspond to the two most common HTTP methods. At a high level:
- GET is used to request data from a server.
- POST is used to send data to a server to create or update a resource.
Your familiarity with basic HTTP methods will be helpful here, but let's dive into the practical implications for a servlet developer. The following video provides an excellent explanation.
JSPs and Servlets Tutorial 07 - Understanding GET and POST
The video 'Understanding GET and POST' by Java Brains clearly explains the conceptual differences, browser behavior, and security considerations when choosing between GET and POST.
Please watch the video from 00:46 to 09:25. As you watch, focus on three key points: The recommended use case for each method (retrieving vs. modifying data). How the browser handles them differently (URL parameters for GET, refresh warnings for POST). The security and data-length implications.
To summarize the key distinctions discussed in the video:
| Criteria | GET | POST |
|---|---|---|
| Use Case | Retrieving data (idempotent operations, i.e., can be repeated safely) | Submitting data that changes state (e.g., creating a user, placing an order) |
| Data Visibility | Parameters are appended to the URL, making them visible and bookmarkable. | Parameters are sent in the request body, hidden from the URL. |
| Security | Less secure for sensitive data like passwords, as they are in the URL. | More secure, as sensitive data is not exposed in the URL or browser history. |
| Data Size | Limited by the maximum URL length supported by browsers and servers. | Can send large amounts of data, including files. |
| Caching | Can be cached by the browser. | Not cached by default. |
The Role of HttpServlet
So, how does the Servlet Container know to call doGet() for a GET request and doPost() for a POST request?
As we saw in the previous lesson, the container calls the service() method for every request. The HttpServlet class (which our servlet will extend) provides a default implementation of service() that acts as a dispatcher. It inspects the HTTP method of the request and calls the corresponding do...() method, like doGet() or doPost().
This process is illustrated perfectly in the diagram below.
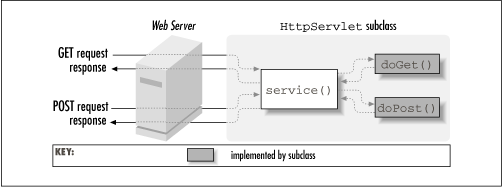
This raises an interesting question: what happens if a request arrives for a method you haven't implemented? For example, if a POST request is sent to a servlet where you've only overridden doGet()? The default doPost() method in HttpServlet will be executed, which sends back an HTTP 405 "Method Not Allowed" error.
To see exactly why this happens, the next short clip looks at the actual source code of HttpServlet.
JSPs and Servlets Tutorial 07 - Understanding GET and POST
This final clip from the Java Brains video reveals what's inside the base HttpServlet class.
Watch from 09:25 to 14:42. You'll see the default implementation of doGet() and doPost(), which simply return an error. This reinforces why you must override them.
Implementing Your First Servlet: Step-by-Step
Now it's time to build a simple servlet that adds two numbers. This classic example will allow us to focus on the mechanics of handling requests and responses.
We'll use a textual guide for this section. It contains all the necessary code snippets for an HTML form, the servlet, and the web.xml configuration.
Handling HTTP GET and POST Requests in Servlets
The article 'Handling HTTP GET and POST Requests in Servlets' from GeeksforGeeks provides a clear, step-by-step implementation that we will follow. It aligns perfectly with the foundational approach you requested.
Open this article and keep it handy. We will work through the code provided in 'Step 2: Handling GET Requests', 'Step 3: Handling POST Requests', and 'Step 4: Handling Both GET and POST Requests'. Don't worry about setting up a full project just yet; focus on understanding the three key files: the HTML form, the Java servlet class, and the web.xml configuration.
Let's break down the implementation into logical pieces, following the article.
1. The Servlet Class Structure
As shown in the article under "Servlet to Handle GET Request," a servlet is just a Java class that extends javax.servlet.http.HttpServlet.
// Basic structure
public class AddServlet extends HttpServlet {
    // We will implement methods here
}
2. Handling a GET Request
First, we'll implement doGet(). The method signature gives you two crucial objects:
HttpServletRequest req: Contains everything about the incoming request (parameters, headers, etc.).HttpServletResponse res: Your tool for crafting the response to send back to the client.
Inside the method, we perform three main actions:
- Get Parameters: We use
req.getParameter("num1")to get the data submitted from the HTML form. SincegetParameteralways returns aString, we must parse it into a number usingInteger.parseInt(). - Process Logic: We perform our business logic—in this case, simple addition.
- Send Response: We get a
PrintWriterobject from the response usingres.getWriter()and use it to write our HTML output back to the browser.
// From the article: AddServlet.java with doGet()
public void doGet(HttpServletRequest req, HttpServletResponse res) throws IOException {
    int num1 = Integer.parseInt(req.getParameter("num1"));
    int num2 = Integer.parseInt(req.getParameter("num2"));
    int result = num1 + num2;

    PrintWriter out = res.getWriter();
    out.println("The result is = " + result);
}
3. Mapping the Servlet with web.xml
How does the servlet container know that a request to http://.../add should be handled by com.learnservlets.AddServlet? This mapping is defined in the Deployment Descriptor, a file named web.xml located in your project's WEB-INF directory.
This file is central to your request for understanding the foundations before frameworks. Spring Boot will later automate this for you, but knowing how it works is key.
The web.xml configuration has two parts:
<servlet>: Gives a logical name to your fully qualified servlet class.<servlet-mapping>: Maps a URL pattern (e.g.,/add) to that logical name.
<!-- From the article: web.xml -->
<web-app>
    <servlet>
        <servlet-name>AddServlet</servlet-name>
        <servlet-class>com.learnservlets.AddServlet</servlet-class>
    </servlet>

    <servlet-mapping>
        <servlet-name>AddServlet</servlet-name>
        <url-pattern>/add</url-pattern>
    </servlet-mapping>
</web-app>
4. Handling a POST Request
Now, let's handle POST requests. Look at the code under "Step 3: Handling POST Requests" in the article. You'll notice the code inside doPost() is identical to doGet(). This is common for simple actions. You would create a second HTML form, but this time with method="post".
Test your understanding!
Based on what we've learned, what would happen if you submitted the form with method="post" but your AddServlet class only contained the doGet() method?
Show answer
The servlet container would respond with an HTTP 405 Method Not Allowed error. This is because the service() method in HttpServlet would be called, it would see the POST request, and attempt to call doPost(). Since you didn't override doPost(), the default implementation from HttpServlet would run, which is specifically designed to return this error.
5. Refactoring for "DRY" Code
Having identical code in doGet() and doPost() violates the "Don't Repeat Yourself" (DRY) principle. A better approach, shown in "Step 4" of the article, is to have both methods call a single, shared private method.
public class AddServlet extends HttpServlet {

    public void doGet(HttpServletRequest req, HttpServletResponse res) throws IOException {
        processRequest(req, res); // Delegate to the shared method
    }

    public void doPost(HttpServletRequest req, HttpServletResponse res) throws IOException {
        processRequest(req, res); // Delegate to the shared method
    }

    private void processRequest(HttpServletRequest req, HttpServletResponse res) throws IOException {
        // All the logic is now in one place
        int num1 = Integer.parseInt(req.getParameter("num1"));
        int num2 = Integer.parseInt(req.getParameter("num2"));
        int result = num1 + num2;

        PrintWriter out = res.getWriter();
        out.println("The result is = " + result);
    }
}
This is much cleaner and more maintainable. If you need to change the logic, you only have to do it in one place.
Key Takeaways
- A servlet is a Java class that extends
HttpServlet. - You must override
doGet()and/ordoPost()to handle HTTP GET and POST requests. The base class implementations will otherwise return an error. - The
HttpServletRequestobject provides access to incoming data, like form parameters viagetParameter(). - The
HttpServletResponseobject is used to construct the response, typically by using itsgetWriter(). - The
web.xmlfile is used to map a URL pattern to a specific servlet class, telling the container how to route requests. - It's good practice to refactor common logic from
doGet()anddoPost()into a shared private method.
What's Next?
Congratulations on designing your first servlet! You've successfully handled the most common types of web requests and configured the application manually.
In our next lesson, "Describe the Servlet lifecycle (init, service, destroy)," we will take a closer look at the lifecycle methods we first introduced in lesson 2. You'll learn how to use init() for one-time setup tasks and destroy() for cleanup, giving you full control over your servlet's existence within the container.