Hello! Welcome to our lesson on advanced configuration in Spring Boot.
In previous lessons, we learned how to externalize configuration values using application.yml and inject them one-by-one with the @Value annotation. We also saw how to use @Profile to switch between different beans for different environments. While @Value is great for simple cases, it can become repetitive and error-prone when you have many related properties, like for a database connection or an external API.
Today, we will learn how to use @ConfigurationProperties for type-safe configuration binding. This powerful feature allows you to map a whole group of related properties from your configuration files directly into a structured, validated Java object. This makes your code cleaner, safer, and much easier to manage, which is a cornerstone of professional backend development.
1. From Individual Values to Structured Objects
Imagine you're configuring a connection to an external email service. You might need a host, port, username, password, and a list of default recipients. With @Value, your service class might look like this:
@Service
public class EmailService {

    @Value("${email.service.host}")
    private String host;

    @Value("${email.service.port}")
    private int port;

    @Value("${email.service.username}")
    private String username;

    // ... and so on for every single property
}
This is clumsy. The configuration is scattered, and there's no single object that represents the "email service configuration." @ConfigurationProperties solves this by letting you define a dedicated class to hold all these properties together.
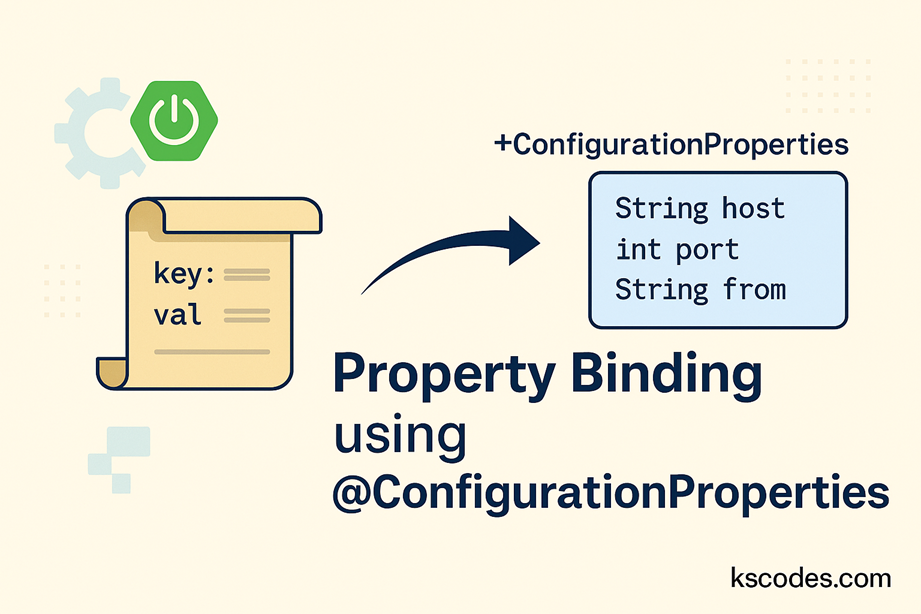
2. @ConfigurationProperties vs. @Value
The @ConfigurationProperties annotation is designed for structured, hierarchical data, which is its main advantage over @Value. Let's look at the key differences.
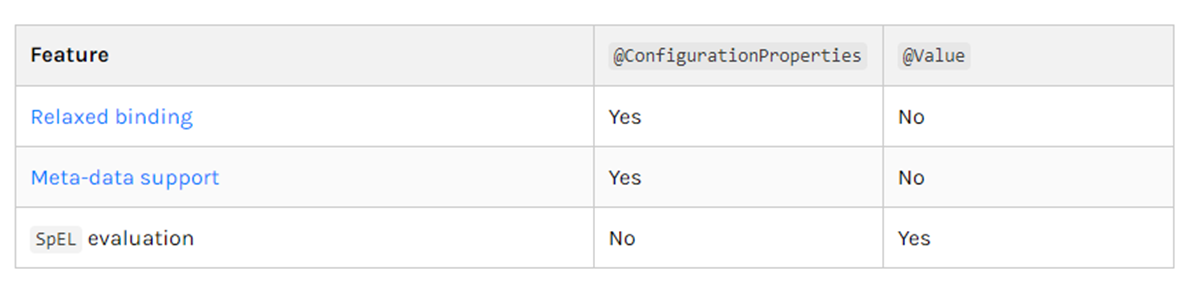
The most important feature to note is relaxed binding. This means Spring is flexible about how you name your properties in the application.yml or .properties file. For example, a property named thread-pool (kebab-case, common in YAML) or THREAD_POOL (screaming snake case, common for environment variables) will correctly map to a Java field named threadPool (camelCase). This makes your configuration more robust and adaptable.
3. Implementing Type-Safe Properties
Let's walk through a practical example of converting a set of properties into a type-safe configuration object. We'll use a scenario with both simple properties and more complex nested structures.
Spring Boot @ConfigurationProperties example
The article "Spring Boot @ConfigurationProperties example" from mkyong.com provides a clear, hands-on example. We'll use it to understand how to bind simple values, nested objects, and lists.
Please read sections 1 and 2. Section 1 briefly recaps @Value, and Section 2 dives into the implementation of @ConfigurationProperties. Pay close attention to: How the application.properties (or YAML) structure maps to the Java classes (GlobalProperties and AppProperties). The use of a prefix in @ConfigurationProperties("app") to target a specific block of properties. How nested properties (compiler) and lists (menus) are represented as nested classes and List fields in Java.
Let's summarize the key steps from the article to create and use a configuration properties class:
Step 1: Define the properties in application.yml
Organize your properties under a common prefix. This is a best practice for keeping your configuration clean.
app:
  error: /error/
  menus:
    - title: Home
      name: Home
      path: /
    - title: Login
      name: Login
      path: /login
  compiler:
    timeout: 5s # Using Spring's Duration format
    output-folder: /temp/
Step 2: Create the Java Properties Class
Create a POJO (Plain Old Java Object) whose fields match the property keys.
import org.springframework.boot.context.properties.ConfigurationProperties;
import java.util.List;
import java.time.Duration;

// This class will be a Spring bean, so we can use @Component,
// or enable it via @EnableConfigurationProperties
// @Component is not used here; we will enable it another way.
@ConfigurationProperties(prefix = "app")
public class AppProperties {

    private String error;
    private List<Menu> menus;
    private Compiler compiler;

    // Inner static classes for nested objects
    public static class Menu {
        private String name;
        private String path;
        private String title;
        // Getters and Setters...
    }

    public static class Compiler {
        private Duration timeout; // Spring can automatically convert "5s" to a Duration object
        private String outputFolder;
        // Getters and Setters...
    }

    // Getters and Setters for top-level properties...
}
Note: For this traditional setter-based binding to work, you must provide standard getters and setters for all fields.
Step 3: Enable the Configuration Properties Class
Spring needs to know about your AppProperties class. You have a few options, but a very clear and explicit one is to use @EnableConfigurationProperties on a configuration class or your main application class.
import org.springframework.boot.context.properties.EnableConfigurationProperties;
import org.springframework.context.annotation.Configuration;

@Configuration
@EnableConfigurationProperties(AppProperties.class)
public class AppConfig {
    // This class enables the AppProperties bean
}
This tells Spring to create a bean of type AppProperties and fill it with values from your configuration file.
Step 4: Inject and Use the Properties Object
Now you can inject the entire configuration object into any other service using standard dependency injection.
@Service
public class SomeService {

    private final AppProperties appProperties;

    // Constructor injection
    public SomeService(AppProperties appProperties) {
        this.appProperties = appProperties;
    }

    public void doSomething() {
        System.out.println("Compiler timeout is: " + appProperties.getCompiler().getTimeout());
        System.out.println("First menu item is: " + appProperties.getMenus().get(0).getTitle());
    }
}
This is much cleaner than injecting a dozen individual values!
4. Validating Configuration at Startup
One of the biggest benefits of @ConfigurationProperties is that you can validate your configuration when the application starts. If a required property is missing or has an invalid value, the application will fail to start with a clear error message, rather than failing unexpectedly at runtime.
This is done using standard Java Bean Validation (JSR-380) annotations.
Spring Boot @ConfigurationProperties example
Let's return to the mkyong.com article to see how to add validation.
Please read section 3, "Add JSR303 Validation". Note the two key things you need to do: Add the @Validated annotation to your properties class. Add validation annotations (like @Max, @Min, @NotEmpty) to the fields.
As the article demonstrates, you first add the @Validated annotation to your properties class. Then, you can use annotations from the jakarta.validation.constraints package on your fields.
import org.springframework.boot.context.properties.ConfigurationProperties;
import org.springframework.validation.annotation.Validated;
import jakarta.validation.constraints.NotEmpty;
import jakarta.validation.constraints.Email;
import jakarta.validation.constraints.Positive;
import java.util.List;

@ConfigurationProperties(prefix = "mail")
@Validated // Enable validation for this class
public class MailProperties {

    @NotEmpty
    private String host;

    @Positive
    private int port;

    @Email
    private String from;

    // ...getters and setters...
}
If you try to start the application with a missing host or a port of 0, Spring will immediately throw an exception with a descriptive message, telling you exactly which property is invalid and why. This is incredibly helpful for maintaining robust applications.
Test your understanding!
Given the following YAML configuration:
database:
  url: "jdbc:postgresql://localhost:5432/mydb"
  username: "user"
  pool-size: 0 # Invalid value!
  supported-drivers:
    - "org.postgresql.Driver"
Write a DatabaseProperties class that binds to this configuration. Add validation to ensure:
urlis not empty.usernameis not empty.poolSizeis a positive number (greater than 0).
Show answer
import org.springframework.boot.context.properties.ConfigurationProperties;
import org.springframework.validation.annotation.Validated;
import jakarta.validation.constraints.NotEmpty;
import jakarta.validation.constraints.Positive;
import java.util.List;

@ConfigurationProperties(prefix = "database")
@Validated
public class DatabaseProperties {

    @NotEmpty
    private String url;

    @NotEmpty
    private String username;

    @Positive // This will cause the application to fail at startup because pool-size is 0
    private int poolSize;

    private List<String> supportedDrivers;

    // Getters and setters for all fields
    public String getUrl() { return url; }
    public void setUrl(String url) { this.url = url; }

    public String getUsername() { return username; }
    public void setUsername(String username) { this.username = username; }

    public int getPoolSize() { return poolSize; }
    public void setPoolSize(int poolSize) { this.poolSize = poolSize; }

    public List<String> getSupportedDrivers() { return supportedDrivers; }
    public void setSupportedDrivers(List<String> supportedDrivers) { this.supportedDrivers = supportedDrivers; }
}
With this class, an application trying to start with pool-size: 0 would fail with an error like "Reason: must be greater than 0".
5. Modern Practice: Immutable and Record-Based Properties
The examples so far use getters and setters, which means the properties objects are mutable. A more modern and safer approach is to create immutable configuration objects using constructor binding. This guarantees that the object's state is set once and never changes, which is ideal for configuration.
Since you're proficient in Java, you'll appreciate that this aligns well with modern functional programming paradigms and makes your code inherently more thread-safe.
Guide to @ConfigurationProperties in Spring Boot
The Baeldung article "Guide to @ConfigurationProperties in Spring Boot" covers this modern approach very well, including its integration with Java records.
Please read sections 8 ("Immutable @ConfigurationProperties Binding") and 9 ("Java 16 Records"). Focus on how the class structure changes: fields become final and setters are removed in favor of a constructor.
With constructor binding, our MailProperties class becomes much cleaner and safer:
import org.springframework.boot.context.properties.ConfigurationProperties;
import org.springframework.validation.annotation.Validated;
import jakarta.validation.constraints.NotEmpty;
import jakarta.validation.constraints.Email;
import jakarta.validation.constraints.Positive;

@ConfigurationProperties(prefix = "mail")
@Validated
public class MailProperties {

    @NotEmpty
    private final String host; // Field is final

    @Positive
    private final int port; // Field is final

    @Email
    private final String from; // Field is final

    // Constructor binding is used here. For a single constructor, @ConstructorBinding is optional in recent Spring Boot versions.
    public MailProperties(String host, int port, String from) {
        this.host = host;
        this.port = port;
        this.from = from;
    }

    // Only getters are needed
    public String getHost() { return host; }
    public int getPort() { return port; }
    public String getFrom() { return from; }
}
Even better, with Java 16+ records, the code becomes incredibly concise:
import org.springframework.boot.context.properties.ConfigurationProperties;
import org.springframework.validation.annotation.Validated;
import jakarta.validation.constraints.NotEmpty;
import jakarta.validation.constraints.Email;
import jakarta.validation.constraints.Positive;

@ConfigurationProperties(prefix = "mail")
@Validated
// A record is a perfect fit for an immutable data carrier.
public record MailProperties(
    @NotEmpty String host,
    @Positive int port,
    @Email String from
) {}
This single record definition replaces the class, final fields, constructor, getters, equals(), hashCode(), and toString() methods! This is the recommended approach for new applications.
Conclusion
You've now mastered a sophisticated and powerful way to handle configuration in Spring Boot. By grouping related properties into type-safe, validated objects, you make your application more robust, maintainable, and easier to reason about.
Key Takeaways:
@ConfigurationPropertiesbinds hierarchical configuration from.ymlor.propertiesfiles to Java objects.- It is superior to
@Valuefor managing structured configuration. - Relaxed binding allows for flexible naming conventions (e.g.,
kebab-casein YAML tocamelCasein Java). - You can validate properties at application startup using
@Validatedand JSR-380 annotations, preventing runtime errors. - Modern best practice favors immutable configuration using constructor binding, for which Java
records are an excellent and concise tool.
What's Next?
We've explored how to externalize and structure application configuration. In the next lesson, we will focus on a specific and critical type of configuration: logging. You will learn how to configure logging levels and output patterns for your application using application.yml, giving you fine-grained control over the information your application produces during development, testing, and in production.