Hello! Welcome to your next lesson on backend development.
In our last session, we explored Spring Boot Actuator and learned how to monitor our application's health and performance. We saw how to get real-time data on metrics like memory usage and HTTP request latency. Today, we'll shift from monitoring performance to actively improving it using one of the most effective techniques in backend engineering: caching.
This lesson will introduce you to the fundamental role of caching in modern applications. You will learn how to implement simple but powerful method-level caching in Spring Boot using the @Cacheable annotation. This will enable your application to respond faster and reduce the load on its underlying data sources, like your database.
1. The What and Why of Caching
At its heart, caching is about trading memory for speed. It involves storing the results of expensive operations (like database queries or complex calculations) in a temporary, fast-access location (the "cache"). When the same operation is requested again, the application can serve the result directly from the cache instead of re-doing the expensive work.
Effective Cache Management in Spring Boot Applications
To begin, let's establish a clear understanding of what caching is and the benefits it brings to an application. This article provides a concise explanation.
Please read the introductory section titled "Firstly, some theory" and the subsection "Caching". Focus on the three main benefits mentioned: improved response times, decreased server load, and enhanced scalability.
The Cache-Aside Pattern
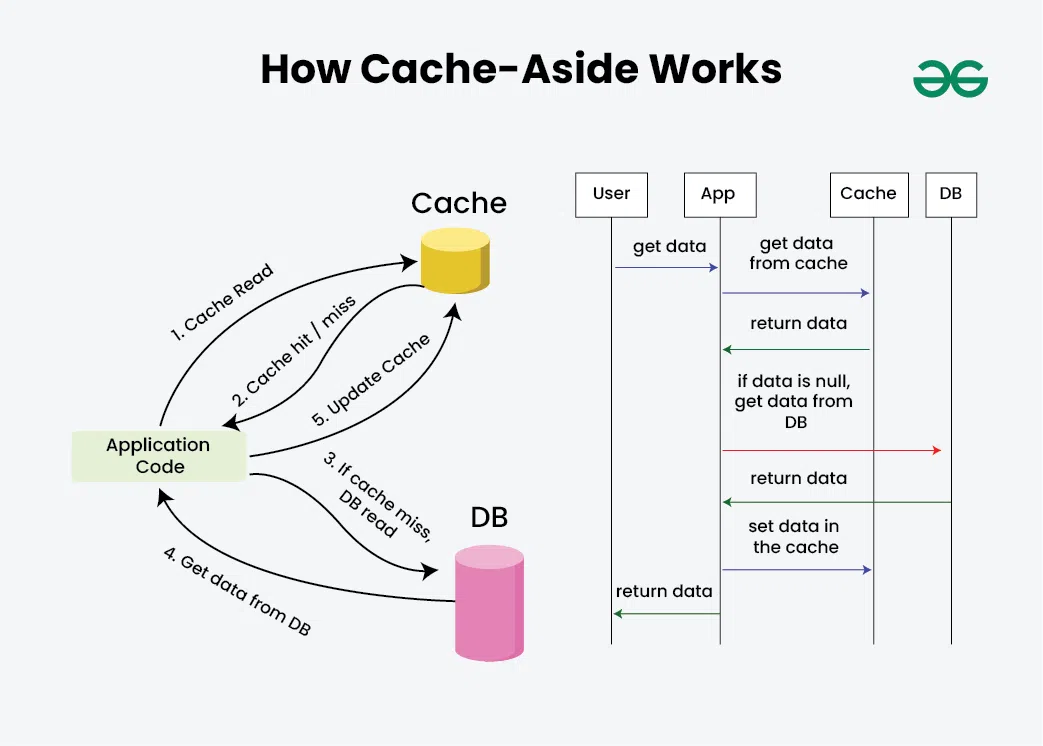
Most caching implementations, including the one we'll build, follow a common strategy called the Cache-Aside pattern. It works like this:
- Your application receives a request for some data.
- It first checks the cache to see if the data is already there.
- Cache Hit: If the data is found in the cache, it is returned immediately, and the process stops.
- Cache Miss: If the data is not in the cache, the application proceeds to fetch it from the primary data source (e.g., the database).
- Before returning the data to the client, the application stores a copy of it in the cache for future requests.
This flow ensures that frequently requested data is served quickly from the cache, while data that is requested for the first time is fetched from the source and then cached.
2. How Spring Implements Caching
Given your interest in understanding what frameworks do "under the hood," it's useful to know that Spring doesn't magically add caching to your methods. It uses a concept from Aspect-Oriented Programming (AOP) called proxies.
When you annotate a method with @Cacheable, Spring creates a proxy object that wraps your actual service bean. Any calls to your service are first intercepted by this proxy. The proxy contains the logic for the Cache-Aside pattern: it checks the cache, and only if there's a cache miss does it invoke the original method on your object.
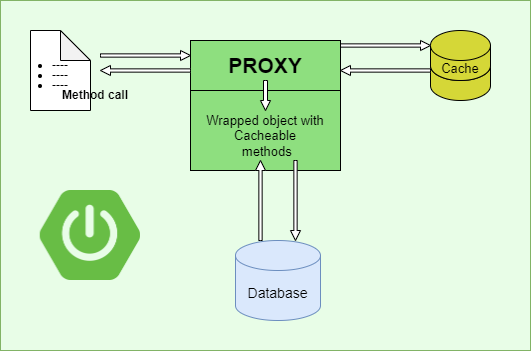
This is a powerful design because it keeps your business logic clean. Your service method only contains the logic to fetch data from the database; the caching concern is handled separately and declaratively by the proxy via annotations.
3. Implementing Caching in Spring Boot
Now, let's get practical. Implementing basic caching in Spring involves three simple steps.
Step 1: Add the Caching Dependency
First, ensure your pom.xml includes the spring-boot-starter-cache dependency. This brings in all the necessary libraries for Spring's caching abstraction.
<dependency>
    <groupId>org.springframework.boot</groupId>
    <artifactId>spring-boot-starter-cache</artifactId>
</dependency>
Step 2: Enable Caching
Next, you need to enable Spring's caching infrastructure. You do this by adding the @EnableCaching annotation to one of your configuration classes (e.g., your main application class).
import org.springframework.boot.SpringApplication;
import org.springframework.boot.autoconfigure.SpringBootApplication;
import org.springframework.cache.annotation.EnableCaching;

@SpringBootApplication
@EnableCaching // This line enables caching
public class MyApplication {
    public static void main(String[] args) {
        SpringApplication.run(MyApplication.class, args);
    }
}
Step 3: Configure a Cache Manager
Spring needs to know where to store the cached data. A CacheManager bean is responsible for this. For this lesson, we'll use the simplest available implementation, ConcurrentMapCacheManager, which stores caches in an in-memory java.util.concurrent.ConcurrentHashMap.
Effective Cache Management in Spring Boot Applications
The following resource demonstrates how to define a CacheManager bean and provides a simple example.
Read the section titled "2. Define a Cache Manager". Focus on the example that creates a ConcurrentMapCacheManager bean. Note how it's configured with the names of the caches it will manage, in this case, "items".
Here is the configuration code. You can add this to a @Configuration class:
import org.springframework.cache.CacheManager;
import org.springframework.cache.concurrent.ConcurrentMapCacheManager;
import org.springframework.context.annotation.Bean;
import org.springframework.context.annotation.Configuration;

@Configuration
public class CacheConfig {

    @Bean
    public CacheManager cacheManager() {
        // We are defining a cache named "products"
        return new ConcurrentMapCacheManager("products");
    }
}
This sets up a single cache named "products". You can list multiple cache names here if needed.
Step 4: Annotate a Method with @Cacheable
Now for the final step: applying caching to a method. Let's say you have a service method that fetches a product from the database, which can be a slow operation.
Declarative Annotation-based Caching :: Spring Framework
Let's see how to use the @Cacheable annotation. The Spring documentation and the "Effective Cache Management" article both provide clear examples.
Read the section "The @Cacheable Annotation" to understand its purpose. Notice how it's used to associate a method with a cache by name.
To cache the result of this method, you just add @Cacheable("products").
import org.springframework.cache.annotation.Cacheable;
import org.springframework.stereotype.Service;

@Service
public class ProductService {

    // This method simulates a slow database query
    @Cacheable("products")
    public Product getProductById(String id) {
        System.out.println("Fetching product with ID " + id + " from the database...");
        try {
            // Simulate a 2-second delay for the database call
            Thread.sleep(2000);
        } catch (InterruptedException e) {
            e.printStackTrace();
        }
        return new Product(id, "Sample Product");
    }
}
How does this work?
- The first time
getProductById("123")is called, the message "Fetching product..." will be printed, and the method will take 2 seconds to execute. Spring's caching proxy will store the returnedProductobject in the "products" cache. The key for this cache entry will be automatically generated from the method argument, which is"123". - The second time
getProductById("123")is called, the proxy will find an entry in the "products" cache for the key"123". It will return the cachedProductobject immediately. The method body will be skipped entirely—you will not see the "Fetching product..." message, and there will be no 2-second delay.
Test your understanding!
If you call getProductById("123") and then immediately call getProductById("456"), will the second call be served from the cache? Why or why not?
Show answer
No, the second call will not be served from the cache. The default cache key is generated from the method's arguments. Since the id argument is different ("123" vs. "456"), the cache keys are different. The second call will result in another cache miss, another 2-second delay, and a new entry being added to the cache with the key "456".
4. Refining Caching Behavior
The default behavior is useful, but Spring provides powerful options to customize it.
Customizing the Cache Key
The default key generation works for simple cases, but sometimes you need more control. For example, if a method has multiple parameters but only one should be part of the key. You can use the key attribute of @Cacheable with a Spring Expression Language (SpEL) expression.
Declarative Annotation-based Caching :: Spring Framework
The official Spring documentation provides an excellent guide on customizing key generation.
Please read the sections "Default Key Generation" and "Custom Key Generation Declaration". Pay attention to how SpEL expressions (e.g., key="#isbn") allow you to select specific arguments to use as the cache key.
For instance, if our method took a user object but we only wanted to use the user's ID for the key:
// Using SpEL to access a property of an argument object
@Cacheable(value = "products", key = "#user.id")
public Product findProductForUser(User user, boolean includeDetails) {
    // ... logic that uses both user and includeDetails
}
Here, includeDetails does not affect the cache key. Two calls with the same user but different includeDetails values will result in a cache hit.
Conditional Caching
You might not want to cache every result. For example, you might want to avoid caching null values or cache only items that meet certain criteria. The condition and unless attributes are perfect for this.
Declarative Annotation-based Caching :: Spring Framework
Let's explore how to apply caching conditionally.
Read the section "Conditional Caching". Understand the difference between condition (evaluated before the method runs) and unless (evaluated after the method runs, using the #result).
condition: Evaluated before method execution. If the expression is false, the method is not cached.// Only cache products with long names @Cacheable(value = "products", condition = "#name.length() > 10") public Product findProductByName(String name) { ... }unless: Evaluated after method execution. If the expression is true, the result is not put into the cache. This is useful for preventing certain results from being cached.// Do not cache the result if it's null @Cacheable(value = "products", unless = "#result == null") public Product findProductById(String id) { ... }
Conclusion
You've now learned how to implement a fundamental performance optimization in your Spring Boot applications. Caching is an essential tool for building scalable and responsive backend services.
Key Takeaways:
- Caching improves performance by storing the results of expensive operations in a fast, temporary data store.
- Spring Boot provides a powerful caching abstraction that uses proxies and annotations, keeping your code clean.
- Implementing caching involves three steps: add the dependency, enable caching with
@EnableCaching, and configure aCacheManager. - The
@Cacheableannotation triggers caching on a method. The first call executes the method and caches the result; subsequent calls with the same key return the cached value directly. - You can customize caching behavior using SpEL for keys (
keyattribute) and conditional logic (conditionandunlessattributes).
What's Next?
In this lesson, we used a simple in-memory cache. This works perfectly for a single application instance, but it has a major limitation: in a distributed system with multiple instances of your service, each instance would have its own separate, inconsistent cache.
In our next lesson, we will solve this problem by learning how to configure and integrate a distributed cache provider, such as Redis. This will ensure all instances of your application share a single, consistent cache.