Hello! Welcome back to our module on database integration with Spring Data JPA.
In our last lesson, we successfully configured our Spring Boot application to communicate with a database. We set up the DataSource in application.properties and learned how to control Hibernate's behavior. The bridge between our application and the database is built, but it's currently empty.
Today, we will learn how to define the data structures that will cross that bridge. Our learning outcome is to define JPA entities using @Entity, @Table, @Id, and @GeneratedValue. We'll take a plain Java class (a POJO) and, with a few key annotations, transform it into a JPA entity—an object that Hibernate can understand and persist to a database table.
1. From Java Object to Database Table: What is an Entity?
At its core, Object-Relational Mapping (ORM) is about making your database tables look and feel like native Java objects. A JPA Entity is the central piece of this puzzle. It's a special Java class that represents a table in your database. Each instance of the entity class corresponds to a single row in that table, and each field in the class typically maps to a column.
To turn a regular Java class into an entity, we use annotations. Let's start with the most fundamental one: @Entity.
The article "Defining JPA Entities" from Baeldung provides a concise introduction to the concept. It explains what an entity is and introduces the core @Entity annotation.
Please read the introduction (Section 1) and the section on "The Entity Annotation" (Section 2.1). Pay close attention to the three requirements for an entity class mentioned in the article: it must have a no-arg constructor, a primary key, and it must not be declared final.
As you read, the key takeaway is that the @Entity annotation is a signal to the JPA provider (Hibernate) that this class is part of your data model and should be managed for persistence.
2. Mapping Your Entity: @Entity and @Table
Once you've marked a class with @Entity, Hibernate needs to know which database table it corresponds to.
- By Default: If you only use
@Entity, Hibernate will assume the table name is the same as your class name (e.g., aProductclass maps to aProducttable). - With
@Table: In professional development, Java class naming conventions (CamelCase) and database table naming conventions (snake_case) often differ. The@Tableannotation gives you explicit control over the mapping.
Let's look at a simple example:
import jakarta.persistence.Entity;
import jakarta.persistence.Table;

@Entity // Tells JPA this is an entity
@Table(name = "user_accounts") // Maps this entity to the "user_accounts" table
public class User {
    // ... fields will go here
}
Without @Table(name = "user_accounts"), JPA would have looked for a table named user. The @Table annotation makes our mapping clear and independent of class names. You can also specify the database schema using @Table(name = "user_accounts", schema = "security"), which is useful in larger, multi-schema databases.
The following image provides a great visual summary of this mapping.
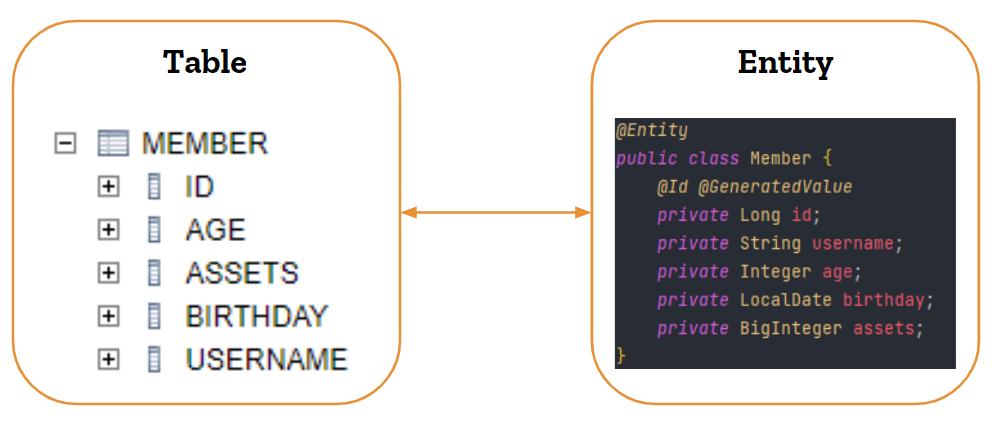
3. The Unique Identifier: @Id and @GeneratedValue
Every table in a relational database needs a primary key—a column with a unique value that identifies each row. In JPA, every entity must have a field that corresponds to this primary key.
You mark this field with the @Id annotation.
import jakarta.persistence.Id;

@Entity
@Table(name = "products")
public class Product {

    @Id
    private Long id; // This field is the primary key

    private String name;
    // ...
}
This is good, but how does the id get its value? Assigning it manually is risky and inefficient. This is where @GeneratedValue comes in. It tells the JPA provider to automatically generate a value for the primary key when a new entity is saved.
@GeneratedValue takes a strategy argument, which defines how the ID is generated. Here are the most common strategies:
GenerationType.IDENTITY: This is a very popular choice. It relies on an auto-incrementing column in the database. When you insert a new row, the database itself generates and assigns the new ID. This is highly efficient and works well with MySQL, PostgreSQL, and SQL Server.GenerationType.SEQUENCE: This strategy uses a database sequence to generate IDs. The JPA provider calls the sequence to get the next ID before inserting the row. This is common with Oracle and PostgreSQL.GenerationType.AUTO(Default): This lets the JPA provider (Hibernate) pick the most appropriate strategy based on the database you are connected to. It might chooseIDENTITYfor MySQL andSEQUENCEfor Oracle. It's a good, portable choice if you don't need fine-grained control.
For your work with MySQL, GenerationType.IDENTITY is an excellent and explicit choice.
JPA and Hibernate Tutorial using Spring Boot Data JPA
The Spring Boot Tutorial website provides clear examples of these core annotations in action.
Please review "Example 1" under the "Examples of JPA Mappings" section, which shows how @Table, @Id, @GeneratedValue, and @Column are used together. Then, review the list under "Important Annotations and Concepts", which provides a quick summary of what @Entity, @Id, and @GeneratedValue do.
4. Putting It All Together: A Complete Entity
Let's combine these annotations to create a complete, persistable Product entity.
package com.example.store.domain;

import jakarta.persistence.Entity;
import jakarta.persistence.GeneratedValue;
import jakarta.persistence.GenerationType;
import jakarta.persistence.Id;
import jakarta.persistence.Table;

/**
 * Represents a product in the store's inventory.
 * This class is a JPA entity mapped to the "products" table.
 */
@Entity
@Table(name = "products")
public class Product {

    @Id
    @GeneratedValue(strategy = GenerationType.IDENTITY)
    private Long id;

    private String name;

    private String description;

    private double price;

    /**
     * JPA requires a no-argument constructor.
     * It can be protected, as only the persistence framework needs it.
     */
    protected Product() {}

    /**
     * Constructor for creating new Product instances to be saved.
     */
    public Product(String name, String description, double price) {
        this.name = name;
        this.description = description;
        this.price = price;
    }

    // --- Getters and Setters ---

    public Long getId() {
        return id;
    }

    public void setId(Long id) {
        this.id = id;
    }

    public String getName() {
        return name;
    }

    public void setName(String name) {
        this.name = name;
    }

    public String getDescription() {
        return description;
    }

    public void setDescription(String description) {
        this.description = description;
    }

    public double getPrice() {
        return price;
    }

    public void setPrice(double price) {
        this.price = price;
    }
}
Notice a few key details:
- All the annotations are from the
jakarta.persistence.*package, which is the standard Java Persistence API. - We have a
protectedno-arg constructor for JPA's use. - We have a
publicconstructor that we can use in our application code to create newProductobjects. - Standard getters and setters are included for all fields. JPA uses these to access the entity's state.
If you were to run your application now with spring.jpa.hibernate.ddl-auto=create and spring.jpa.show-sql=true (from our last lesson), you would see Hibernate execute a CREATE TABLE products (...) SQL statement in your console. This demonstrates the power of ORM in action!
Test your understanding!
Your task is to define a JPA entity for a Book.
The entity should have the following fields:
- An auto-generated
idof typeLong. - A
titleof typeString. - An
authorof typeString.
The entity class should be named Book and it must be mapped to a database table named bookshelf. Use the IDENTITY strategy for ID generation. Don't forget the required constructor!
Show answer
Here is a complete solution for the Book entity:
import jakarta.persistence.Entity;
import jakarta.persistence.GeneratedValue;
import jakarta.persistence.GenerationType;
import jakarta.persistence.Id;
import jakarta.persistence.Table;

@Entity
@Table(name = "bookshelf")
public class Book {

    @Id
    @GeneratedValue(strategy = GenerationType.IDENTITY)
    private Long id;

    private String title;

    private String author;

    // Protected no-arg constructor for JPA
    protected Book() {}

    // Public constructor for application use
    public Book(String title, String author) {
        this.title = title;
        this.author = author;
    }

    // Getters and Setters
    public Long getId() { return id; }
    public void setId(Long id) { this.id = id; }
    public String getTitle() { return title; }
    public void setTitle(String title) { this.title = title; }
    public String getAuthor() { return author; }
    public void setAuthor(String author) { this.author = author; }
}
Conclusion
Great job! You have now mastered the fundamental skill of creating JPA entities. This is the cornerstone of building any data-driven application with Spring Data JPA.
Key Takeaways:
- A JPA entity is a Java class that maps to a database table, marked with the
@Entityannotation. - The
@Tableannotation provides explicit control over the table name, which is crucial for following standard naming conventions. - Every entity must have a primary key field, marked with
@Id. - The
@GeneratedValueannotation automates the generation of primary key values, withIDENTITYbeing a common and effective strategy. - Entities must have a no-argument constructor for the persistence provider to use.
What's Next?
We can now define individual, standalone entities. However, real-world data is rarely isolated. A customer has multiple orders; an order contains multiple products. In our next lesson, we will learn how to map entity relationships using @OneToMany, @ManyToOne, @OneToOne, and @ManyToMany. This will allow us to build a rich, interconnected domain model that accurately reflects our application's data structure.