Hello! Welcome back to our course on backend development with Java and Spring.
In our last lesson, you did an excellent job mapping out our data model, defining entities like Product and Category and establishing the relationships between them using annotations like @OneToMany and @ManyToOne. We now have a solid Java representation of our database schema. But a model is static; how do we actually use it to interact with the database? How do we save a new product, find a specific category, or delete an old item?
This lesson will answer those questions. Our goal is to create repository interfaces by extending JpaRepository for basic CRUD operations. You will learn how Spring Data JPA provides a powerful abstraction layer, called a repository, that allows you to perform all common database operations—Create, Read, Update, and Delete (CRUD)—without writing a single line of implementation code.
This is a fundamental step in building the data access layer of any backend application.
1. The Repository Pattern and Spring Data's Magic
Before we dive into the code, let's understand the concept. The Repository Pattern is a design pattern that provides an abstraction over the data source. Think of it as a collection-like interface for your domain objects. It isolates your business logic from the complexities of database access. You can ask the repository to save an object or find an object, without needing to know anything about SQL, JDBC, or Hibernate sessions.
This is where Spring Data JPA comes in. It takes this pattern to the next level by providing a complete implementation for you at runtime. All you have to do is define an interface.
Spring Data provides a hierarchy of repository interfaces, each building upon the last.

CrudRepository: Provides the most basic functions for CRUD operations.PagingAndSortingRepository: ExtendsCrudRepositoryto add methods for retrieving data in sorted and paginated chunks. We'll cover this in a later lesson.JpaRepository: ExtendsPagingAndSortingRepositoryand adds JPA-specific methods, like flushing the persistence context (flush()) and batch operations. It also refines some inherited methods, for example,findAll()returns aList<T>instead of anIterable<T>.
For most applications, JpaRepository is the recommended choice as it combines all the necessary functionality in one place.
To see the methods each interface provides, let's consult a clear breakdown.
Spring Data Repositories compared
The article "Spring Data Repositories compared" by Baeldung provides an excellent overview of these interfaces and their methods.
Please read sections 2, 3, and 5. Focus on the core idea in section 2 about the inheritance relationship. Then, scan the method lists in sections 3 (CrudRepository) and 5 (JpaRepository) to get a feel for the operations that are provided out-of-the-box.
2. Creating Your First JpaRepository
Now for the practical part. Creating a repository is surprisingly simple. You just need to define a Java interface that extends JpaRepository.
The syntax is:public interface YourEntityRepository extends JpaRepository<EntityType, IdType> {}
Let's break this down:
EntityType: This is the JPA entity class that this repository will manage (e.g.,Product).IdType: This is the data type of the primary key of your entity (e.g.,Long,Integer,String).
Let's continue with the Product entity from our previous lesson. Assuming it has an ID of type Long, the repository interface would look like this:
package com.example.myapp.repository;

import com.example.myapp.entity.Product;
import org.springframework.data.jpa.repository.JpaRepository;
import org.springframework.stereotype.Repository;

@Repository
public interface ProductRepository extends JpaRepository<Product, Long> {
    // That's it!
}
Let's analyze this code:
@Repository: While not strictly necessary for simple repositories anymore (Spring is smart enough to detect them), it's a good practice to annotate your repository interfaces with@Repository. It clearly marks the role of this interface in your application and allows for component scanning.extends JpaRepository<Product, Long>: This is the core of the magic. By extending this interface,ProductRepositoryinherits dozens of methods for working withProductentities, such assave(),findById(),findAll(), anddeleteById(). Spring Data will automatically provide the implementation when your application starts.
Here is a great walkthrough that demonstrates creating an entity, repository, service, and controller. We'll focus on the repository and service parts.
Spring Boot JpaRepository with Example
The article "Spring Boot JpaRepository with Example" from GeeksforGeeks provides a complete, step-by-step implementation of a CRUD application. It clearly shows how to create and use a JpaRepository.
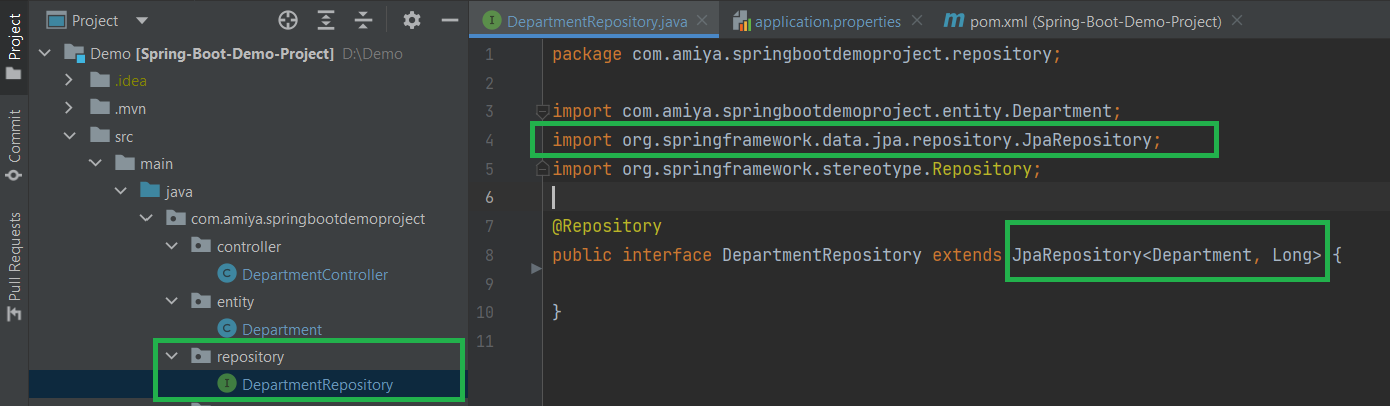
Please focus on 'Step 4: Repository Interface'. This short section shows exactly how to declare the repository interface. The associated image is also a helpful visual guide.
This is what it looks like in an IDE:
Test your understanding!
In our last lesson, we also discussed a Category entity, which has a relationship with Product. Assuming the Category entity also has a primary key of type Long, how would you declare its repository interface?
Show answer
The declaration would be:
package com.example.myapp.repository;

import com.example.myapp.entity.Category;
import org.springframework.data.jpa.repository.JpaRepository;
import org.springframework.stereotype.Repository;

@Repository
public interface CategoryRepository extends JpaRepository<Category, Long> {
}
It follows the exact same pattern, simply substituting Category for Product as the entity type.
3. Using the Repository in Your Application
Creating the interface is just the first step. The real power comes when you use it in your application's business logic, which typically resides in a service layer.
Your service classes can get an instance of the repository injected by Spring's Dependency Injection mechanism. Then, you can call the repository's methods to perform database operations.
Let's create a simple ProductService that uses our ProductRepository.
package com.example.myapp.service;

import com.example.myapp.entity.Product;
import com.example.myapp.repository.ProductRepository;
import org.springframework.beans.factory.annotation.Autowired;
import org.springframework.stereotype.Service;

import java.util.List;
import java.util.Optional;

@Service
public class ProductServiceImpl implements ProductService {

    private final ProductRepository productRepository;

    @Autowired
    public ProductServiceImpl(ProductRepository productRepository) {
        this.productRepository = productRepository;
    }

    // Method to save a new product
    public Product saveProduct(Product product) {
        return productRepository.save(product);
    }

    // Method to find all products
    public List<Product> findAllProducts() {
        return productRepository.findAll();
    }

    // Method to find a product by its ID
    public Optional<Product> findProductById(Long id) {
        // findById returns an Optional to handle the case where no product is found
        return productRepository.findById(id);
    }

    // Method to delete a product by its ID
    public void deleteProductById(Long id) {
        productRepository.deleteById(id);
    }
}
Key Points:
@Service: This annotation marks the class as a Spring service component.@Autowired: We use dependency injection (here, through the constructor) to get an instance of theProductRepositorythat Spring created for us.productRepository.save(product): This single method handles both creating a new record (if the product's ID is null) and updating an existing one (if the ID exists).productRepository.findAll(): Retrieves allProductrecords from the database.productRepository.findById(id): Fetches a singleProduct. It returns anOptional<Product>, which is a modern Java construct to avoidNullPointerExceptions. You must check if the value is present before using it.productRepository.deleteById(id): Deletes the record with the given ID.
The GeeksforGeeks article you reviewed earlier has a great example of this in its service implementation.
Spring Boot JpaRepository with Example
Let's revisit the GeeksforGeeks article to see how the repository is used in a service.
Please read 'Step 5: Service Layer', focusing on Example B (DepartmentServiceImpl.java). Notice how departmentRepository is injected with @Autowired and how its methods (save, findAll, findById, deleteById) are called to implement the service's logic.
Conclusion
Congratulations! You've now bridged the gap between your Java object model and the database. By creating a simple interface, you've unlocked a powerful set of tools for data manipulation, which is a cornerstone of backend development.
Key Takeaways:
- The Repository Pattern abstracts data access, and Spring Data JPA provides automatic implementations.
- You create a repository by defining an interface that extends
JpaRepository<EntityType, IdType>. JpaRepositorygives you a rich set of CRUD (Create, Read, Update, Delete) methods for free, includingsave(),findById(),findAll(), anddelete().- Repositories are injected into service-layer components using
@Autowiredto manage your application's business logic.
What's Next?
The built-in methods are fantastic, but they are limited. What if you need to find a product by its name? Or find all products within a certain price range? In our next lesson, we will explore one of Spring Data JPA's most powerful features: derived query methods. You'll see how Spring can automatically implement custom database queries for you, simply by following a specific method naming convention.