Hello! Last time, you used groups of two and three black keys to find the white notes. Today, you’ll put that map under your right hand: one finger on each key from C through G. The aim is to play the pattern comfortably, not quickly. Allow about 35–40 minutes, including plenty of time at the keyboard.
Place your right hand
Find a group of two black keys near the middle of your keyboard. The white key immediately to their left is C. Let your right thumb rest on that C, then place your other fingers over the next four white keys. Piano fingers are numbered from the thumb outward:
| Note | C | D | E | F | G |
|---|---|---|---|---|---|
| Right-hand finger | 1 | 2 | 3 | 4 | 5 |
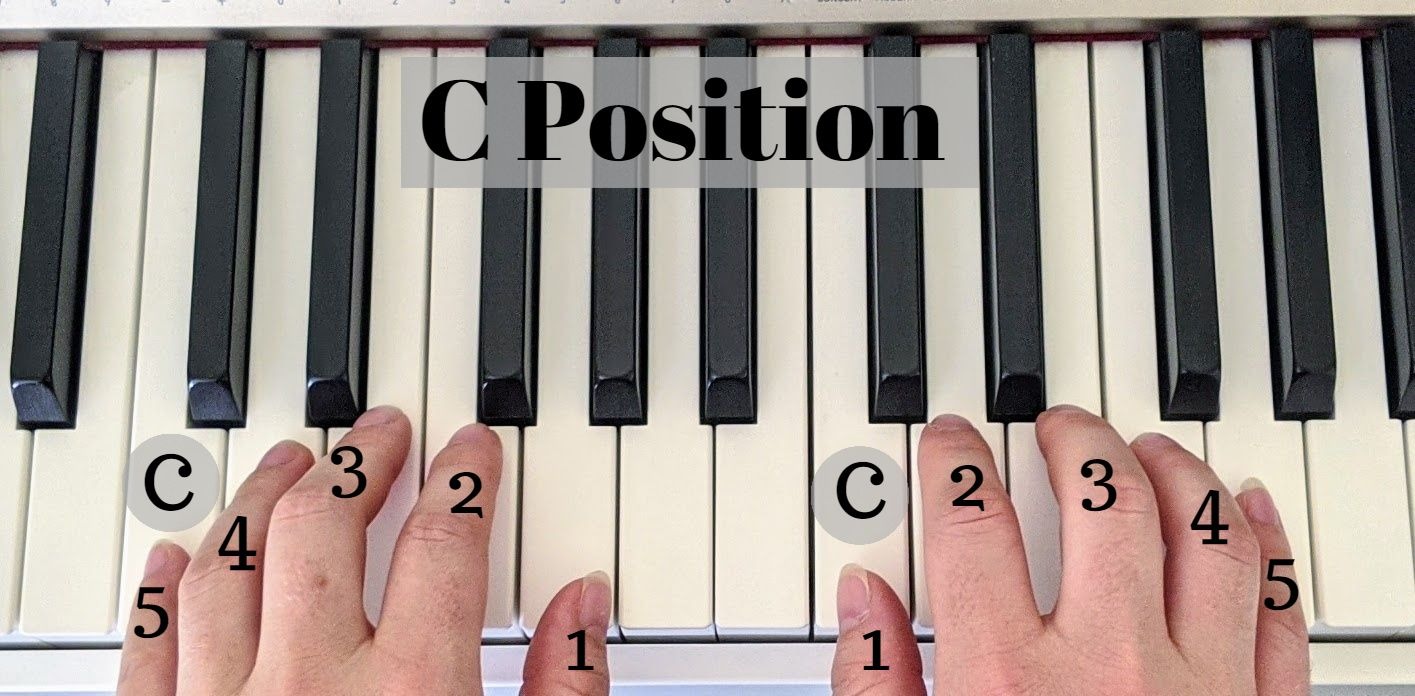
Let your fingers curve gently rather than flattening them or curling them tightly. Keep the wrist roughly in line with the forearm and free to move; recall the relaxed shoulders and supported feet from your first lesson. Your fingers should be near their keys, but you do not need to hold every fingertip rigidly in place.
Watch how the hand settles before the notes are played:
How To Play Piano (Beginner Piano Lesson)
Watch “How To Play Piano (Beginner Piano Lesson)” from Pianote for a demonstration of right-hand placement and the five-note pattern.
In the section that begins with the right thumb on C, watch hand and pattern. Notice the space beneath the palm, the wrist that is neither dropped nor stiffly raised, and the way each finger plays its neighboring key. This lesson stops with the right hand; you do not need to follow the video's later left-hand work.
Play five neighboring notes
With your hand in place, press C with finger 1, then release it. Play D with finger 2 and release it. Continue with E–F–G using fingers 3–4–5. You have played the ascending pattern:
C, D, E, F, G
1, 2, 3, 4, 5
A key needs only enough pressure to sound. Once it has gone down, do not keep pushing into it. Let the playing finger come back up as the next finger plays; the unused fingers can remain close to the keys. It is fine if they move a little in sympathy with one another. Trying to freeze four fingers while moving the fifth often creates more tension than it prevents.
Try the pattern slowly several times. Pause after each note if that helps you find the next finger. When you reach G, let your hand rest for a moment. You can then come back down through G, F, E, D, C with fingers 5, 4, 3, 2, 1. The return trip helps you feel that your hand can stay in the same place; no finger needs to reach across another.
Keep the movement comfortable
The ring finger and little finger may feel less independent than your thumb and index finger. That is normal. If F or G is hard to play, slow down rather than lifting the finger high or pressing harder. Check whether your shoulders have risen, your wrist has become fixed, or your thumb is gripping its key while the other fingers work. Let go, allow the hand to relax, and start again with fewer notes.
For a useful guide to the difference between concentration and strain, read this short section:
Piano Exercises for Beginners | tonestro
Read the guidance in tonestro’s “Piano Exercises for Beginners” to recognize when slow practice is helping and when you need to reset your hand.
Under “How Slowly Should You Practice?”, read the tempo guidance. Then, under “Should Piano Exercises Feel Difficult?”, read the comfort guidance. Focus on the signs that call for a pause, not on the other exercises elsewhere on the page.
Pain is a stop signal, not a normal part of building skill. If something hurts, stop playing and reset your position. If discomfort persists, seek advice from a qualified piano teacher or healthcare professional.
A short keyboard session
Spend the remaining practice time on small, comfortable repetitions rather than speed:
- Settle in for about 2 minutes. Find C from its pair of black keys, place fingers 1–5 over C–G, and check your shoulders and wrist.
- Play upward for about 8–10 minutes. Play C–D–E–F–G slowly, resting between attempts. If one finger catches another key, repeat just the two neighboring notes involved before trying all five again.
- Play up and back for about 8–10 minutes. Use C–D–E–F–G–F–E–D–C. Listen for clear notes and leave enough time for each finger to release.
- Finish with about 3 minutes of easy playing. Choose a pace at which your hand still feels loose. Stop after a comfortable repetition rather than a fast one.
Brief pauses are part of practice. Each time you restart, find C by sight and place the whole hand again; that connects last lesson’s keyboard map to today’s finger pattern.
You can now place your right hand over C–D–E–F–G and play the notes with fingers 1–5, keeping the wrist free and the pressure light. Clear, comfortable movement matters more than speed. Next, you’ll give notes different lengths while keeping a slow, steady pulse.