Hello! Last time, you found a comfortable position at the keyboard: supported feet, relaxed shoulders, and wrists that can move freely. Keep that setup today. You’ll learn to locate every white note by using the black keys as landmarks, rather than memorizing a long row of keys. Allow about 35–40 minutes, with most of that time spent looking at and trying the pattern on your instrument.
Find the repeating shape
Look across the keyboard from left to right. The black keys appear in alternating groups of two and three. Some keyboards end partway through a group, so begin near the middle, where the pattern is easiest to see.

Start by pointing to a group of two black keys, then to the next group of three. Move farther along the keyboard and find the same pair of groups again. You have found the shape that repeats across the instrument.
Give the white keys names
White notes use seven letter names: A, B, C, D, E, F, and G. After G, the names begin again at A. Although there are many white keys, you only need to learn where those seven names sit within one repeating pattern.
Watch the selected parts of this demonstration, then use the chart below to check what you saw.
How to name the white notes on piano
“How to name the white notes on piano,” from Piano From Scratch, demonstrates how the black-key groups help you find white keys across the instrument.
Watch the repeating groups, then finding C. Skip ahead to the other notes, paying particular attention to F beside a group of three black keys. The practice ideas show how to connect a key’s appearance with its name; there is no need to work on speed yet.
The two groups give you two dependable starting points:
- C is the white key immediately left of two black keys. Between those black keys is D; immediately to their right is E.
- F is the white key immediately left of three black keys. Moving across that group, the next white keys are G, A, and B.
After B comes another C, beside the next group of two. Read the pattern from one C to the next:
C, D, E, F, G, A, B, C.
Notice that E and F are neighboring white keys, as are B and C. There is no black key between either pair. This is part of the regular keyboard layout, not a missing key.
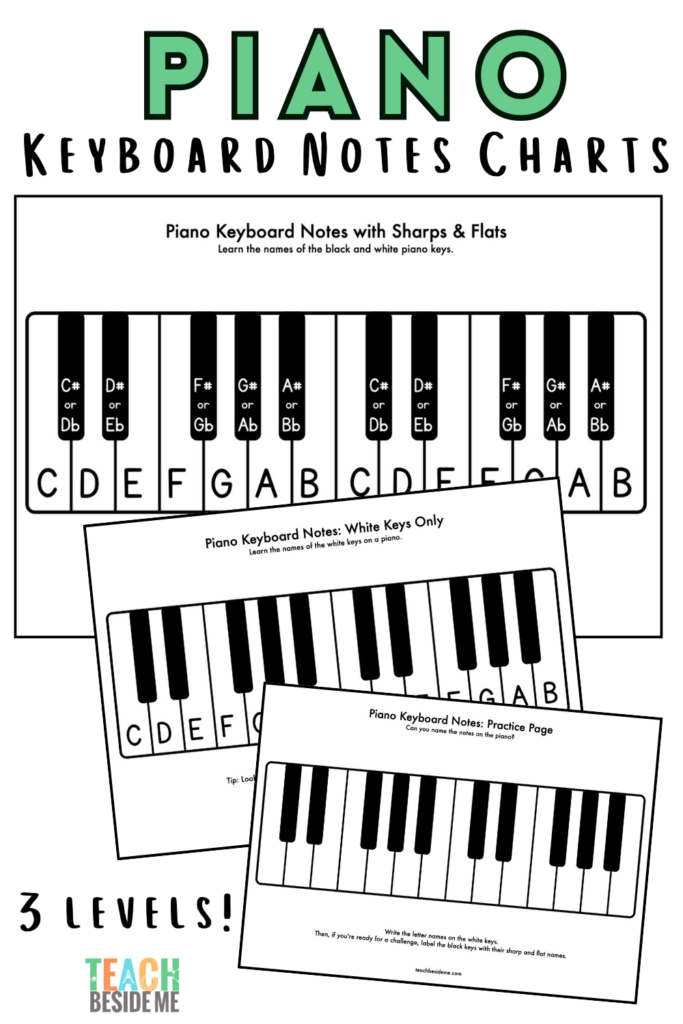
On the largest chart, trace the white letters from one C to the next. Then look for that same arrangement on your keyboard. The black-key groups let you start anywhere; you do not have to count from the far left.
Use the landmarks across the keyboard
Spend about 10–15 minutes making the map familiar. First, locate several groups of two black keys and gently play the C immediately left of each one. Say “C” as you play. Do the same with groups of three and their neighboring F keys. Use whichever finger feels comfortable; this is a note-finding activity, not a fingering exercise.
Next, stay near the middle of the keyboard. Find a C and move one white key at a time to the right, saying C, D, E, F, G, A, B, C. Look at the black keys as you go: they should confirm where you are, especially at C and F. Repeat in another part of the keyboard.
Finally, vary where you begin. To find A, for instance, spot a group of three black keys and find the white key between its second and third black keys. To find E, spot a group of two and choose the white key just to their right. Take your time to check each choice against the shape, rather than guessing from how far along the keyboard you are.
Moving right produces higher sounds; moving left produces lower ones. A C in one part of the keyboard and a C farther right share a note name, but the second sounds higher. If you are using a shorter keyboard, simply work with the complete groups available on it.
You can now orient yourself with two landmarks: C sits left of a pair of black keys, and F sits left of a group of three. The remaining white-note names fill the spaces between them, repeating across the keyboard. Keep this visual map handy; next, you’ll use it to place your right hand on C through G and play a five-note pattern without unnecessary tension.