Welcome to your first lesson on professional Python practices. As an experienced data engineer, you're already adept at building and managing complex systems. This course is designed to formalize and deepen your Python skills, focusing on the software engineering principles that ensure the code you write is not just functional, but also robust, maintainable, and reliable.
We'll begin with the cornerstone of professional software development: automated testing. This lesson introduces pytest, the de-facto standard testing framework in the Python ecosystem. Our goal is to get you writing and running your first tests. We'll cover how pytest discovers tests, how to write clear assertions to verify your code's behavior, and how to handle common scenarios like floating-point comparisons.
The Anatomy of a Test
Before we write any code, it's helpful to establish a mental model for what a test is. A well-structured test generally follows a clear pattern, often summarized by the "Arrange-Act-Assert" (AAA) paradigm.

- Arrange: Prepare the world for your test. This involves setting up any necessary objects, data, or environment states. For example, creating input data for a function.
- Act: Execute the specific piece of code you want to test. This is typically a single function call or method invocation.
- Assert: Check that the outcome of the "Act" phase is what you expected. If the assertion fails, the test fails.
- Cleanup (or Teardown): Restore the environment to its original state. This is crucial to ensure that tests are independent and don't interfere with one another. We will cover this in more detail when we discuss fixtures in a later lesson.
This structure makes tests readable, predictable, and easy to debug.
Getting Started with pytest
pytest is a third-party library that you'll install into your project's virtual environment. A key principle of modern Python development is to manage dependencies carefully, separating production dependencies from development tools like pytest.
To see how this is done and get an overview of a typical project setup, watch the first few minutes of the following video.
This Is How Marie Kondo Sets up Her Pytest
This video from ArjanCodes demonstrates a professional setup for pytest.
Watch the segments on installing pytest as a development dependency and configuring your project structure. Installing pytest: Note how pytest is added as a development-only dependency. This is standard practice. Structuring tests: Pay attention to the convention of placing tests in a separate tests/ directory.
Test Discovery: How pytest Finds Your Tests
One of pytest's most powerful features is its ability to automatically discover and run tests without requiring you to manually register them. This "magic" happens because pytest looks for files and functions that follow specific naming conventions.
To understand these conventions, please read the following guide.
Mastering Default Naming Conventions in pytest - QAbash.com
This article clearly outlines the naming patterns that pytest uses for auto-discovery.
Focus on the core rules for files, functions, and classes. Start with Test File Discovery Rules to see how test files should be named. Continue to Test Function and Method Naming to understand how to name test functions and test classes. Finally, review the Key Takeaways section for a concise summary of these rules.
To summarize the key rules:
- Test files must be named
test_*.pyor*_test.py. - Test functions must be prefixed with
test_. - Test classes must be prefixed with
Test(and should not have an__init__method). Methods within these classes that are tests must be prefixed withtest_.
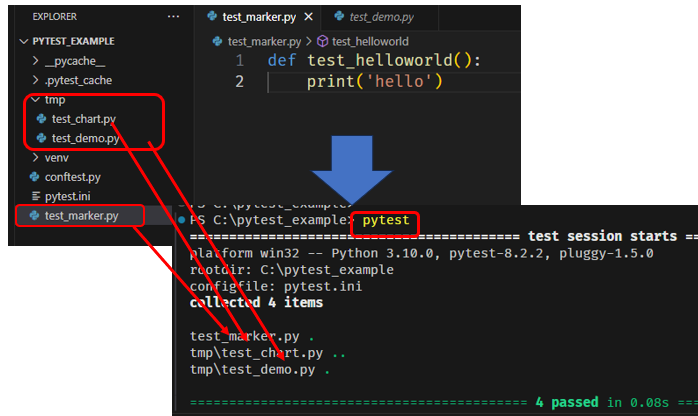
The following image illustrates how running the pytest command in your terminal triggers the discovery and execution of tests that follow these conventions.
Writing Assertions
At the heart of every test is an assertion—a statement that declares an expected condition. pytest allows you to use Python's built-in assert statement, but it supercharges it with a feature called "assertion rewriting." This means that when an assertion fails, pytest provides a detailed report explaining why it failed, which is invaluable for debugging.
Let's see this in action. The official pytest documentation provides the best explanation.
How to write and report assertions in tests
This resource from the official pytest documentation explains how to use assert and how pytest provides rich failure reports.
Please read the following sections: Asserting with the assert statement: Start reading the introduction to see a basic example of a failing assertion and the rich output pytest generates. Context-sensitive comparisons: Read the section on comparisons to see how pytest provides helpful diffs for complex types like sets, lists, and dictionaries. A common pitfall: Finally, review the section on return values. This highlights a frequent mistake where developers return a boolean from a test instead of using assert.
As you can see, using assert with pytest is straightforward, and the detailed feedback on failure is a significant productivity boost. You don't need complex assertEqual or assertTrue methods like in other testing frameworks.
Running Your Tests
Once you've written some tests, you'll run them from your terminal.
# Make sure you are in your project's root directory with the virtual environment activated
pytest
pytest provides many command-line options to control which tests are run and how the output is displayed. The video from ArjanCodes provides a great tour of the most useful ones.
This Is How Marie Kondo Sets up Her Pytest
This part of the video covers the practical aspects of running tests from the command line and within an IDE like VS Code.
Focus on the command-line flags, which are universal. Running tests: Watch how tests are executed from the console. Filtering tests: This demonstrates how to run specific tests using file paths, test names, and the powerful -k flag for keyword-based filtering. Verbose and print output: Learn about the -v (verbose) and -s (show prints) flags, which are very useful for debugging.
Handling Numerical Precision with pytest.approx
Your work in finance and data engineering often involves floating-point arithmetic, which is susceptible to small precision errors. Directly comparing two floating-point numbers with == is a fragile practice.
For example, 0.1 + 0.2 == 0.3 evaluates to False in Python due to how these numbers are represented in binary. This can lead to tests that fail for the wrong reasons.
pytest provides a clean solution: pytest.approx. It asserts that a number is equal to another within a certain tolerance.
The pytest documentation explains this clearly.
How to write and report assertions in tests
This section of the documentation introduces pytest.approx.
Read the section on approximate equality. Notice that it works not only for single numbers but also for sequences and even NumPy arrays, which will be highly relevant for your work.
Here's a quick example to solidify the concept. Imagine a function that applies a 5% fee to a transaction.
import pytest

def apply_fee(amount, fee_rate=0.05):
    return amount * (1 - fee_rate)

def test_apply_fee():


    # Arrange
    initial_amount = 100.0
    expected_amount_after_fee = 95.0


    # Act
    result = apply_fee(initial_amount)


    # Assert
    # A direct comparison might be fine here, but `approx` is safer.
    assert result == pytest.approx(expected_amount_after_fee)

def test_complex_fee_calculation():


    # A more complex scenario where floating point errors are likely
    # Arrange
    amount = 0.1
    fee_rate = 0.2


    # The actual result of amount * (1 - fee_rate) is 0.08000000000000002


    # Act
    result = apply_fee(amount, fee_rate)


    # Assert
    # assert result == 0.08  # This would fail!
    assert result == pytest.approx(0.08) # This passes.
This practice is essential for writing dependable tests for any code involving financial calculations, statistical analysis, or scientific computing.
Conclusion
In this lesson, we've laid the groundwork for professional testing in Python. You now have a solid understanding of the fundamental concepts and tools needed to start writing effective tests with pytest.
Here are the key takeaways:
- Tests are best structured using the Arrange-Act-Assert pattern.
pytestuses simple naming conventions (test_*.pyfiles,test_*functions) to automatically discover tests.- You can use Python's standard
assertstatement, andpytestwill provide rich, detailed error reports on failure. - Tests are run from the command line using the
pytestcommand, with flags like-vand-kto control execution. - For floating-point comparisons, always use
pytest.approx()to avoid issues with numerical precision.
In our next lesson, we will explore one of pytest's most powerful features: fixtures. Fixtures are how we manage the "Arrange" and "Cleanup" phases of our tests in a clean, scalable, and reusable way. They are the key to managing test state and dependencies, allowing you to write more complex and realistic tests.