Hello! Welcome back to our course on FastAPI.
In our last few lessons, we successfully built a complete, asynchronous CRUD API using FastAPI and SQLAlchemy. We can now create, read, update, and delete notes. However, our database schema is currently static. If we wanted to add a new field to our Note model, we would have to manually alter the database, which is risky and not scalable.
This lesson tackles that exact problem. We will cover the learning outcome: Set up and use Alembic for database migrations, comparing the workflow to Django's makemigrations and migrate.
For someone with your background in Django, this process will feel very familiar. Alembic is to the SQLAlchemy world what Django's migration system is to the Django world. It's the standard tool for managing and versioning your database schema programmatically.
By the end of this lesson, you'll be able to confidently manage your database schema evolution in a FastAPI project, a critical skill for any production application.
1. Why We Need Schema Migrations
First, let's briefly formalize the concept. As an application evolves, so does its data model. We might need to add a tags table, add a last_updated column to an existing table, or change a column from nullable to non-nullable. These changes to the database structure are called schema migrations.
Doing this manually is error-prone. A migration tool like Alembic provides a structured, version-controlled way to apply and revert these changes. Think of it like Git for your database schema.
Database Schema Evolution with Alembic and Django Migrations
To start, let's get a clear definition of the core concepts. The article 'Database Schema Evolution with Alembic and Django Migrations' provides a great introduction.
Read the section titled 'Understanding Schema Evolution Tools'. Focus on the definitions for Schema Migration, Migration Script, and Migration History. These concepts are universal and apply to both Alembic and the Django system you're familiar with.
2. Setting Up the Alembic Environment
The first step is to initialize an Alembic "environment" in our project. This is a one-time setup that creates the necessary configuration files and directories.
Analogy to Django: This is similar to the migrations/ directory that Django automatically creates inside an app when you first run makemigrations. With Alembic, we do it explicitly with an init command.
Let's watch a video that walks through the entire setup process, from installing Alembic to initializing the environment and configuring the database connection.
Alembic Introduction - Migrations and Auto-Generating Revisions from SQLAlchemy Models
The video 'Alembic Introduction' by BugBytes provides a clear, step-by-step guide to getting started. It even uses a PostgreSQL database in Docker, which is a great professional practice.
Watch from the beginning to 07:37. This will cover: Installation: The video will show pip install alembic and the PostgreSQL driver (psycopg2). In our async project, you should already have asyncpg installed. Initialization (alembic init): Pay close attention to the directory structure it creates: an alembic.ini file and a directory (e.g., my_app/) containing env.py and a versions/ subdirectory. Configuration: See how the sqlalchemy.url in alembic.ini is updated to point to the database. This is how Alembic knows where to apply the migrations.
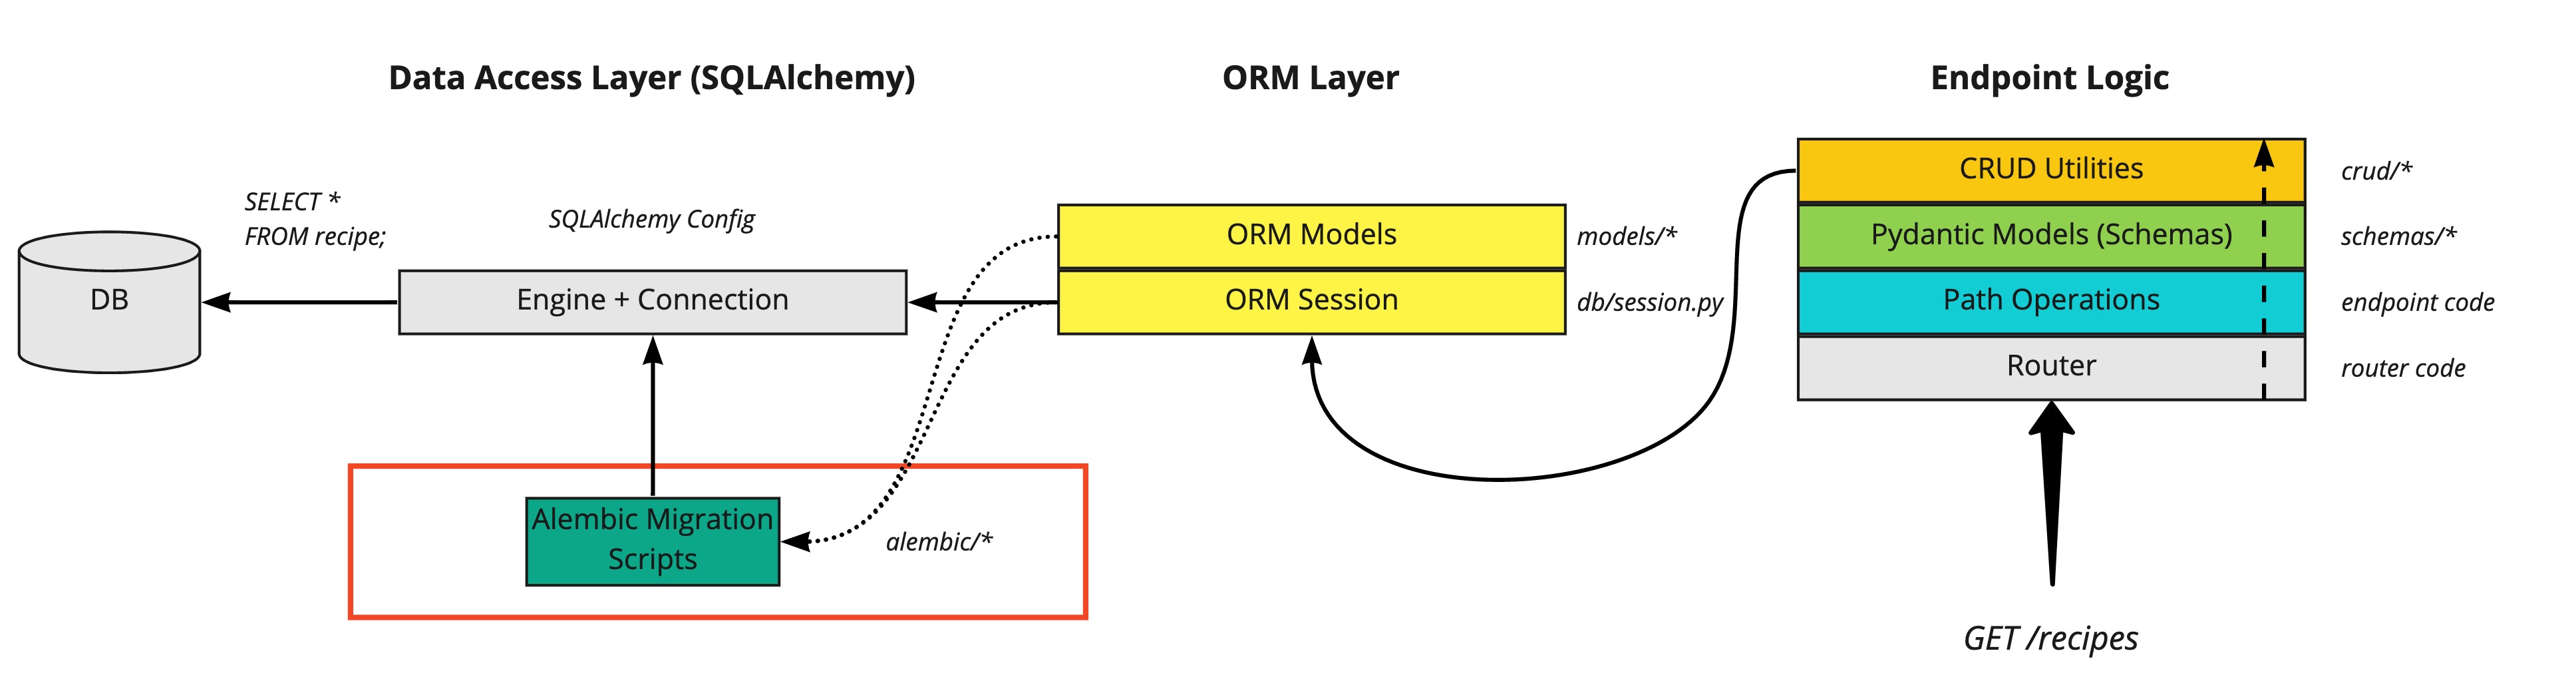
After following the video, your project should have a structure that includes:
alembic.ini: The main configuration file. This is where you set the database URL.migrations/(or a similar name you chose): The environment directory.env.py: A Python script that is run every time you use thealembiccommand. We'll configure this next.versions/: This directory will hold all your migration scripts, just like Django'smigrationsfolder.script.py.mako: A template file for generating new migration scripts. You rarely need to touch this.
3. Configuring Alembic for Autogeneration
Out of the box, Alembic doesn't know about your SQLAlchemy models. To enable autogenerate—Alembic's equivalent of Django's model change detection—we must tell it where to find them.
This is a key difference from Django, which automatically discovers models from your INSTALLED_APPS. Alembic requires an explicit configuration step in the env.py file.
The goal is to point Alembic's target_metadata to your declarative Base.metadata.
The video you just watched continues to explain exactly how to do this.
Alembic Introduction - Migrations and Auto-Generating Revisions from SQLAlchemy Models
Let's continue with the 'Alembic Introduction' video to configure autogeneration.
Watch the section from 20:12 to 24:30. The key steps are: Create a models.py file with your SQLAlchemy models (you already have this). In env.py, import the Base object from your models.py file. Find the line target_metadata = None and change it to target_metadata = Base.metadata. This simple change links your models to Alembic, enabling it to detect changes automatically.
A More Modern Configuration Approach
The method above works perfectly fine. However, in modern Python projects, it's common to manage settings using Pydantic and environment variables, rather than hardcoding values in .ini files.
The following video demonstrates a more advanced setup that aligns with this practice. It configures env.py to:
- Read the database URL from a Pydantic settings object (which in turn reads from environment variables).
- Programmatically set the configuration for Alembic, overriding what's in
alembic.ini.
You don't have to switch to this method right now, but it's an excellent pattern to be aware of for professional projects.
Setting Up a Dev Environment for FastAPI, PostgreSQL, SQLAlchemy & Alembic with Docker
For a look at a more production-ready setup, watch this segment from 'Setting Up a Dev Environment for FastAPI...' by Ssali Jonathan.
Watch from 53:28 to 59:42. Don't worry about the uv commands; focus on the concepts: He imports his Pydantic config object into env.py. He programmatically builds the database URL and sets it using config.set_main_option("sqlalchemy.url", db_url). He also imports his Base and sets target_metadata = Base.metadata, just as we saw before.
4. The Migration Workflow: Alembic vs. Django
Now for the main event. Let's compare the commands you know from Django with their Alembic counterparts. The workflow is conceptually identical.
| Task | Django Command | Alembic Command |
|---|---|---|
| Generate migration script | python manage.py makemigrations |
alembic revision --autogenerate -m "Message" |
| Apply all pending migrations | python manage.py migrate |
alembic upgrade head |
| Revert the last migration | python manage.py migrate <app> <prev> |
alembic downgrade -1 |
| Revert all migrations | python manage.py migrate <app> zero |
alembic downgrade base |
| View migration history & status | python manage.py showmigrations |
alembic history --verbose |
| View SQL for a migration | python manage.py sqlmigrate <app> <id> |
alembic upgrade <rev_id> --sql |
This table is your Rosetta Stone for migrations. Let's break down the key commands.
Generating a Migration (revision)
The alembic revision --autogenerate -m "..." command is the equivalent of makemigrations.
--autogenerate: Tells Alembic to inspect your models (viatarget_metadata) and compare them to the current state of the database, generating the changes.-m "...": A required short message describing the migration, similar to a Git commit message.
When you run this, Alembic creates a new file in your versions/ directory. It contains an upgrade() function to apply the changes and a downgrade() function to revert them.
Applying and Reverting Migrations (upgrade/downgrade)
alembic upgrade head: This is the direct equivalent ofmigrate. It applies all unapplied migrations until the database schema matches the latest revision (head).alembic downgrade -1: This reverts the most recent migration by running thedowngrade()function from that migration script. You can use-2to revert two steps, and so on.
The articles below reinforce this comparison perfectly.
SQLAlchemy for Django Developers - OddBird
The article 'SQLAlchemy for Django Developers' has a section that directly compares the migration commands. It's an excellent, concise summary.
Read the section titled 'Migrations Are Not Built-In'. It provides a direct mapping of the Django commands to their Alembic equivalents and also highlights a key philosophical difference: Django has per-app migrations, while Alembic has a single, unified history.
5. Practical Example: Evolving Our Note Model
Let's walk through a practical scenario.
Step 1: Create the Initial Migration
Assuming your database is currently empty but your Note model is defined in models.py, let's create the first migration. In your terminal, run:
alembic revision --autogenerate -m "Create initial note table"
Inspect the new file created in your migrations/versions/ directory. You should see op.create_table(...) inside the upgrade() function and op.drop_table(...) in downgrade().
Now, apply it:
alembic upgrade head
Your notes table now exists in the database! Alembic also created a table named alembic_version to track which migrations have been applied.
Step 2: Add a New Field
Now, let's modify your models.py file. Add a new field to the Note model:
# models.py
import datetime
from sqlalchemy import String, Text, DateTime, func
from sqlalchemy.orm import Mapped, mapped_column
from .database import Base

class Note(Base):
    __tablename__ = "notes"

    id: Mapped[int] = mapped_column(primary_key=True)
    title: Mapped[str] = mapped_column(String(100), index=True)
    content: Mapped[str] = mapped_column(Text, nullable=True)
    created_at: Mapped[datetime.datetime] = mapped_column(
        DateTime(timezone=True), server_default=func.now()
    )


    # New field added below!
    is_archived: Mapped[bool] = mapped_column(default=False, server_default='false')
Step 3: Generate the New Migration
With the model updated, run the revision command again:
alembic revision --autogenerate -m "Add is_archived field to Note model"
Check the new migration file. This time, it should contain op.add_column(...) and op.drop_column(...). Alembic correctly detected the change.
Step 4: Apply the New Migration
Finally, bring the database up to date:
alembic upgrade head
Your notes table in the database now has an is_archived column. This workflow allows you to safely and incrementally evolve your database schema as your application grows.
Conclusion
In this lesson, we demystified database migrations in the FastAPI ecosystem. You've seen that while the specific commands are different, the underlying principles and workflow are nearly identical to what you already know from Django.
Key Takeaways:
- Alembic is the standard migration tool for SQLAlchemy.
- The workflow starts with
alembic initto create the environment. - You must configure
env.pyto point to your model metadata (target_metadata = Base.metadata) to enableautogenerate. - The core workflow is a two-step process:
alembic revision --autogenerate -m "..."to create a migration script (likemakemigrations).alembic upgrade headto apply it to the database (likemigrate).
- Reverting changes is done with
alembic downgrade.
Preview of the Next Lesson:
Now that we can manage our database schema, we're ready to explore one of FastAPI's most powerful and defining features: the Dependency Injection system. In the next lesson, we'll explain what it is, how it works, and how it helps you write cleaner, more modular, and more testable code—contrasting it with Django's middleware and DRF's permission patterns.