Hello! Welcome to the tenth module, "Testing and Production Deployment."
In our last lesson, we mastered testing authenticated endpoints by leveraging FastAPI's dependency injection system. You learned how to isolate endpoint logic using app.dependency_overrides for fast, robust tests, and how to write integration tests with real tokens to verify the end-to-end authentication flow.
Now that we have a well-tested and reliable application, it's time to prepare it for deployment. This lesson bridges the gap between local development and production by addressing the learning outcome: Containerize the FastAPI application using a multi-stage Dockerfile for a lean production image.
We'll explore how to package our application into a Docker container, the industry standard for creating portable and consistent application environments. You'll learn why simply putting your code into a container isn't enough for production and how to apply optimization techniques—especially multi-stage builds—to create an image that is small, fast, and secure.
From Virtual Environments to Containers
In your development workflow, you're accustomed to using virtual environments (venv) to isolate Python dependencies for a specific project. A Docker container takes this isolation to the next level. It's a lightweight, standalone, executable package that includes everything needed to run an application: the code, a runtime (Python), system tools, libraries, and settings.
The blueprint for creating a container is a text file called a Dockerfile. Let's start by looking at a common but inefficient way to write one, and then we'll systematically improve it.
The Problem with a "Naive" Dockerfile
A straightforward approach to creating a Dockerfile for a Python application might look something like this:
# A basic, but inefficient Dockerfile
FROM python:3.12

WORKDIR /app

COPY . .

RUN pip install -r requirements.txt

CMD ["uvicorn", "app.main:app", "--host", "0.0.0.0", "--port", "8000"]
While this works, it's problematic for a production environment for several reasons:
- Large Image Size: It uses the full
python:3.12base image, which is over 1GB and contains many development tools you don't need at runtime. It also copies your entire project directory, including.venv,__pycache__, and test files. - Slow Rebuilds: Any change to a single line of your source code will invalidate the Docker cache for the
COPYinstruction, forcingpip installto run again on every build. - Security Risks: The final image contains your entire development setup, including build tools and development dependencies, which unnecessarily increases the potential attack surface.
Our goal is to create a lean production image that contains only what is absolutely necessary to run the application. The key to achieving this is the multi-stage build.
The Multi-Stage Build Strategy
A multi-stage build uses multiple FROM instructions in a single Dockerfile. Each FROM starts a new "stage." The core idea is to use an initial stage (the "builder") to install all dependencies and prepare your application, and then copy only the essential artifacts to a clean, minimal final stage.
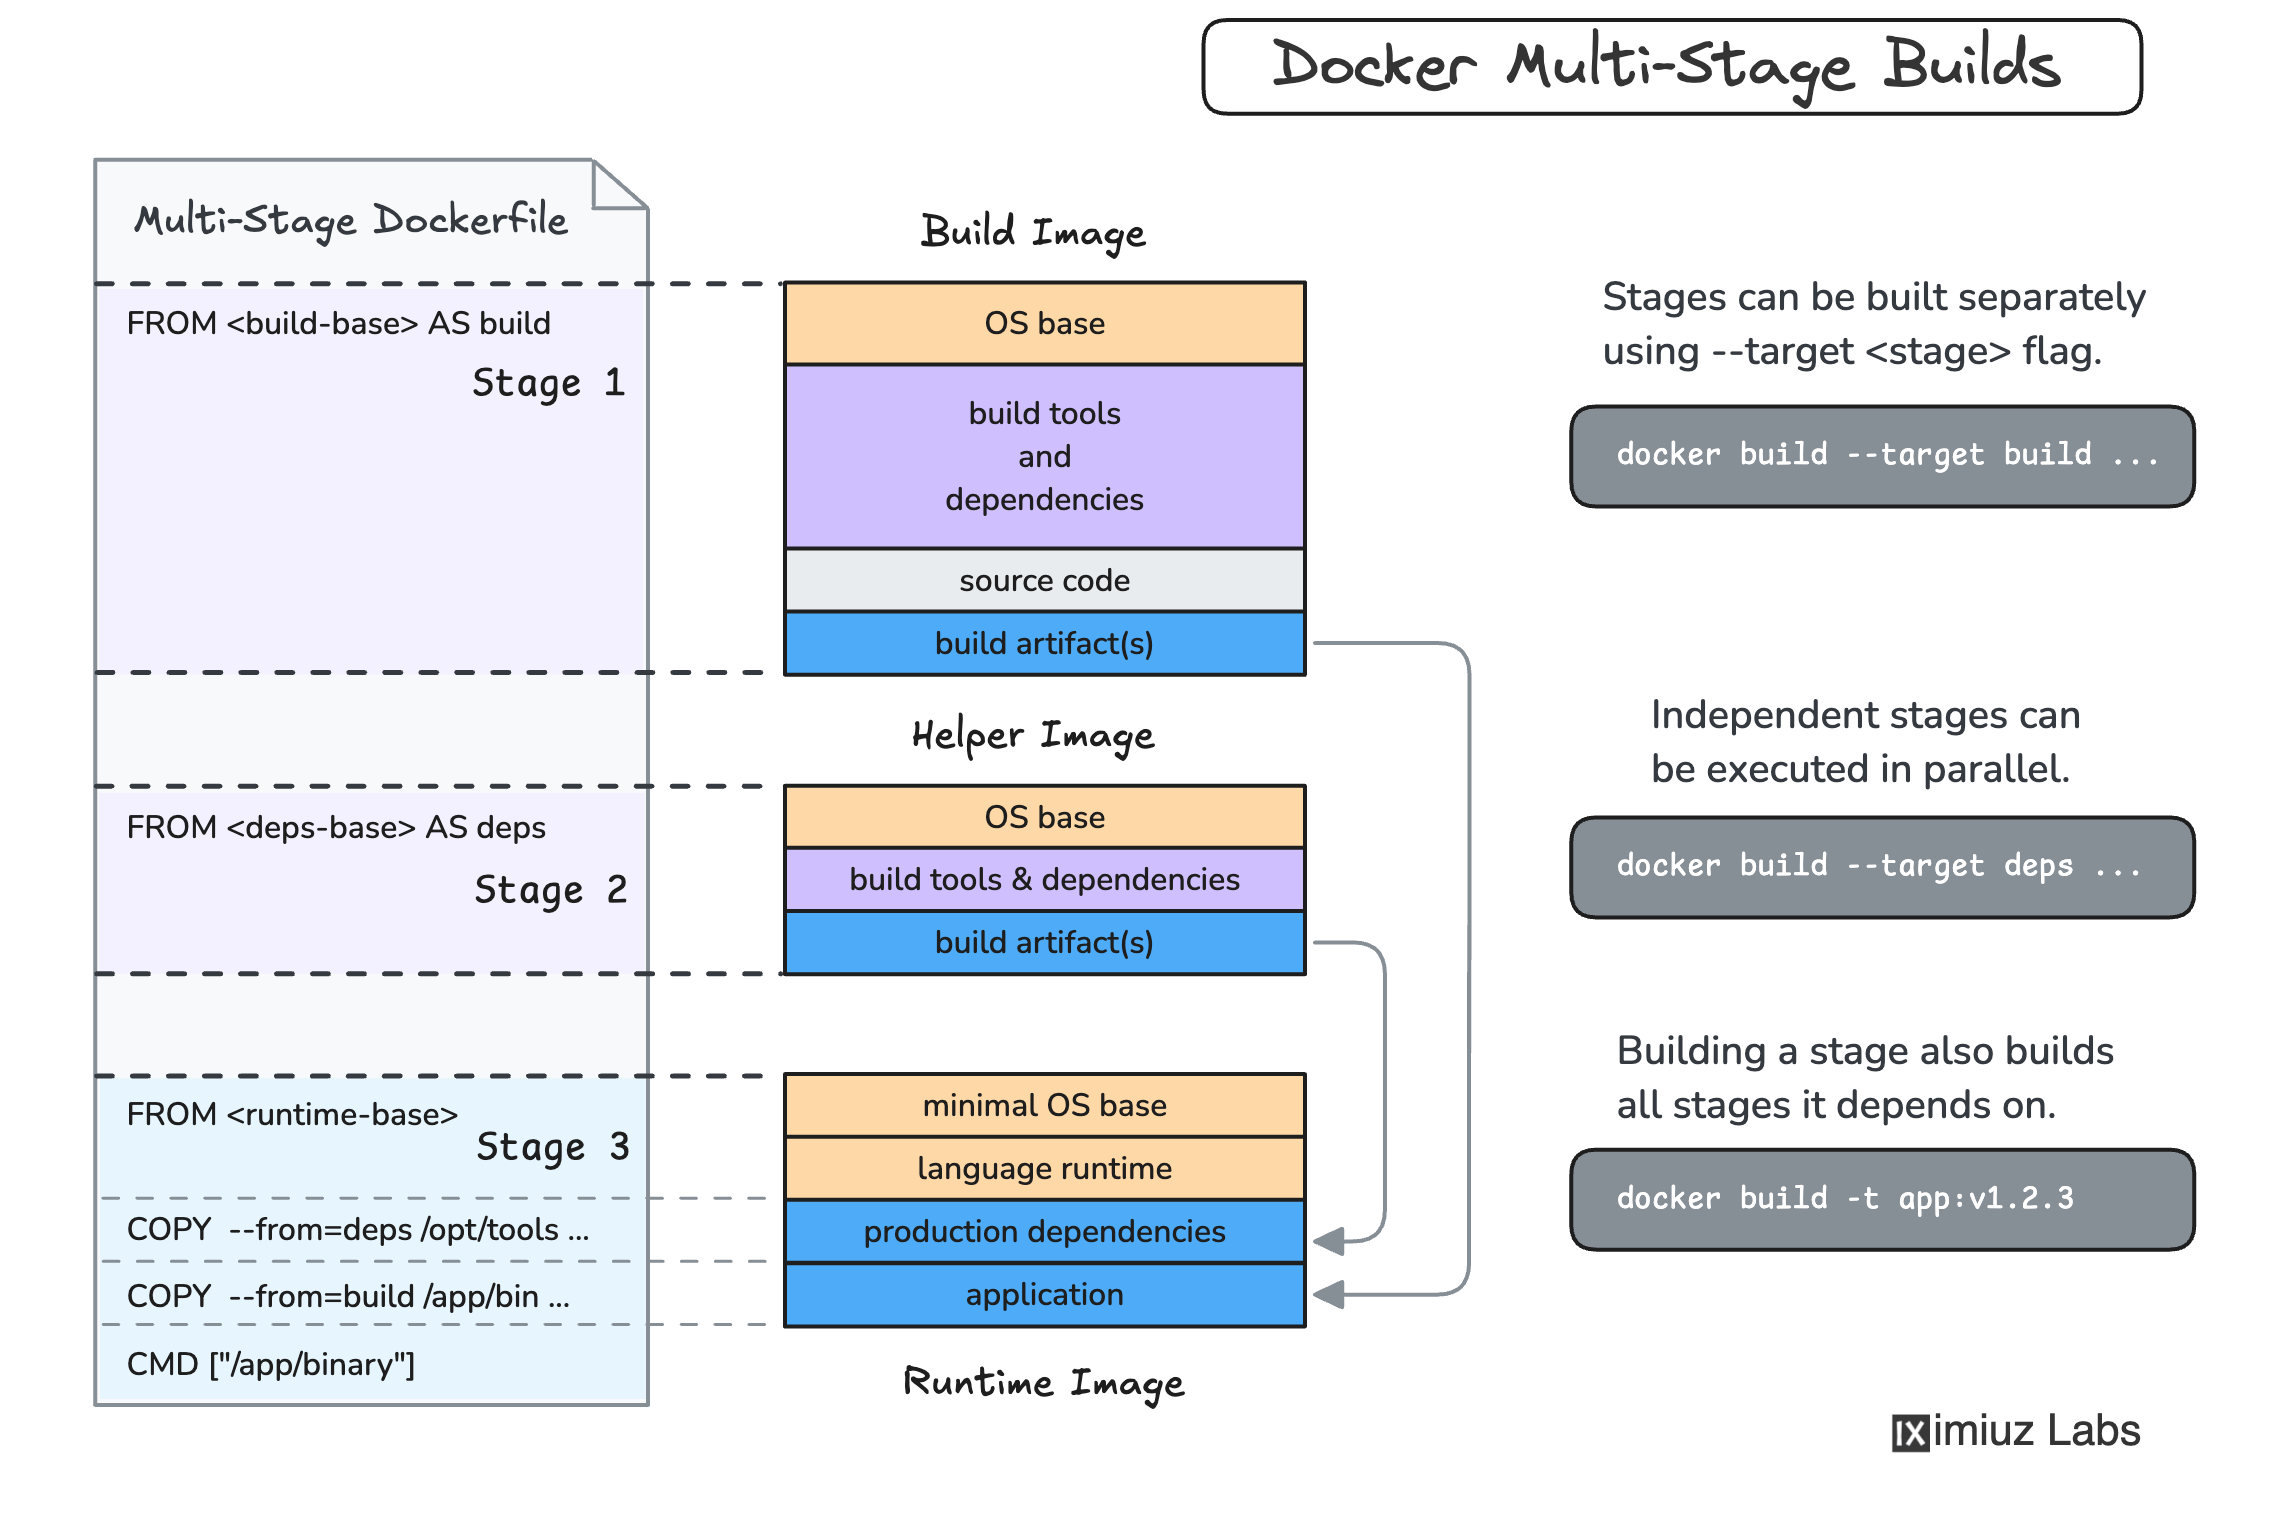
Think of it this way: when you deploy a Django project, you don't copy your entire local development folder with its venv containing tools like django-debug-toolbar to the production server. Instead, you perform a clean installation of only the production dependencies. A multi-stage Dockerfile automates this separation of concerns.
Building an Efficient Python Docker Image
The following video provides an excellent step-by-step guide to transforming a basic, inefficient Dockerfile into a highly optimized one using modern tools and techniques. We'll walk through its key concepts together.
This Is How You Write an Efficient Python Dockerfile
First, let's watch the beginning of this video from the ArjanCodes channel. It will introduce a simple FastAPI app and a basic Dockerfile, demonstrating the problems of large image size and slow build times that we just discussed.
Watch from the start until 2:55. Pay attention to the initial Dockerfile structure and the resulting image size (almost 1GB) and build time.
Now that you've seen the baseline, let's explore the key optimization principles.
1. Choose a Slim Base Image
The first and easiest optimization is to start with a smaller base image. The full python image is based on Debian and includes many compilers and tools. For production, a slim or alpine variant is much better.
python:3.12-slim: A stripped-down version of the Debian-based image. It's a great default choice as it's significantly smaller but maintains compatibility with most pre-compiled Python packages (wheels).python:3.12-alpine: Based on Alpine Linux, which is incredibly small. However, it uses a different C standard library (muslinstead ofglibc), which can sometimes require you to compile packages from source if pre-built wheels aren't available.
Let's see the impact this change has.
This Is How You Write an Efficient Python Dockerfile
Continuing with the ArjanCodes video, this next segment demonstrates the immediate benefit of switching to a python-slim-bookworm image.
Watch from 2:55 to 5:08. Notice how just changing the base image reduces both build time and final image size.
2. Optimize Layer Caching and File Copying
Docker builds images in layers, and it caches each layer. If a layer's instruction and its inputs haven't changed, Docker reuses the cached layer instead of rebuilding it. To take advantage of this:
- Order matters: Place instructions that change infrequently (like installing dependencies) before instructions that change frequently (like copying your source code).
- Be specific: Copy only what you need. Instead of
COPY . ., copy files selectively. First, copy just the dependency file (requirements.txtorpyproject.toml), install dependencies, and then copy the rest of your application code. This way, code changes won't trigger a re-installation of all dependencies. - Use
.dockerignore: Create a.dockerignorefile in your project root to exclude files and directories like.git,.venv, and__pycache__/from the build context. This speeds up the build and prevents secrets or unnecessary files from ending up in your image.
3. Implement the Multi-Stage Build
Now for the main event. We will create two stages: builder and final.
This Is How You Write an Efficient Python Dockerfile
This is the core of our lesson. The video will now walk you through refactoring the Dockerfile into a multi-stage build. It separates the dependency installation from the final runtime environment, leading to a massive reduction in image size.
Watch from 9:16 to 11:42. Pay close attention to: The FROM ... AS builder syntax to define the first stage. How dependencies are installed into a virtual environment (.venv) inside the builder stage. The second FROM statement that starts the clean, final stage. The COPY --from=builder /path/to/venv ./venv command that copies only the installed packages to the final image.
4. Security Best Practices: Run as a Non-Root User
By default, containers run as the root user. This is a security risk. If an attacker were to find a vulnerability in your application, they would gain root access inside the container. A crucial best practice is to create a dedicated, unprivileged user to run your application.
This Is How You Write an Efficient Python Dockerfile
Finally, let's add a critical security enhancement. This last segment shows how to create and switch to a non-root user inside your Dockerfile.
Watch from 14:52 to the end (16:34). Observe the RUN addgroup ... and RUN adduser ... commands, followed by the USER appuser instruction before the final CMD.
Your Production-Ready Dockerfile
By combining all these techniques, we arrive at a robust, optimized, multi-stage Dockerfile. The following resource provides a clear, text-based example that you can use as a template. It uses a slightly different method for installing dependencies (--prefix instead of a venv), but the principle is identical.
Slimmer FastAPI Docker Images with Multi-Stage Builds
This article, 'Slimmer FastAPI Docker Images with Multi-Stage Builds', provides a great, well-commented Dockerfile that puts all these concepts together. It's an excellent reference to have alongside the video.
Read through the article, focusing on the example Dockerfile and the breakdown that follows. Notice how it clearly separates the 'Builder Stage' from the 'Final Stage'. Also, read the final section, 'Why Slim Docker Images Are Good', which reinforces the benefits of this approach.
Here is an example Dockerfile that combines the best practices from our resources, using a poetry-based project structure similar to what you might use.
# Stage 1: The "builder" stage
# We use a slim Python image to install dependencies
FROM python:3.12-slim AS builder


# Set working directory
WORKDIR /app


# Install poetry
RUN pip install poetry


# Copy only the files needed to install dependencies
COPY poetry.lock pyproject.toml ./


# Install dependencies, creating a virtual environment in /app/.venv
# --no-dev excludes development dependencies like pytest
RUN poetry install --no-dev


# Stage 2: The "final" or "runtime" stage
# We start from a fresh, clean slim image
FROM python:3.12-slim AS final


# Set working directory
WORKDIR /app


# Create a non-root user to run the application
RUN addgroup --system app && adduser --system --group app


# Copy the virtual environment from the builder stage
COPY --from=builder /app/.venv ./.venv


# Copy the application source code
COPY ./app ./app


# Set the PATH to include the virtual environment's executables
ENV PATH="/app/.venv/bin:$PATH"


# Change ownership of the app directory to the non-root user
RUN chown -R app:app /app


# Switch to the non-root user
USER app


# Command to run the application using uvicorn
CMD ["uvicorn", "app.main:app", "--host", "0.0.0.0", "--port", "8000"]
To build this image, you would run docker build -t my-fastapi-app . from your project root. The resulting my-fastapi-app image will be dramatically smaller and more secure than the one from our initial naive attempt.
Conclusion
Congratulations! You have learned one of the most important skills for modern application deployment: creating optimized, production-ready Docker images. This process is fundamental to building scalable, secure, and maintainable systems.
Key Takeaways:
- Containers provide isolation: Docker packages your application and its dependencies into a portable unit.
- Multi-stage builds are essential for production: They separate build-time tools from the final runtime environment, resulting in lean and secure images.
- Optimization is a multi-step process:
- Start with a slim base image (
python-slim). - Structure your
Dockerfileto leverage layer caching by installing dependencies before copying code. - Use a
.dockerignorefile to keep your build context clean. - Run your application as a non-root user for better security.
- Start with a slim base image (
- The benefits are significant: Smaller images lead to faster deployments, lower storage costs, and a reduced attack surface.
Preview of the Next Lesson:
Now that we know how to containerize our FastAPI application, what about the other services it depends on, like a database? In the next lesson, we will learn how to create a docker-compose.yml file to orchestrate the application and its database for local development. This will allow you to spin up your entire multi-service application with a single command, streamlining your development workflow.