Hello! Welcome back to our course on FastAPI.
In the previous lesson, we established a robust, centralized error handling strategy using custom exceptions and global handlers. This allows our application to produce consistent error responses. Now, the logical next step is to communicate these possibilities to our API consumers.
This brings us to today's learning outcome: Declare different status codes and multiple possible responses for a single endpoint in the OpenAPI documentation.
An API is only as good as its documentation. If a developer using your API only knows about the "happy path" (the successful 200 OK response), they can't build resilient client applications that properly handle errors like "Not Found" or "Invalid Data". Today, you'll learn how FastAPI's first-class support for OpenAPI allows you to declaratively document every possible response, making your APIs truly self-describing.
For someone with your background, this is FastAPI's direct and, arguably, more integrated answer to using libraries like drf-spectacular with @extend_schema decorators in Django REST Framework to document API behavior.
1. Setting the Primary Status Code
By default, FastAPI assumes a successful response from a path operation will have a 200 OK status code. This is fine for most GET requests, but for other methods, different codes are more appropriate according to RESTful conventions. For instance, successfully creating a new resource via a POST request should return a 201 Created status code.
You can specify the success status code for an endpoint using the status_code parameter in the path operation decorator.
To see this in action, let's watch a segment from a tutorial you've seen before.
Python FastAPI Tutorial (Part 4): Pydantic Schemas - Request and Response Validation
In this clip from Corey Schafer's Python FastAPI Tutorial, he demonstrates how to create a POST endpoint and explicitly sets the success status code to 201.
Watch from 12:39 to 15:31. Focus on how he adds status_code=status.HTTP_201_CREATED to the @app.post decorator and explains why 201 is a best practice for resource creation.
As you saw, setting the primary status code is straightforward:
from fastapi import FastAPI, status
from pydantic import BaseModel


# Assume PostCreate and PostResponse schemas are defined
# as in the video.

app = FastAPI()

@app.post(
    "/posts",
    response_model=PostResponse,
    status_code=status.HTTP_201_CREATED  # This is the key part!
)
def create_post(post: PostCreate):


    # ... logic to create and save the post ...
    new_post = ...
    return new_post
Using the status module (e.g., status.HTTP_201_CREATED) instead of the raw integer 201 is a best practice. It improves readability and helps avoid magic numbers in your code.
2. Documenting Multiple Responses with responses
Now for the main event: documenting all possible responses, including errors. FastAPI provides the responses parameter in the path operation decorator for this exact purpose. It takes a dictionary where keys are the HTTP status codes and the values are dictionaries describing the response.
Let's imagine a GET endpoint for retrieving an item. It has two main outcomes:
- 200 OK: The item is found and returned.
- 404 Not Found: An item with the given ID doesn't exist.
We've already seen how to use response_model to document the 200 OK response. We can use responses to document the 404 error.
The official FastAPI documentation has the perfect guide for this.
Additional Responses in OpenAPI - FastAPI
This document, 'Additional Responses in OpenAPI', is the definitive guide to using the responses parameter. It will show you how to declare responses with different status codes and even different Pydantic models.
Read the introduction, the section 'Additional Response with model', and the section 'Combining information'. Focus on the structure of the responses dictionary and how you can specify a Pydantic model for an error response.
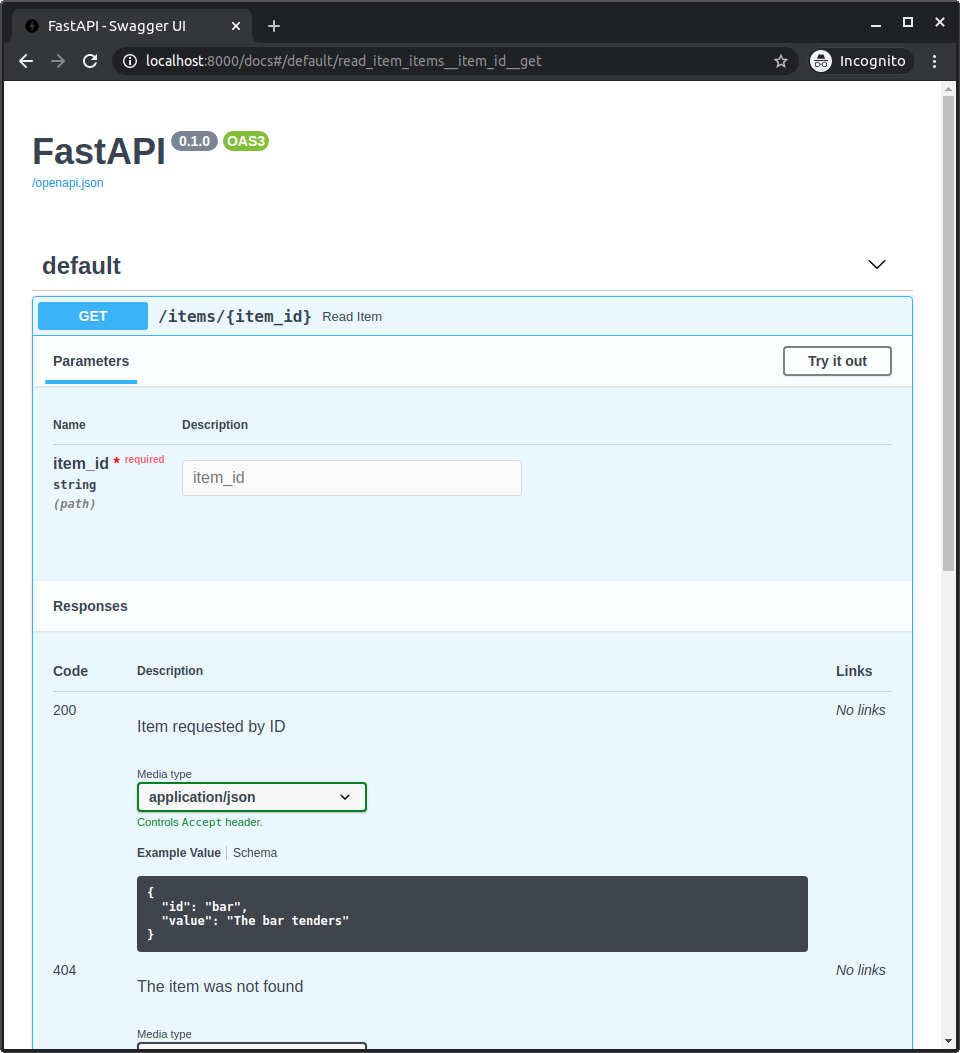
Let's synthesize what you've just read. To document both the successful retrieval and the "not found" error for an endpoint, you combine response_model and responses:
from fastapi import FastAPI, HTTPException
from pydantic import BaseModel


# Schema for the successful response data
class Item(BaseModel):
    id: str
    value: str


# Schema for the error message
class Message(BaseModel):
    message: str

app = FastAPI()

@app.get(
    "/items/{item_id}",
    response_model=Item,  # Documents the 200 OK response
    responses={
        404: {"model": Message, "description": "The item was not found"}
    }  # Documents the 404 Not Found response
)
async def read_item(item_id: str):
    if item_id == "foo":
        return {"id": "foo", "value": "Found it!"}
    else:


        # As we learned last lesson, you would raise an exception here.
        # FastAPI's default handler or your custom one would create the response.
        # This documentation makes that behavior explicit.
        raise HTTPException(status_code=404, detail="Item not found")
When you run this and visit your /docs page, FastAPI generates a rich, interactive UI that shows both possibilities clearly.
Analogy to Django REST Framework
In DRF with drf-spectacular, you'd achieve a similar result with a more verbose decorator:
# In DRF with drf-spectacular
from drf_spectacular.utils import extend_schema, OpenApiResponse

@extend_schema(
    responses={
        200: ItemSerializer,
        404: OpenApiResponse(response=MessageSerializer, description="The item was not found"),
    }
)
@api_view(['GET'])
def read_item(request, item_id):


    # ...
As you can see, FastAPI integrates this functionality more natively into its core decorator system, making it a bit more streamlined.
3. Applying Responses to an Entire Router
In any reasonably sized application, you'll have common responses that apply to many endpoints. For example, almost every endpoint in a "users" module might return a 404 Not Found if the user ID is invalid. Repeating the responses={404: ...} dictionary in every path operation decorator violates the DRY principle.
Just as you can set a common prefix or tags on an APIRouter, you can also set common responses.
Bigger Applications - Multiple Files - FastAPI
The documentation on building bigger applications shows how to add configuration, including default responses, directly to an APIRouter.
Read the section 'Another module with APIRouter' and 'Add some custom tags, responses, and dependencies'. Notice how responses={404: {"description": "Not found"}} is passed to the APIRouter constructor, and how a specific endpoint can add another response (403) on top of that.
This is a powerful pattern for maintaining consistency. Here's how it looks:
from fastapi import APIRouter, HTTPException

router = APIRouter(
    prefix="/items",
    tags=["items"],
    responses={404: {"description": "Not found"}}  # Applied to all routes in this router
)

@router.get("/{item_id}")
async def read_item(item_id: str):


    # ... logic that might raise a 404 error
    if item_id not in fake_items_db:
        raise HTTPException(status_code=404, detail="Item not found")
    return {"name": fake_items_db[item_id]["name"]}

@router.put(
    "/{item_id}",


    # You can add more specific responses here
    responses={403: {"description": "Operation forbidden"}}
)
async def update_item(item_id: str):


    # ... logic that might raise 403 or 404
    if item_id not in fake_items_db:
        raise HTTPException(status_code=404, detail="Item not found")
    if item_id == "plumbus":
        raise HTTPException(status_code=403, detail="Plumbus cannot be updated")
    return {"item_id": item_id, "name": "The great Plumbus"}
In the example above:
read_itemautomatically gets the404 Not Founddocumentation from the router.update_itemgets the404documentation from the router and has its own specific403 Forbiddendocumentation. FastAPI intelligently merges them.
This separation of concerns—defining common behavior at the router level and specific behavior at the endpoint level—is a hallmark of well-structured FastAPI applications.
Conclusion
In this lesson, you have learned how to create a comprehensive and explicit API contract by documenting all possible success and error responses. This is a critical skill for building professional APIs that are easy for other developers to understand and consume.
Key Takeaways:
- Use the
status_codeparameter in path operation decorators to define the primary success status code (e.g.,status.HTTP_201_CREATED). - Use the
responsesparameter to declare additional responses, especially for error cases like404 Not Foundor422 Unprocessable Content. - You can associate Pydantic models with your extra responses (e.g.,
{"model": MyErrorModel}) to fully document the structure of error payloads. - To keep your code DRY, apply common responses to an entire
APIRouter, which will be inherited by all path operations within it.
Preview of the Next Lesson:
So far, all our data has been temporary and stored in memory. To build real-world applications, we need to persist data. In our next lesson, we will begin the "Database Integration" module and tackle the first outcome: Set up async SQLAlchemy with FastAPI, contrasting it with the Django ORM's synchronous model. This will be a significant step, moving us into the world of asynchronous database operations, one of FastAPI's core strengths.