Welcome back! In our last lesson, you learned how to subscribe to events generated by Azure services using system topics. We saw how this enables you to automate workflows, for instance, by triggering an Azure Function when a file is uploaded to Blob Storage.
Today, we'll flip the script. Instead of just reacting to Azure's events, we will make our own applications the source of events. This lesson focuses on a core skill for building decoupled, microservice-based architectures: publishing custom events to an Azure Event Grid topic using the .NET SDK. Given your deep experience with .NET, you'll be able to quickly grasp the SDK mechanics, allowing us to focus on the event-driven patterns themselves.
By the end of this lesson, you will be able to write a C# application that can announce important business moments—like a new order being placed—to the rest of your system through Event Grid.
1. From System Topics to Custom Topics
In the previous lesson, we worked with system topics, which are built-in endpoints for Azure services. When your application needs to be an event source, you create a custom topic.
A custom topic is a user-defined endpoint that your applications can publish events to. It acts as a central point for distributing your application's events, allowing other services to subscribe and react without being tightly coupled to the original application.
For a quick refresher on the core concepts of Event Grid, including the role of topics, watch the first two minutes of this video.
This video from Adam Marczak - Azure for Everyone provides a concise overview of Event Grid's key concepts.
Watch the short segment from on key concepts. Focus on the definitions of an event source, a topic (especially for custom events), an event subscription, and an event handler. This will set the stage for the components we're about to build.
2. Creating a Custom Topic
Before your .NET application can publish an event, it needs a destination. This destination is your custom Event Grid topic in Azure. You can create this using the Azure Portal, CLI, or an ARM/Bicep template.
The following video demonstrates how to create a custom topic and then publish to it from a .NET console application. We will focus on the creation and publishing parts.
AZ-204 - Connect and Consume Services - Azure Event Grid
This video by Alan Rodrigues provides a detailed, practical walkthrough of publishing custom events from a .NET application.
First, watch the section where a custom topic is created in the Azure Portal: Topic creation. Next, watch the core demonstration of publishing an event from a C# console application. Follow along as the presenter: Installs the Azure.Messaging.EventGrid NuGet package. Package install Retrieves the topic endpoint and an access key from the Azure portal. Get credentials Initializes the EventGridPublisherClient with these credentials. Client setup Defines a custom data object (Order), constructs an EventGridEvent, and sends it. Create and send event You can stop at 00:57:16, as the rest of the video deals with the event handler, which we will cover in our next lesson.
3. Publishing Events with the .NET SDK
As you saw in the video, the Azure.Messaging.EventGrid library is the primary tool for interacting with Event Grid from a .NET application. Let's formalize the steps and look at the code in more detail.
Step 1: Install the Package and Authenticate the Client
First, you need the SDK. The official Microsoft documentation provides the command.
Azure Event Grid client library for .NET
This is the official documentation for the SDK. It's the source of truth for installation, authentication, and usage.
Focus on three parts: Under Getting started, find the dotnet add package command in the Install the package section. In the Authenticate the Client section, note that you need an endpoint and a credential (access key). Under Authenticate using Topic Access Key, review the C# code snippet that shows how to instantiate the EventGridPublisherClient.
Your client initialization code will look like this, using the endpoint and key from the custom topic you created in Azure:
using Azure;
using Azure.Messaging.EventGrid;
using System;

// Get your topic endpoint and access key from the Azure portal.
string topicEndpoint = "YOUR_TOPIC_ENDPOINT"; // e.g., https://my-custom-topic.eastus-1.eventgrid.azure.net/api/events
string topicAccessKey = "YOUR_TOPIC_ACCESS_KEY";

var client = new EventGridPublisherClient(
    new Uri(topicEndpoint),
    new AzureKeyCredential(topicAccessKey)
);
Step 2: Choose an Event Schema
Event Grid supports two primary event schemas:
- Event Grid Schema: The native, Azure-specific schema. The
EventGridEventclass in the SDK corresponds to this. - CloudEvents v1.0 Schema: A standardized, open-source specification from the Cloud Native Computing Foundation (CNCF). It's designed for interoperability across different cloud providers and services. The
CloudEventclass corresponds to this.
For new development, using the CloudEvents schema is generally recommended as it makes your architecture more portable. The AZ-204 exam expects you to be familiar with both.
Step 3: Construct and Send the Event
To publish an event, you create an instance of CloudEvent (or EventGridEvent), populate its properties, and use the client's SendEventAsync method.
The following article provides a concise code example for publishing an event using the CloudEvent schema. This reinforces the concepts with a slightly different example.
How to Implement Event-Driven Architecture with Azure Event Grid ...
This blog post provides another clear, code-first example of publishing a custom event.
Read the section Publishing Events. Notice how a CloudEvent is constructed. It requires a source, type, and your custom data (jsonSerializableData). It also shows how to add an optional Subject for more granular filtering by subscribers.
When working with CloudEvent, be aware of the required attributes. A common mistake is forgetting to set the Id property, which is mandatory.
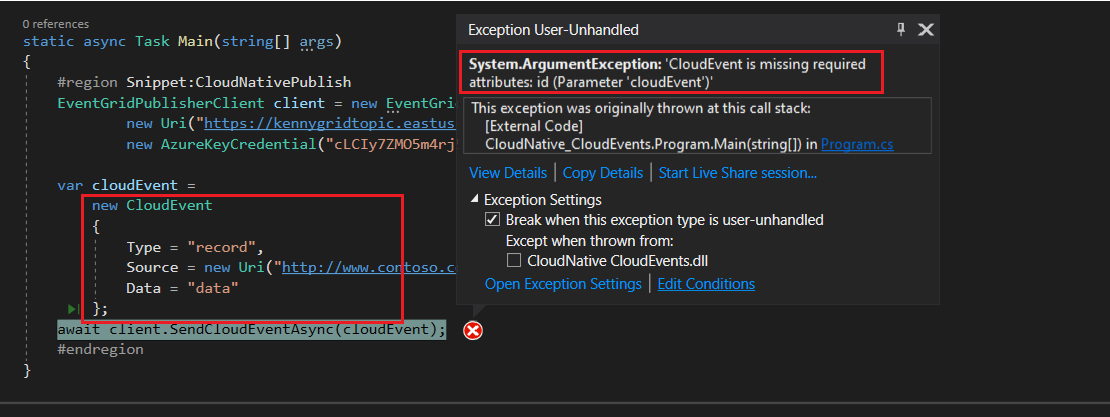
After successfully publishing, your event will appear in the Event Grid topic. Subscribers can then receive it. Tools like the Azure Event Grid Viewer can be used for debugging to see the exact payload that was sent.

Complete C# Example
Here is a complete, runnable example using your C# skills to publish a custom OrderPlaced event using the CloudEvent schema.
using Azure;
using Azure.Messaging.EventGrid;
using System;
using System.Threading.Tasks;

public class Program
{
    public static async Task Main(string[] args)
    {
        // 1. Client setup
        var client = new EventGridPublisherClient(
            new Uri("YOUR_TOPIC_ENDPOINT"),
            new AzureKeyCredential("YOUR_TOPIC_ACCESS_KEY")
        );

        // 2. Define custom event data
        var orderData = new
        {
            OrderId = $"ORD-{new Random().Next(1000, 9999)}",
            Amount = 42.50,
            Currency = "USD"
        };

        // 3. Construct the CloudEvent
        var cloudEvent = new CloudEvent(
            // Source: Uniquely identifies the context in which an event happened.
            source: "/my-app/orders-service",
            // Type: Describes the event type. Used for filtering by subscribers.
            type: "com.mycompany.orders.placed",
            // Data: The event payload. The SDK will serialize this to JSON.
            jsonSerializableData: orderData
        )
        {
            // Id: A unique identifier for the event. Required by the CloudEvents spec.
            Id = Guid.NewGuid().ToString(),
            // Subject: Optional path for filtering. Often the resource the event is about.
            Subject = $"orders/{orderData.OrderId}",
            // Time: The timestamp for the event.
            Time = DateTimeOffset.UtcNow
        };

        // 4. Send the event
        try
        {
            await client.SendEventAsync(cloudEvent);
            Console.WriteLine($"Successfully published event {cloudEvent.Id} for order {orderData.OrderId}.");
        }
        catch (Exception ex)
        {
            Console.WriteLine($"Failed to publish event: {ex.Message}");
        }
    }
}
Conclusion
In this lesson, you learned how to make your .NET applications first-class citizens in an event-driven architecture by publishing custom events. This is a significant step beyond simply reacting to built-in Azure events and is fundamental to building scalable, loosely-coupled systems.
Here are the key takeaways:
- Custom Topics are endpoints you create in Azure to receive events from your own applications.
- The
Azure.Messaging.EventGridNuGet package is the .NET SDK for publishing events. - The
EventGridPublisherClientis used to send events and is authenticated using the topic's endpoint and an access key. - You can structure your events using the
EventGridEventclass or, preferably, theCloudEventclass for better interoperability. - The
SendEventAsyncandSendEventsAsyncmethods publish single or batched events to the topic.
We've now covered how to send a custom event. The logical next step is to receive it. In the next lesson, we will implement an event handler to consume these custom events, completing the end-to-end workflow.