Hello! Welcome to the first lesson of your C++ and Skia course. Your goal is to build a high-performance, feature-rich digital whiteboard, a project that sits squarely at the intersection of system programming and graphics rendering. It's an ambitious and exciting goal. Before we can dive into the complexities of rendering with Skia or optimizing data structures, we need to lay a solid foundation. In C++, this foundation starts with the build system.
This lesson will focus on configuring your project using CMake. For a project like yours, which will eventually depend on several external libraries (Skia, SDL2, PDFium), having a robust and maintainable build process is not a luxury—it's a necessity. We will cover how to define your project, compile code, create libraries, and, most importantly, manage dependencies in a clean, modern way. By the end of this lesson, you'll be able to set up a C++ project from scratch, preparing you for the C++ language features we'll explore next.
What is CMake?
First, it's important to understand what CMake is and what it isn't. You might have used build tools like make before. While make directly reads a Makefile to compile and link code, CMake works at a higher level of abstraction.
CMake is a build system generator. You write a set of instructions in files named CMakeLists.txt. CMake reads these files and generates the actual build files for a specific environment, such as Makefiles for Linux/macOS, Ninja build files, or Visual Studio solutions for Windows. This two-stage process is what makes CMake so powerful and cross-platform. You define your project's structure and dependencies once, and CMake handles the specifics of the underlying build tools.
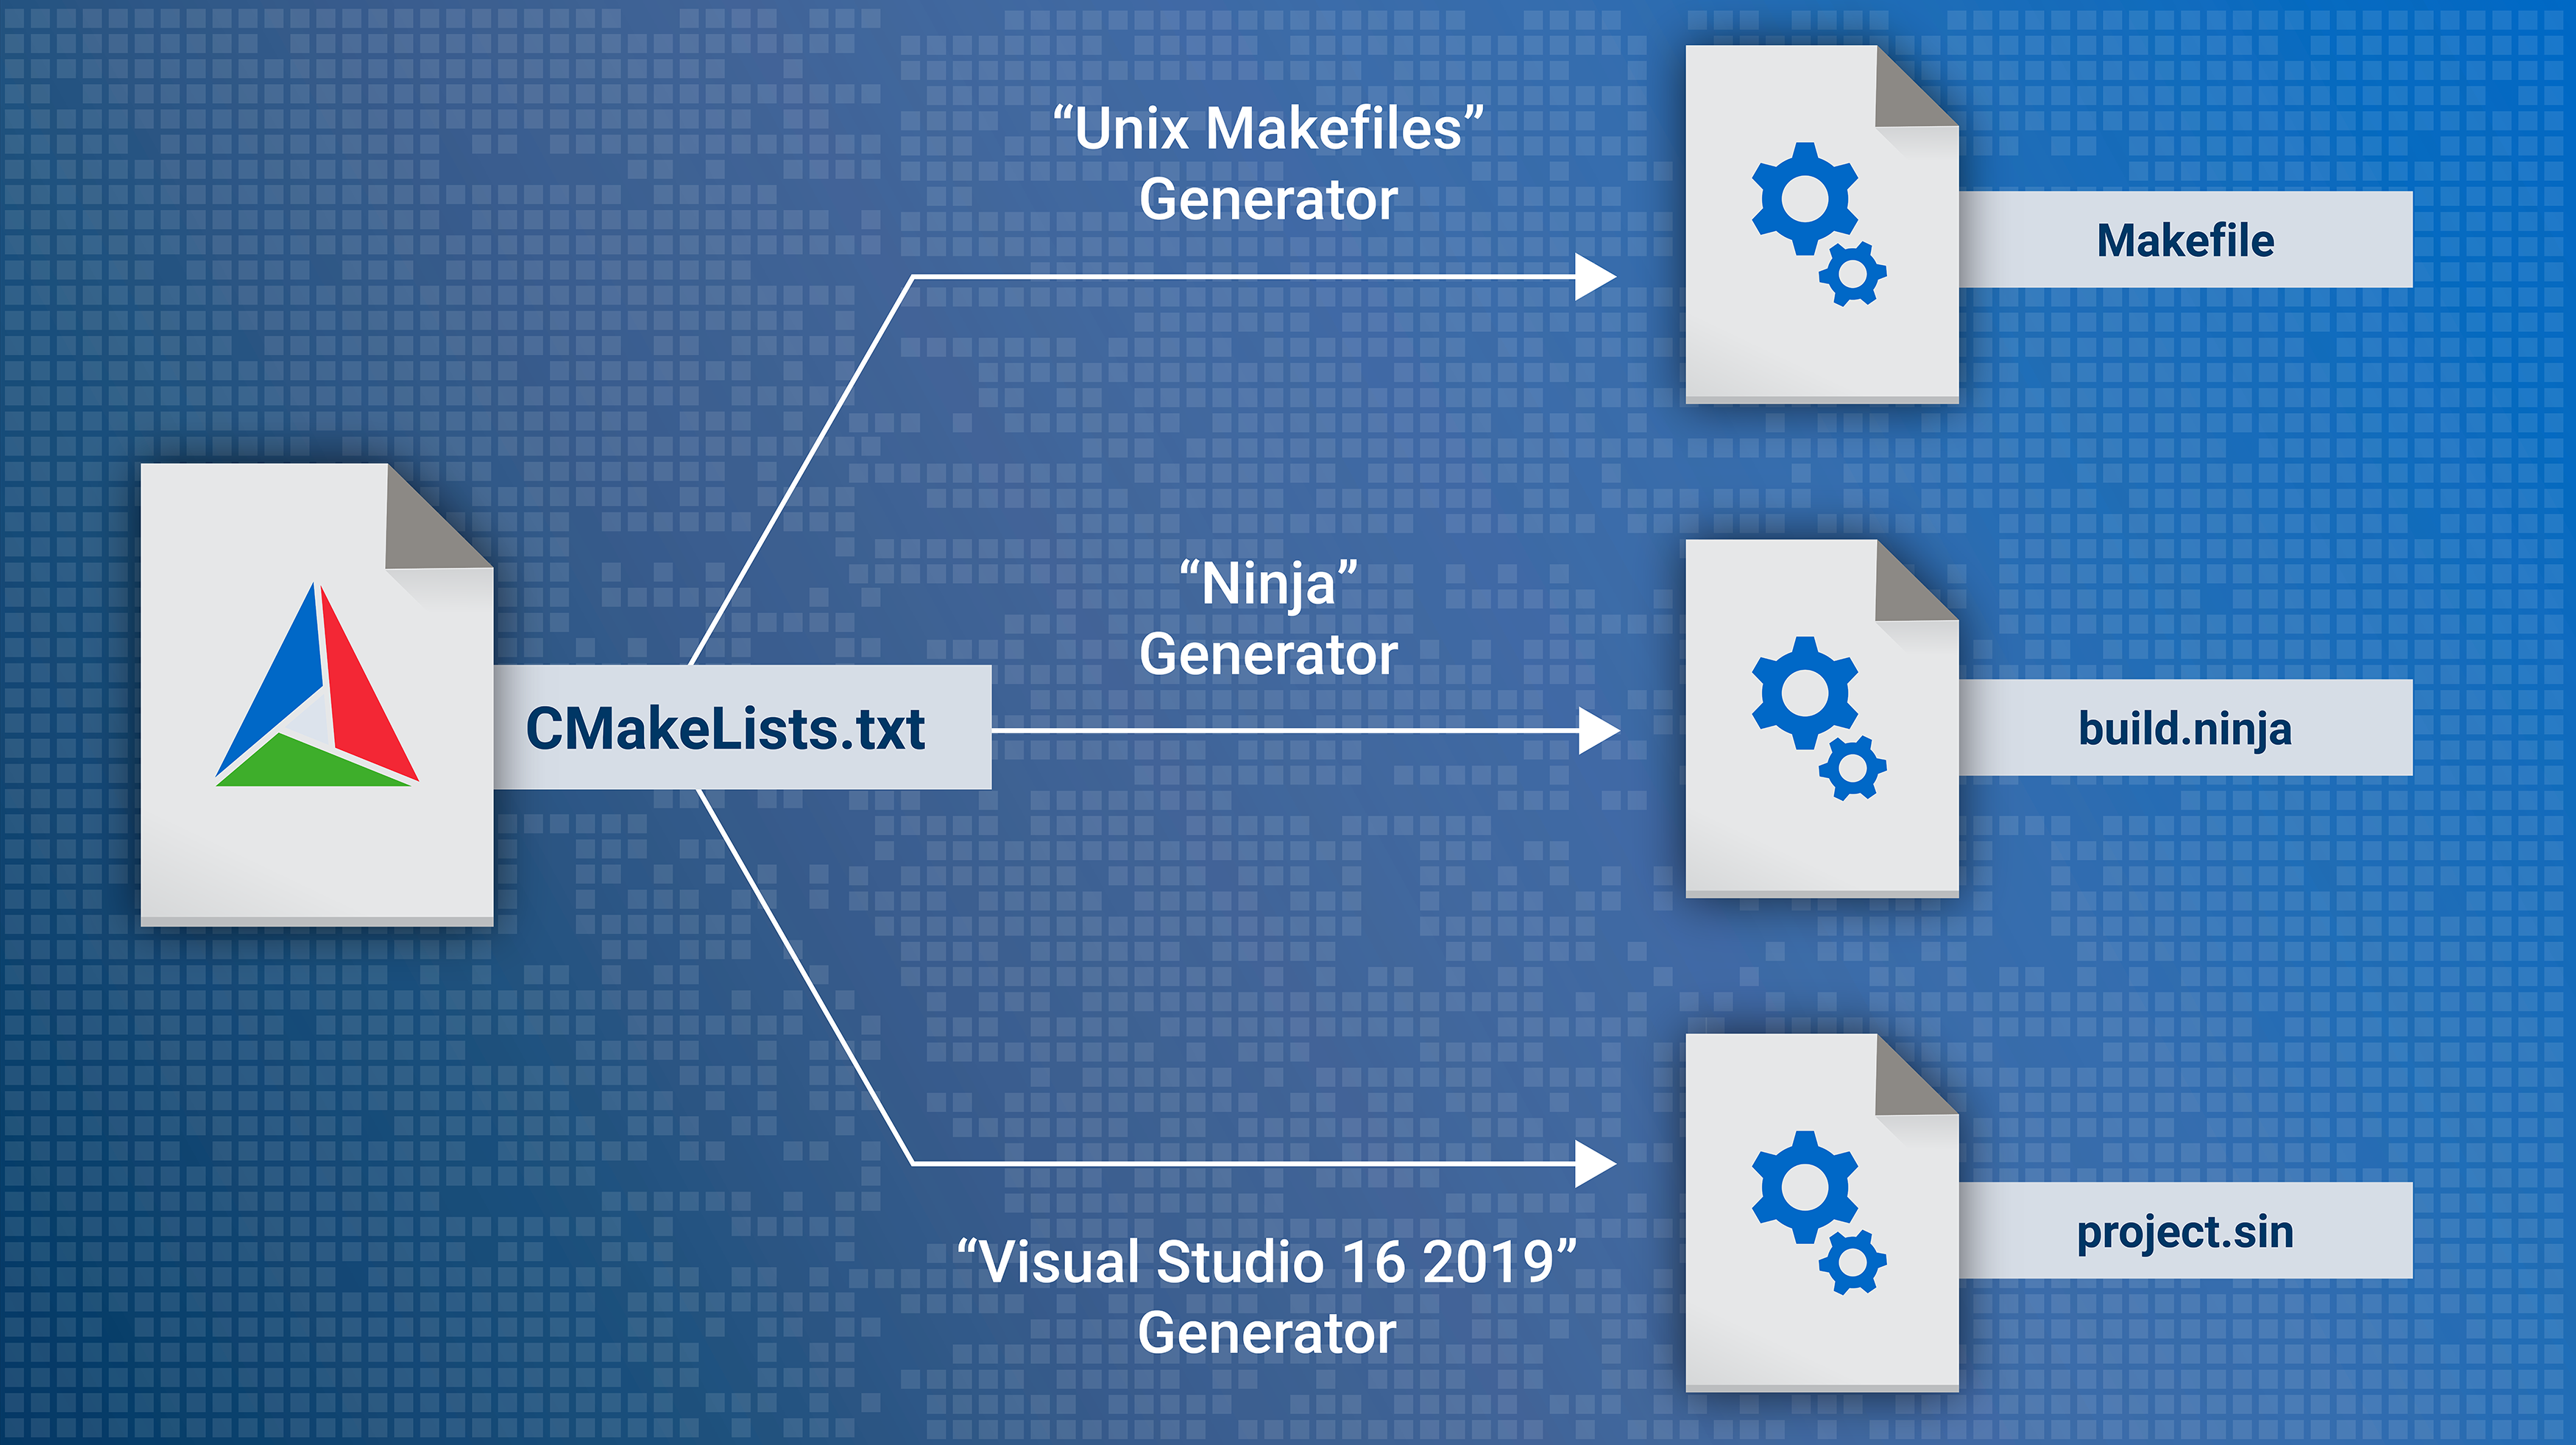
To begin, let's look at the basic philosophy of CMake.
[PDF] CMake: Best Practices - Jefferson Lab Indico
This document provides a concise overview of CMake's role and its importance in the C++ ecosystem. It's a great starting point for understanding the 'why' before we get to the 'how'.
Please read the first few slides, focusing on the sections What is CMake?, which distinguishes it from a direct build system, and Why CMake?, which explains its industry-wide adoption.
Your First CMake Project
Let's get hands-on by creating a minimal C++ project. The best practice for any CMake project is to perform an out-of-source build. This means all temporary build files, caches, and the final executables are kept in a separate directory (e.g., build/) from your source code. This keeps your project directory clean and makes it easy to start a fresh build by simply deleting the build directory.
We'll follow these steps:
- Create a project folder (e.g.,
Whiteboard). - Inside it, create a
main.cppfile and aCMakeLists.txtfile. - Create a
builddirectory. - From inside the
builddirectory, run CMake to configure the project, then run the build command to compile it.
The following video provides a practical demonstration of this entire process. It covers creating the initial CMakeLists.txt, compiling a simple executable, and the standard command-line workflow.
The "Practical Software" channel gives a clear, step-by-step tutorial on setting up a basic CMake project from scratch within an isolated environment, which is perfect for understanding the fundamentals.
Watch the segment from this section. The presenter will guide you through: Creating the CMakeLists.txt file. Using cmake_minimum_required and project. Adding a simple C++ source file with add_executable. The out-of-source build process: running cmake from a build directory and then compiling with make.
After watching, your CMakeLists.txt should look something like this:
# Specify the minimum version of CMake required. This also sets policies
# to ensure modern, consistent behavior.
cmake_minimum_required(VERSION 3.16)


# Define the project name.
project(Whiteboard LANGUAGES CXX)


# Add an executable target named "whiteboard_app" from the source file "main.cpp".
add_executable(whiteboard_app main.cpp)
And your main.cpp can be a simple "Hello, World!":
#include <iostream>

int main() {
    std::cout << "Hello, Whiteboard!" << std::endl;
    return 0;
}
The commands to build this, following the out-of-source pattern, would be:
# From your project's root directory
mkdir build
cd build
cmake ..
cmake --build .
The first cmake command configures the project, and cmake --build . invokes the actual build tool (like make or Ninja) to compile your code.
Thinking in Targets: The Modern CMake Approach
In "classic" CMake, it was common to manage project settings globally. Developers would use commands like include_directories() or add_definitions() to apply settings to the entire project. This approach is brittle and does not scale. If you have many components, it quickly becomes impossible to reason about their individual dependencies, leading to the "dependency hell" illustrated in the diagram below.
Modern CMake revolves around the concept of targets. A target is a logical component of your project—either an executable (add_executable) or a library (add_library). Instead of setting properties globally, you attach them directly to the targets that need them.
This target-centric approach is the key to creating modular, maintainable, and scalable C++ projects. To understand the "why" behind this shift, the following talk excerpt is invaluable.
Modern CMake for modular design - Mathieu Ropert - Meeting C++ 2017
In this segment from his "Modern CMake for modular design" talk, Mathieu Ropert vividly explains the pitfalls of the old, flag-based approach and why thinking in terms of dependencies between modules is superior.
Watch the section from here. Pay close attention to how managing dependencies by manually adding include paths and compiler flags leads to an unmaintainable mess. This provides the motivation for the target-based approach we're about to learn.
Encapsulating Dependencies with PUBLIC, PRIVATE, and INTERFACE
When you define a relationship between targets, you must specify its visibility. CMake uses three keywords for this: PUBLIC, PRIVATE, and INTERFACE.
Let's say we have a library libA that our executable my_app uses.
PRIVATE: APRIVATEdependency oflibAis an implementation detail. For example, iflibAuses another librarylibBinternally in its.cppfiles, butlibB's headers are not included inlibA's public headers.my_appwill link tolibA, but it will not know about or have access tolibB.PUBLIC: APUBLICdependency oflibAis part of its public interface. IflibA's public headers (.hfiles) include headers fromlibB, then any target that useslibA(likemy_app) also needs to know aboutlibB.my_appwill getlibA's include paths andlibB's include paths.INTERFACE: AnINTERFACEdependency is for consumers only. This is most common for header-only libraries. The library itself doesn't need to be compiled with the dependency's properties, but anyone who includes it does.
These keywords are used with commands like target_link_libraries(), target_include_directories(), and target_compile_definitions().
The following clip demonstrates these concepts with code.
Modern CMake for modular design - Mathieu Ropert - Meeting C++ 2017
This is the core of the talk, where the abstract concepts are translated into concrete CMake commands.
Watch from this segment. It clearly explains the meaning of PUBLIC/PRIVATE and then shows how to apply them using target_include_directories and target_compile_options. This is the most crucial part of modern dependency management in CMake.
Let's apply this. We'll refactor our project to have a small static library that our main application links against.
- Create
src/math/addition.handsrc/math/addition.cpp. - Update the top-level
CMakeLists.txt.
src/math/addition.h
#pragma once // Prevents the header from being included multiple times

int add(int a, int b);
src/math/addition.cpp
#include "addition.h"

int add(int a, int b) {
    return a + b;
}
main.cpp
#include <iostream>
#include "math/addition.h" // We will make this path work via CMake

int main() {
    std::cout << "2 + 3 = " << add(2, 3) << std::endl;
    return 0;
}
CMakeLists.txt
cmake_minimum_required(VERSION 3.16)
project(Whiteboard LANGUAGES CXX)


# Add a library target for our math functions.
add_library(Math STATIC
    src/math/addition.cpp
)


# Specify the include directories for the Math library.
# The "src" directory contains the public header "math/addition.h".
# This needs to be PUBLIC so that consumers of the Math library (like our app)
# can find the header.
target_include_directories(Math PUBLIC
    ${CMAKE_CURRENT_SOURCE_DIR}/src
)


# Add the main executable.
add_executable(whiteboard_app main.cpp)


# Link our app against the Math library.
# Because Math has a PUBLIC include directory, `whiteboard_app` will
# automatically get that include path, and `#include "math/addition.h"` will work.
target_link_libraries(whiteboard_app PRIVATE Math)
Here, we link whiteboard_app to Math with PRIVATE because the application itself uses Math, but it doesn't re-expose Math as part of its own public API.
Managing External Dependencies
Your project will need external libraries. CMake provides two primary mechanisms for this.
1. find_package(): Using System Libraries
If a library is already installed on the system (e.g., via a package manager like apt or brew), find_package() is the command to locate it. Modern libraries that support CMake provide "config" files that allow find_package() to create special IMPORTED targets. These targets bundle all the necessary information—include paths, library files, compile definitions—just like the targets we created ourselves.
This video demonstrates a perfect, practical example of using find_package to locate the Eigen linear algebra library and link it to an application.
Watch the segment from here. You'll see how find_package(Eigen3 ...) is called and then how the imported target Eigen3::Eigen is used in target_link_libraries. This is the standard, modern way to link against system dependencies.
2. FetchContent: Downloading Source Dependencies
For full control and reproducibility, it's often better to have CMake download and build a specific version of a library as part of your project's build process. This is what we will do for Skia. The modern way to do this is with the FetchContent module.
FetchContent downloads the dependency's source code during the configure step (when you run cmake ..) and then uses add_subdirectory() to integrate it directly into your build. This makes the dependency's targets immediately available, as if they were part of your own source tree.
This approach solves a major problem with the older ExternalProject_Add command, which only downloaded and built dependencies during the build step, making its targets invisible during configuration.
CMake FetchContent vs ExternalProject_Add: A C++ Dependency Guide
This article from studyplan.dev gives a fantastic explanation of why FetchContent is the preferred modern approach.
Start by reading the section introducing FetchContent. Then, study the clear, step-by-step example under The Workflow. Finally, read about the Find-or-Fetch Pattern, a robust strategy you'll find in many professional projects.
Here's how we might use FetchContent to add the {fmt} logging library, a common and useful dependency:
# Add this to your top-level CMakeLists.txt
include(FetchContent)

FetchContent_Declare(
  fmt
  GIT_REPOSITORY https://github.com/fmtlib/fmt.git
  GIT_TAG 8.1.1 # Pin to a specific version for reproducibility
)

FetchContent_MakeAvailable(fmt)


# ... then in your executable's section ...
# Link against the target provided by the fmt library
target_link_libraries(whiteboard_app PRIVATE fmt::fmt)
With FetchContent_MakeAvailable(fmt), the fmt::fmt target is created and ready to be used, with all its include paths and properties correctly configured.
Conclusion
You've just taken the first and most critical step in setting up a professional C++ project. Managing the build process isn't the most glamorous part of software development, but getting it right from the start will save you countless hours and headaches down the line. Your interest in high-performance and systems-level engineering means you can appreciate the value of a clean, modular, and explicit build definition.
Here are the key takeaways from today's lesson:
- CMake is a build system generator: It creates native build files from
CMakeLists.txtscripts. - Use out-of-source builds: Keep your source directory clean by building in a separate
build/folder. - Think in targets: Modern CMake is built around targets (executables and libraries). Properties are attached to targets, not set globally.
- Encapsulate with
PUBLIC,PRIVATE,INTERFACE: These keywords control how dependency properties (include paths, definitions) propagate between targets, enabling true modularity. - Manage dependencies explicitly: Use
find_packagefor pre-installed system libraries andFetchContentto download and build dependencies from source for greater control and reproducibility.
In our next lesson, we will transition from project setup to writing C++ code. We'll start with a cornerstone of modern C++: smart pointers (std::unique_ptr and std::shared_ptr). Mastering them is essential for writing safe, exception-proof, and performant code without manual memory management.