Welcome to the final lesson of our module on sequencing and visual narrative. In our previous session, you did the essential work of transforming your initial image arrangement into a refined sequence with deliberate pacing, rhythm, and a clear narrative arc. You now have a story that flows, with moments of energy and quiet that guide the viewer on an emotional journey.
Today, we will put the finishing touches on that narrative by selecting its most critical anchors: the opening and closing images. These two photographs act as the bookends for your entire project. The first one extends an invitation, and the last one offers a conclusion. Getting them right is the final, crucial step in securing the structure of your visual story before we begin to consider the book as a physical object.
Framing the Narrative
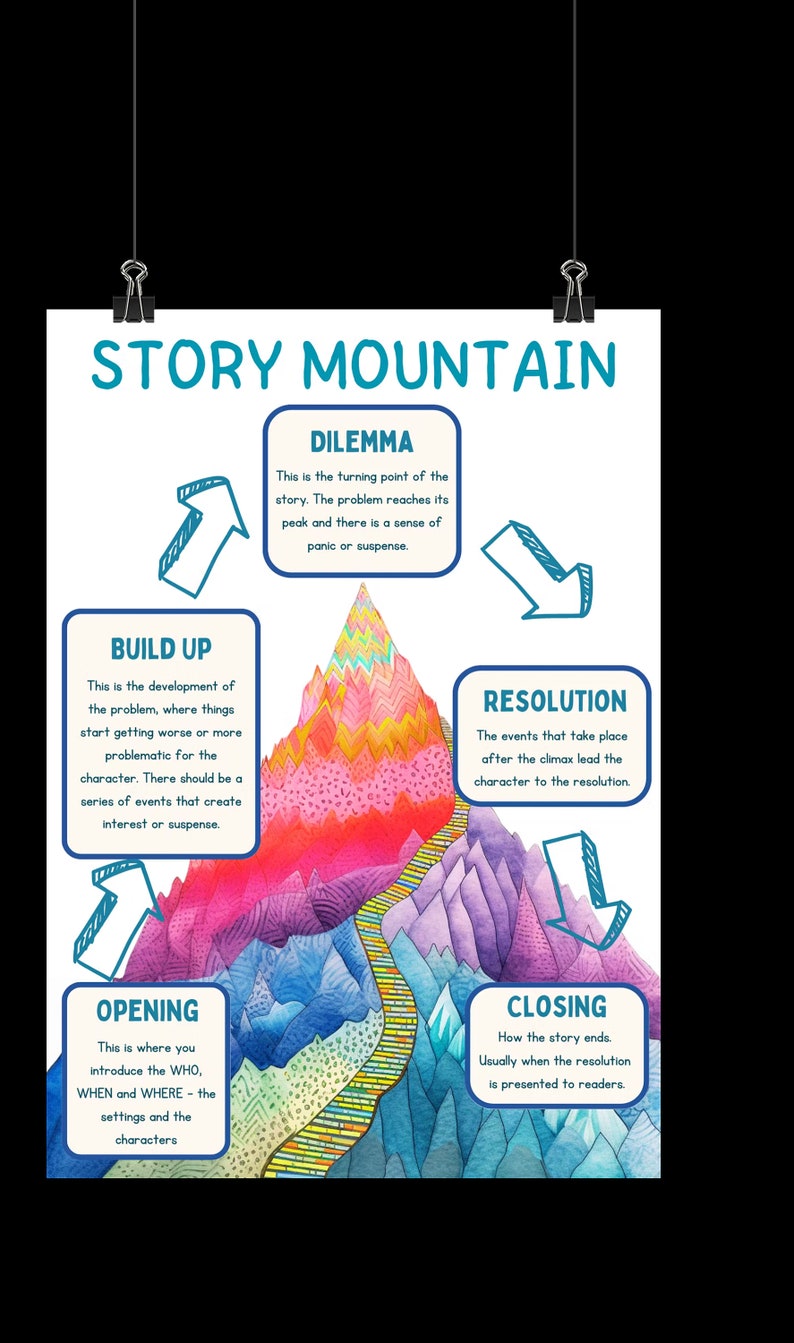
Think of the narrative arc you've built as a "story mountain." The previous lesson focused on the build-up and the climax—the ascent and the peak. Now, we turn our attention to the beginning of the journey and the final view from the end of the path.
The opening and closing images are arguably the most important in your entire sequence. They set the initial tone and leave the final, lasting impression.
[PDF] What Makes a Photo Essay Unforgettable? - E-Learning Ontario
This brief excerpt from an E-Learning Ontario guide clearly articulates the strategic importance of your first and last images.
Read the short paragraph that begins here. Notice the emphasis on "hooking" the viewer and leaving a "lasting impression."
The First Impression: The Opening Image
The opening image is the doorway to your book. Its job is to capture the viewer's attention and signal what kind of experience they are about to have. It can do this in several ways:
- It can be a "scene setter," establishing the location, time, or general atmosphere of the work.
- It can introduce the central theme or pose the core question that the book will explore.
- It can be an "entryway" image, visually leading the viewer into the world of the book, perhaps with compositional elements like paths or leading lines.
A strong opening image doesn't give everything away; it creates intrigue and a desire to turn the page.
Let's look at how photographer Alex Huda analyzes his own choice for an opening image in a photo essay.
Mastering the Photo Essay: How Sequencing Transforms Your ...
This resource provides an excellent, practical example of how an opening image works.
Read the section titled Image 1: The Opening. Pay attention to how the author breaks down its function: establishing setting, creating visual harmony, and hinting at the theme, all to invite the audience "into the narrative."
The Lasting Impression: The Closing Image
The closing image is your farewell to the viewer. It's the final note that will linger in their mind after they've closed the book. It should provide a sense of finality and resolution, but that doesn't necessarily mean it has to answer every question. A great closing image can:
- Provide a sense of closure, summarizing the emotional journey or showing the outcome of the narrative.
- Act as a moment of quiet reflection after the climax of the sequence.
- Leave the viewer with a lingering question or a feeling of mystery.
- Echo the opening image, creating a satisfying sense of symmetry or circularity.
In the following video, publisher Noah Waldeck discusses this very concept, aiming for an ending that creates "the right type of lingering."
How To Edit and Sequence Photo Projects & Books (ft. Noah Waldeck)
This clip from a conversation with Noah Waldeck of Subjectively Objective offers a publisher's perspective on what makes opening and closing images effective.
Watch from 35:44 to 37:46. Notice his emphasis on wanting to be "grabbed by something right away" and left with a feeling that provides a "nice conclusion for the book."
The Frame: Connecting the Opener and Closer
The true power of these two images is revealed when they are considered as a pair. By creating a deliberate relationship between your first and last photograph, you build a strong conceptual frame around your entire sequence. This is an area where your background in design and sculpture will be a significant asset; you are creating a contained, intentional structure for the viewer's experience.
This connection can be:
- Thematic: Starting with a question and ending with an answer (or another question).
- Formal: Starting and ending with images that share a similar composition, color palette, or format.
- Narrative: Starting with a character's departure and ending with their return.
Let's return to Alex Huda's essay, which explicitly uses this strategy to create a circular narrative.
Mastering the Photo Essay: How Sequencing Transforms Your ...
These sections demonstrate how the closing image connects back to the opening, providing a sense of satisfying closure.
First, read the section Image 8: The Closing, and notice how it "connects meaningfully to the first image." Then, read the first point under Insights for Emerging Photographers, which reinforces this idea.
Photographer Dan Milnor also uses this technique, referring to it as establishing "visual hierarchy." By using the same type of image—in his case, a panoramic—for both the start and end, he signals to the viewer how to read the work.
How to Sequence Photos to Tell a Story | The Edit
In these two segments from "How to Sequence Photos to Tell a Story," Dan Milnor demonstrates how to select and connect opening and closing images for different projects.
First, watch his sequencing of Deborah's port project from 18:44 to 19:15 and then from 22:52 to 23:03. He identifies a "perfect scene setter" to start and an ending that "reflects back to the lead photo." Next, watch his work on Leslie's ranch project from 33:13 to 33:41 and then from 35:42 to 36:17. Here, he explicitly discusses using a panoramic as an "entryway" and another as a "fantastic ending frame," creating a clear visual structure.
Your Turn: Setting the Bookends
Now, retrieve the refined sequence of physical prints you developed in our last lesson. Lay them out so you can see the entire flow. We will now select the definitive images to frame this sequence.
1. Audition Your Opening Images
Go through your sequence and pull out two or three images that you feel could function as the opening. Don't just pick your "best" photo. Consider these questions for each candidate:
- Does it serve as an effective "entryway" or invitation?
- Does it establish the mood, theme, or location of the project?
- Does it create intrigue without revealing too much?
2. Audition Your Closing Images
Next, identify two or three candidates for the final image of the book. Ask yourself:
- Does this image feel like a resolution or a final statement?
- Does it provide a sense of emotional closure?
- Could it function as a quiet moment of reflection after the climax?
3. Test the Pairs
Now, experiment with the combinations.
- Take your first opening candidate and place it at the beginning of the sequence.
- Take your first closing candidate and place it at the end.
- Look at the two images on their own. What is their relationship? Do they speak to each other?
- Walk through the entire sequence with these bookends in place. Does the frame feel right for the story inside?
- Repeat this process with different combinations of your opening and closing candidates. This is an intuitive process of finding the pairing that gives your narrative the most satisfying and coherent structure.
Take your time with this exercise. The decision you make here solidifies the narrative you've worked so hard to build.
Conclusion
In this lesson, we have focused on the crucial task of framing your visual narrative. You have learned how to select opening and closing images that not only stand on their own but also work together to define the viewer's entire experience.
Here are the key takeaways:
- The opening and closing images are the most strategic selections in a sequence, setting the first impression and leaving the last.
- A strong opening image acts as an invitation, setting the tone and theme without revealing the whole story.
- An effective closing image provides resolution, closure, or a lasting emotional resonance.
- Creating a formal or thematic link between the opener and closer builds a powerful frame around your narrative, giving it a sense of completeness and intention.
With your opening and closing images selected, your sequence is now complete. You have successfully navigated the curatorial process from a vast body of work to a single, coherent, and powerful visual story.
In our next module, we will transition from the narrative structure to the physical form. We will begin exploring how to design the photo book as a tangible object, starting with how decisions about size, orientation, and format can amplify the story you have just finalized.