Welcome to the fourth and final lesson of our module on building a body of work. In our last session, you undertook the difficult but essential task of curation, culling your initial photographs to establish a core selection of images that truly serve your project's concept. This sharpened selection is the foundation upon which your book will be built.
Today, we will examine that foundation not for what is present, but for what is absent. A core selection of images often acts like a skeleton, revealing the overall form of the project but also highlighting where flesh is needed. This lesson is dedicated to analyzing your work to identify these narrative, thematic, and visual "gaps," and then creating a concrete plan to fill them with new, targeted photography. Your background in sculpture has given you a deep understanding of form; you know when a piece needs more material added or requires a different texture to achieve balance. We will now apply that same sensibility to your growing body of photographic work.
Seeing the Whole Picture
Before you can identify what's missing, you must have a clear view of what you already have. The process of editing and curating is not linear; it's a dynamic and often physical act of arranging, comparing, and seeing relationships. Laying out your core selection of images, either as small prints on a wall or as a digital contact sheet, allows you to move beyond evaluating individual photos and start seeing the project as a holistic entity.
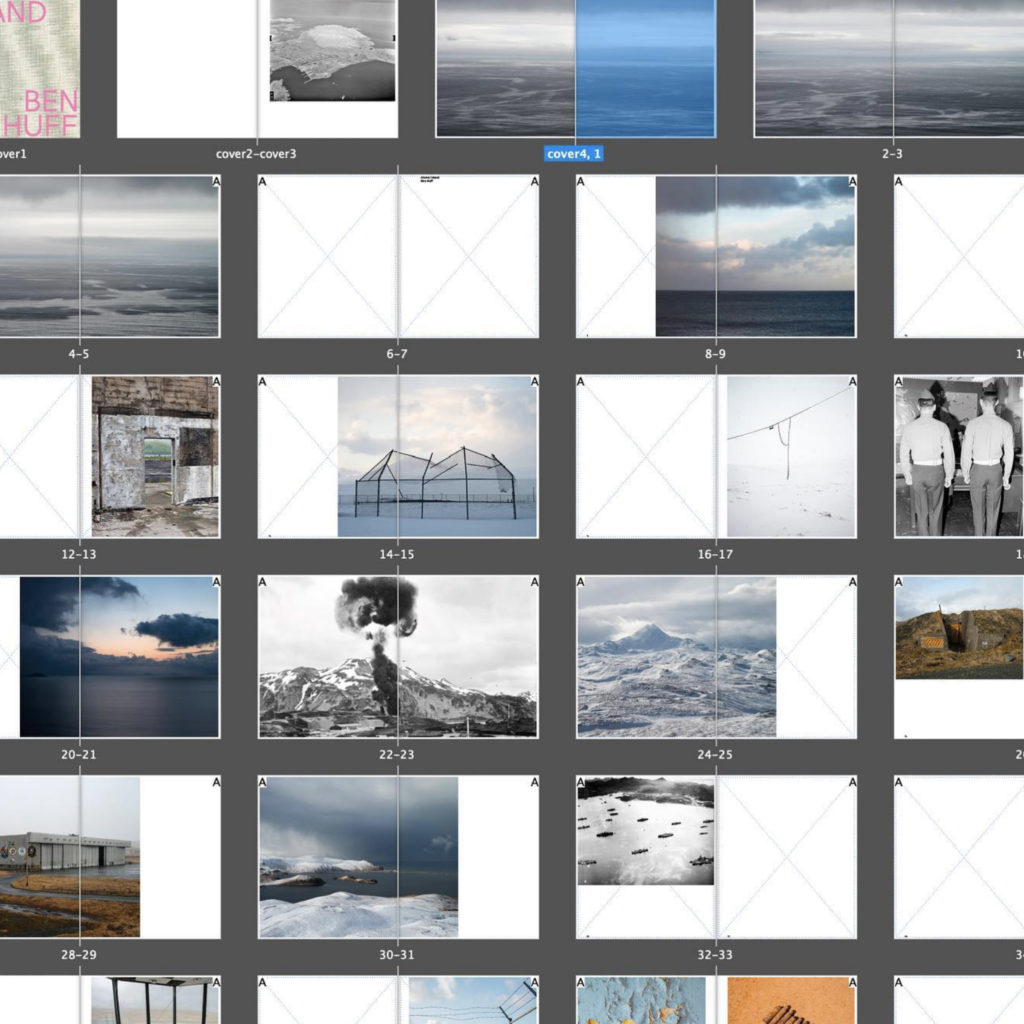
This bird's-eye view is crucial. It’s at this stage that the iterative nature of artistic creation becomes clear. As the article "Your Visual Voice" from ProGrade Digital points out, the review process itself is a source of new direction.
Transcending Visuals: The Importance of Storytelling in Photography
This article provides a clear, actionable guide to building a photographic story and explicitly addresses the iterative stage we're at now.
Please read the final section, Creating Your Own Photographic Story. Focus on the final step, "review and edit your images." The author notes that this is the point where you might realize that you need to "capture additional ones to fill gaps in your story." This confirms that project development is a cycle of shooting, editing, analyzing, and shooting again.
Diagnosing the Gaps
Once your images are laid out, you can begin to diagnose the specific types of gaps in your project. These gaps typically fall into a few key categories:
- Narrative Gaps: Are there missing scenes? For a project that has a chronological or narrative arc, you might have a strong beginning and middle, but no clear resolution. You might be missing the "establishing shots" that set the scene, or the quiet, transitional moments that connect the major "beats" of your story.
- Thematic Gaps: Does the work fully explore your central idea? For instance, if your artist statement speaks to the tension between nature and industry, but your images only show industrial decay, you have a thematic gap. You need to shoot images that represent the "nature" side of the equation to create that tension.
- Visual Gaps: Is there a lack of rhythm or variety? A project with only wide, epic landscapes might feel monotonous. It could be missing medium shots that provide context or close-up details that offer intimacy and texture. Conversely, a project of only details might feel claustrophobic and lack a sense of place.
- Conceptual Gaps: Does the project answer the "So what?" question we discussed in the last lesson? If your images are a collection of interesting observations but don't build toward a unique point of view or conclusion, you have a conceptual gap.

A Masterclass in Identifying Gaps
Identifying these gaps in your own work can be challenging. It's often easier to see them in the work of others. Photographer and bookmaker Dan Milnor provides an excellent demonstration of this skill in his portfolio reviews. Watching him analyze projects is a masterclass in pinpointing exactly what a body of work needs to become stronger and more complete.
How to Sequence Photos to Tell a Story | The Edit
In this video, "How to Sequence Photos to Tell a Story," Dan Milnor reviews several photo projects and provides pointed, practical advice on how to improve them. His feedback is a lesson in itself on identifying different kinds of gaps.
Please watch these three segments where he critiques different projects: A project on Albuquerque: He identifies the story as "nebulous" and suggests that a "subtheme will emerge" with more work, giving the photographer direction. This is a classic example of a conceptual gap. A "road trip" project: Here, he is very direct, telling the photographer a lead image "isn't good enough" and that "you have to make another photograph like this that's better." This shows how a gap can also be one of quality or distinction—a key image is needed, but the current version isn't strong enough. A rural Pennsylvania project: This is perhaps the clearest example of a narrative gap. The project claims to be about "lifestyle" but contains no people. Milnor explicitly states the photographer's "next task is to photograph the people."
Milnor's critiques demonstrate that identifying gaps is not about negativity; it's a constructive process that provides a clear, actionable path forward.
From Diagnosis to Action: The Shoot List
Once you've diagnosed the gaps in your project, the next step is to create a plan to fill them. The most effective tool for this is a shoot list. This is more than a simple to-do list; it's a strategic document that translates your abstract analysis into a concrete set of photographic goals.
The article "Creating Photographic Series and Projects" provides a superb framework for creating and using such a list.
Creating Photographic Series and Projects
This article from Street Photography Magazine provides a clear, practical method for turning a project idea into a concrete shooting plan.
First, read the section that begins After you determine a potential project. This part explains the importance of refining your artistic statement and then creating a "shoot list of the photographs needed to tell the story." Then, study the practical example under the heading The Process in Practice. Pay close attention to the detailed shoot list the author created for his "Bay Street Series." This is a fantastic model for how to translate abstract needs (e.g., "show the commute") into a list of specific, achievable shots (e.g., "Train/Union Station Rush/Rush on the street").
This structured approach should resonate with your background in design and fine art, where projects are often broken down into specific components and phases before execution. A shoot list is simply the photographer's equivalent of a blueprint or a maquette.
Your Turn: Mapping the Gaps and Planning Your Next Move
It's time to apply this analytical process to your own project. This exercise will build directly on the curatorial work you did in the previous lesson and set the agenda for your next phase of shooting.
- Lay It All Out: Take the "core selection" of images you arrived at in the last lesson. Arrange them on a wall, on the floor, or in a digital program like Adobe Lightroom's grid view or Bridge. Give yourself a full, simultaneous view of the project so far.
- Re-read Your Artist Statement: Review the preliminary artist statement you wrote in Module 2. Read it aloud. Now look at the images. Does the current selection of images fully support and express this statement? Where does it fall short? Make notes.
- Analyze the Gaps: Using the categories we discussed (Narrative, Thematic, Visual, Conceptual), write a short analysis of what is missing from your project. Be as specific as possible.
- Instead of saying "I need more variety," try: "My project currently consists of 10 wide shots and 2 medium shots. It lacks intimacy. I have a visual gap and need to create at least 5-7 compelling close-up/detail shots that connect to my theme."
- Instead of "The story doesn't flow," try: "My images show the beginning and the end of a process, but there is no sense of the transition in between. I have a narrative gap and need images that show the middle stages."
- Create Your Shoot List: Based on your gap analysis, create a detailed shoot list for your next one or two shooting sessions. Use the "Bay Street Series" example as a model. Your list should be a concrete plan of action that will generate the specific images your project needs to feel more complete.
Conclusion
In this lesson, you have learned that creating a body of work is an iterative cycle of creation and analysis. The initial culling of your images is a pivotal moment, not because it finalizes the project, but because it clarifies it, allowing you to see its potential and its deficiencies. By systematically diagnosing narrative, thematic, visual, and conceptual gaps, you can move beyond reactive shooting and begin to build your project with deliberate intent. The shoot list is your primary tool for this, transforming your critique into a creative agenda.
After you complete your targeted shoots based on this new plan, you will have a much richer and more comprehensive set of images. With this more complete collection, you will be ready to enter the final, rigorous curatorial stages. In our next module, we will begin that process by learning a structured, multi-pass editing method to help you systematically narrow down your entire body of work to the final selection that will define your photo book.