Introduction
In the previous lesson, you defined a reusable Product schema, which tells Swagger what a "Product" data object looks like. Your documentation UI now has a "Schemas" section, but still no API operations.
Now, we'll put that schema to work. This lesson focuses on documenting your first and most fundamental endpoint: the GET /api/products route that fetches all products. You will learn how to write a YAML-based JSDoc comment that describes this endpoint, its purpose, and its possible outcomes. Specifically, we'll document the successful 200 OK response, showing how it returns an array of products, and the 500 Internal Server Error response for unexpected failures.
By the end of this lesson, your GET-all endpoint will appear in the Swagger UI, complete with a description and a clear model of the data it returns.
Documenting an Endpoint
To document a route, you add a /** ... */ comment block directly above the route handler in your code. The swagger-jsdoc library will parse these comments to build the API specification.
The structure is based on YAML and follows the OpenAPI specification. Let's watch a video that demonstrates this process for a GET-all endpoint.
NodeJS Swagger API Documentation Tutorial Using Swagger JSDoc
This clip from the 'NodeJS Swagger API Documentation Tutorial' by Maksim Ivanov is a perfect walkthrough. It shows exactly how to document a 'GET all books' endpoint, which is a direct parallel to what we are doing.
Watch from 14:56 to 16:36. Pay close attention to how the comment is structured: The path (/books) The HTTP method (get) The summary The responses block, especially how the 200 response uses a $ref to link back to the reusable Book schema.
The JSDoc Structure for GET-all
As you saw, the documentation block has a clear, hierarchical structure. Here is the exact YAML you will use to document your GET /api/products endpoint. You should place this block directly above the router.get('/', ...) definition in your src/routes/productRoutes.js file.
/**
 * @swagger
 * /api/products:
 *   get:
 *     summary: Retrieve a list of products
 *     tags: [Products]
 *     responses:
 *       200:
 *         description: A list of products.
 *         content:
 *           application/json:
 *             schema:
 *               type: array
 *               items:
 *                 $ref: '#/components/schemas/Product'
 *       500:
 *         description: Some server error
 */
Let's break this down:
/api/products:: This is the endpoint path. It must be the full path that a user would call.get:: The HTTP method for this operation.summary: Retrieve a list of products: A short, human-readable summary of what the endpoint does. This appears as the main title for the endpoint in the UI.tags: [Products]: Tags are used to group related endpoints in the Swagger UI. It's a best practice for organization. You'll want to add this tag to all your product-related endpoints.responses:: This crucial section defines the possible outcomes of calling the endpoint.200:: Defines the successful response.description:Explains what this response means.content: application/json: schema:: This specifies that the response body is JSON and defines its structure.type: array: We state that the response is an array.items: $ref: '#/components/schemas/Product': This is the key connection. We are telling Swagger that each item in the array is an object that conforms to theProductschema you defined in the last lesson.
500:: Defines a server error response. For now, a simple description is sufficient.
The structure for defining multiple responses (200, 404, 500, etc.) is a standard pattern. The resource "Express to Impress: Documenting APIs with Swagger" shows another good example of this under the "Swagger Documentation in Your Code" section, which you can use as a reference for future endpoints.
Your Turn: Implement and Verify
It's time to add this to your project and see the result.
-
Open your product routes file (
src/routes/productRoutes.js). -
Copy and paste the YAML JSDoc block from above and place it directly before the route handler for
GET /. Your code should now look like this:const express = require('express'); const router = express.Router(); const productController = require('../controllers/productController'); // Or wherever your logic is /** * @swagger * /api/products: * get: * summary: Retrieve a list of products * tags: [Products] * responses: * 200: * description: A list of products. * content: * application/json: * schema: * type: array * items: * $ref: '#/components/schemas/Product' * 500: * description: Some server error */ router.get('/', productController.getAllProducts); // ... other routes module.exports = router; -
Restart your server to apply the changes.
-
Refresh your Swagger UI page (
http://localhost:PORT/api-docs).
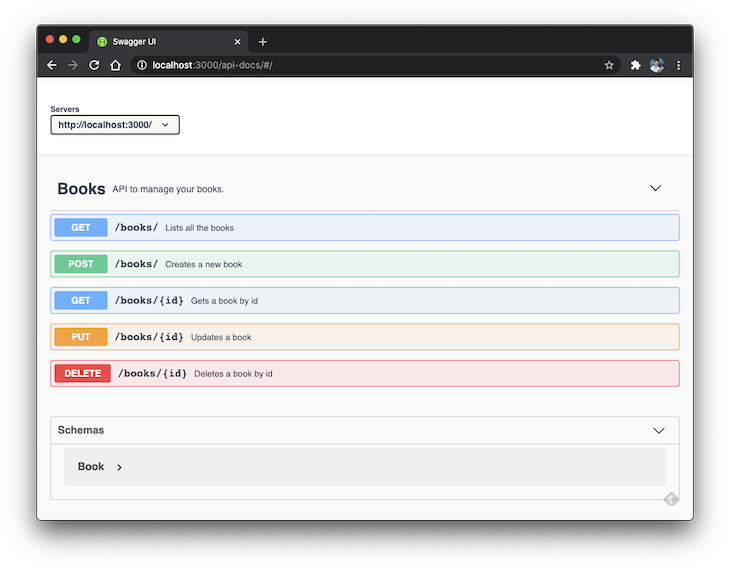
You should now see your first endpoint documented! It will be listed under the "Products" tag. You can expand it to see the summary, the successful 200 response (including the schema for the array of Product objects), and the 500 error response.
Your UI should now be starting to look like this, with operations clearly listed.
A reminder on indentation: YAML is strict. A single misplaced space can cause the parser to ignore your documentation without warning. Ensure every level of indentation uses two spaces.
Conclusion
You've successfully documented your first API endpoint. This is a major step forward. Your API documentation is no longer empty; it now shows a concrete operation that developers can understand and test.
Key Takeaways:
- Endpoint documentation is written in YAML inside a JSDoc comment (
/** ... */) placed directly above the route handler. - The documentation specifies the
path, HTTPmethod, asummary, and organizationaltags. - The
responsesobject details each possible HTTP status code outcome, including adescriptionand thecontentschema. - You use
$ref: '#/components/schemas/YourModelName'to link an endpoint's response back to your reusable schema, keeping your documentation DRY (Don't Repeat Yourself).
Next Up:
In the next lesson, we will continue documenting our API by tackling the GET-by-ID endpoint. This will introduce two new concepts: how to document URL path parameters (like the id) and how to document the 404 Not Found response case.