Hello! Welcome to your third lesson in the "Layered Network Models" module.
In our previous lesson, we created a roadmap of the internet by identifying the five layers of the TCP/IP model and detailing their unique responsibilities. We saw that the Application, Transport, Network, Data Link, and Physical layers each have a specific job, from handling user data to sending signals over a wire.
Today, we'll explore how these layers work together to move data from a sending application to a receiving one. This lesson's learning outcome is to explain how data encapsulation works as it passes through the layers. This is the core mechanism that allows the layered model to function, essentially "packaging" your data for its journey across the network.
From Data to Signals: The Core Idea of Encapsulation
Imagine you're mailing a valuable item. You don't just put a stamp on it. First, you put the item in a protective box (Application data). Then, you put that box inside a shipping box with the recipient's name and room number (Transport Layer). Next, you add a label with the full street address (Network Layer). Finally, the local mailroom adds a tag for the specific mail truck it goes on (Data Link Layer), before the truck physically drives it away (Physical Layer).
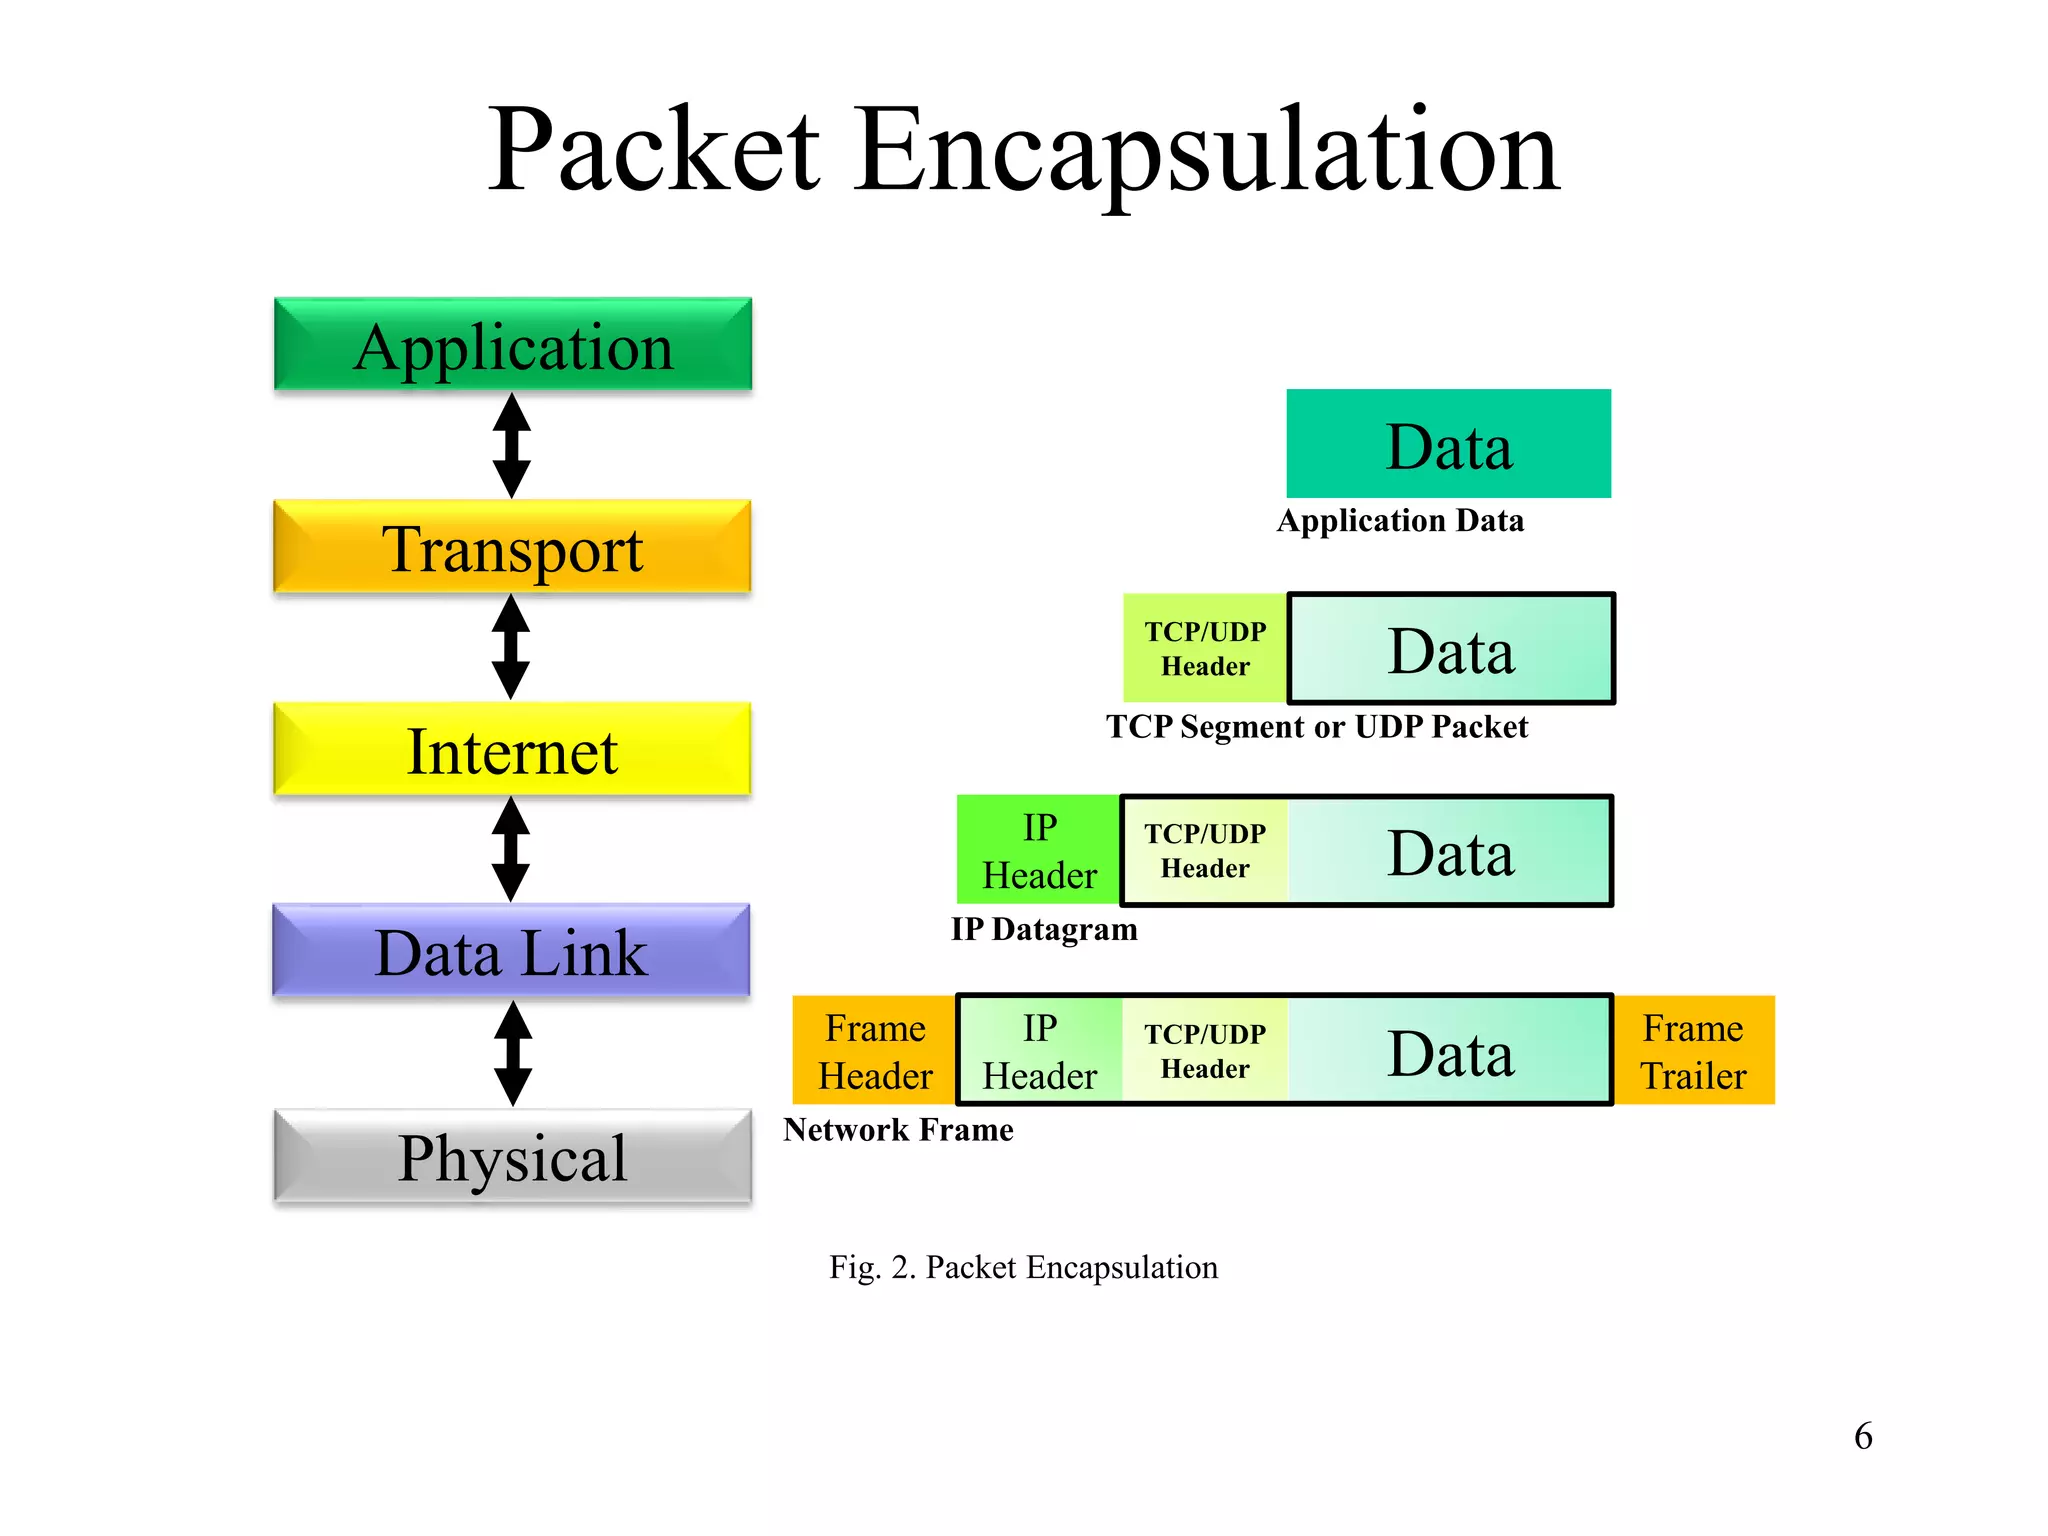
Data encapsulation in networking is a very similar process. As your data, say, an email or a web request, travels down the TCP/IP stack on the sending computer, each layer wraps it in a new "envelope" by adding its own control information. This information is called a header.
Let's watch a video that provides a clear overview of this wrapping process and introduces the key terminology.
TCP/IP Model Explained | Cisco CCNA 200-301
This video from CertBros provides a concise and clear explanation of encapsulation, showing how headers are added at each layer and defining the specific name for the data unit at each stage.
Watch from 02:39 to 04:44. Focus on two key things: The information each layer adds (e.g., ports, IP addresses, MAC addresses). The name given to the data unit at each layer: segment, packet, and frame.
Protocol Data Units (PDUs): The Names of the Packages
As the video explained, the "package" of data has a different name at different layers. This name is technically called a Protocol Data Unit (PDU). Remembering these names is crucial as they are standard networking vocabulary.
| Layer | PDU Name | Header Information Added |
|---|---|---|
| Layer 4: Transport | Segment (for TCP) or Datagram (for UDP) | Source & Destination Port Numbers |
| Layer 3: Network | Packet | Source & Destination IP Addresses |
| Layer 2: Data Link | Frame | Source & Destination MAC Addresses, plus a trailer for error checking |
| Layer 1: Physical | Bits | Not a PDU, but the final form for transmission |
Here is a visual representation of this process:
A Real-World Walkthrough: Tracing an HTTP Request
Now that we have the theory, let's see it in action. You've expressed a strong interest in connecting book knowledge to the real world, and this video does exactly that. It uses a network simulator to visually trace a web request, demonstrating encapsulation step-by-step.
REAL LIFE example!! (TCP/IP and OSI layers) // FREE CCNA // EP 4
NetworkChuck uses a Packet Tracer simulation to provide a very intuitive, real-world example of encapsulation, comparing it to placing a letter inside a series of envelopes.
Watch from 02:35 to 11:45. As you watch, pay close attention to: How the 'envelope' analogy is used for each layer's header. At the Transport Layer (03:42), see the TCP header with port numbers being added to create a segment. At the Network Layer (05:57), see the IP header with IP addresses being added to create a packet. At the Data Link Layer (07:08), see the Ethernet header with MAC addresses being added to create a frame. Crucially, notice how intermediate devices like switches and routers partially unwrap (de-encapsulate) the data just enough to do their jobs before sending it on (08:00 - 10:38). Finally, see the complete unwrapping (de-encapsulation) at the destination server (10:38).
The video demonstrates a critical point: a switch only needs to read the Layer 2 (Data Link) header to find the MAC address, while a router needs to read up to the Layer 3 (Network) header to find the IP address. Neither needs to look at the application data inside. This is a perfect example of the abstraction we discussed in the first lesson of this module.
From Simulation to Raw Bytes
The simulation is a great way to visualize the flow. But given your computer science background, you might be wondering: what does this "header" actually look like in terms of data? Where are these extra bytes?
The following article analyzes a real packet capture from a simple web request. It connects the abstract layers directly to the raw hexadecimal bytes on the wire.
Deep Dive into TCP/IP: What Your Packets Really Look Like
This article on Medium by Ibrahim Cisse is a fantastic deep dive. The author uses curl and Wireshark to inspect a real HTTP response, showing exactly how many bytes each layer's header adds and what those bytes represent. This directly connects the networking concepts to the low-level data that a programmer or system administrator would see.
Read from the beginning down to the end of the 'The Visual Magic: Hex Dump Highlighting' section. Focus on the 'Russian Doll Effect' breakdown, which shows the size of each header. Then, pay close attention to how Wireshark highlights the specific hex bytes corresponding to each layer's header. This is where the abstract concept of a 'header' becomes a concrete block of data.
This article makes a key point: learning to see the structure within the raw bytes is what separates someone who can use a network from someone who understands it. This is the practical skill that underpins all network troubleshooting.
De-encapsulation: Unwrapping the Package
As we saw in the NetworkChuck video, when the data arrives at its destination, the process happens in reverse. This is called de-encapsulation.
As the frame moves up the stack on the receiving computer:
- The Data Link layer strips off the Ethernet header and trailer and passes the packet up.
- The Network layer strips off the IP header and passes the segment up.
- The Transport layer strips off the TCP/UDP header and passes the data to the correct application based on the port number.
- The Application layer receives the original data, ready to be processed.
This diagram shows the complete, symmetrical journey.

Conclusion
Today we've uncovered the fundamental mechanism that makes layered networking possible. Encapsulation is the assembly line of networking, where each layer performs its specific task by adding a header, creating a neat package that the next layer can handle without needing to know about the contents inside.
Key Takeaways:
- Encapsulation is the process of wrapping data with headers as it moves down the TCP/IP stack.
- Each layer adds a header containing control information relevant to its function (e.g., ports at the Transport Layer, IPs at the Network Layer).
- The data package is called a Segment at the Transport Layer, a Packet at the Network Layer, and a Frame at the Data Link Layer.
- De-encapsulation is the reverse process of unwrapping headers as data moves up the stack at the destination.
- Intermediate devices like routers and switches perform partial de-encapsulation to read the necessary headers to do their job of forwarding traffic.
Preview of the Next Lesson:
We now have all the conceptual pieces in place: we know the layers, their jobs, and how they package data. In the next lesson, we will synthesize all of this knowledge to trace an everyday internet action (e.g., loading a webpage) through the TCP/IP layers from start to finish. We will create a complete narrative that follows a single request from your browser to a server and back.