Introduction
Hello! In our last lesson, we built a mental map of the Domain Name System, describing its hierarchical structure of Root, TLD, and Authoritative servers. We also distinguished between the two main types of communication: the recursive query your computer sends to a resolver, and the iterative queries that resolver uses to find the answer.
Today, we're putting all those pieces together. Our goal is to trace the steps of a recursive DNS query from client to resolution. We'll follow the entire journey a request takes, from the moment you type a domain name into your browser until the final IP address is returned. This will connect the theoretical hierarchy we discussed to the practical, step-by-step process that happens millions of times a second across the internet.
Visualizing the DNS Journey
Before we get into a detailed, step-by-step list, let's watch an animation of the entire process. This will give you a strong visual and narrative foundation for the more technical details that follow.
The video 'How DNS Works Visually' provides an excellent animated walkthrough of the entire DNS resolution process. It clearly shows the roles of the client, resolver, and the different server types in the hierarchy.
Please watch from 01:23 to 07:18. Follow the request as it leaves the client, goes to the recursive resolver, and then iteratively queries the root, TLD, and authoritative name servers before the final answer is returned.
The 8 Steps of a DNS Lookup
The video gave you a great overview. Now, let's break that process down into a sequence of concrete steps. The following diagram and text will serve as our primary reference for the full, uncached DNS lookup process.
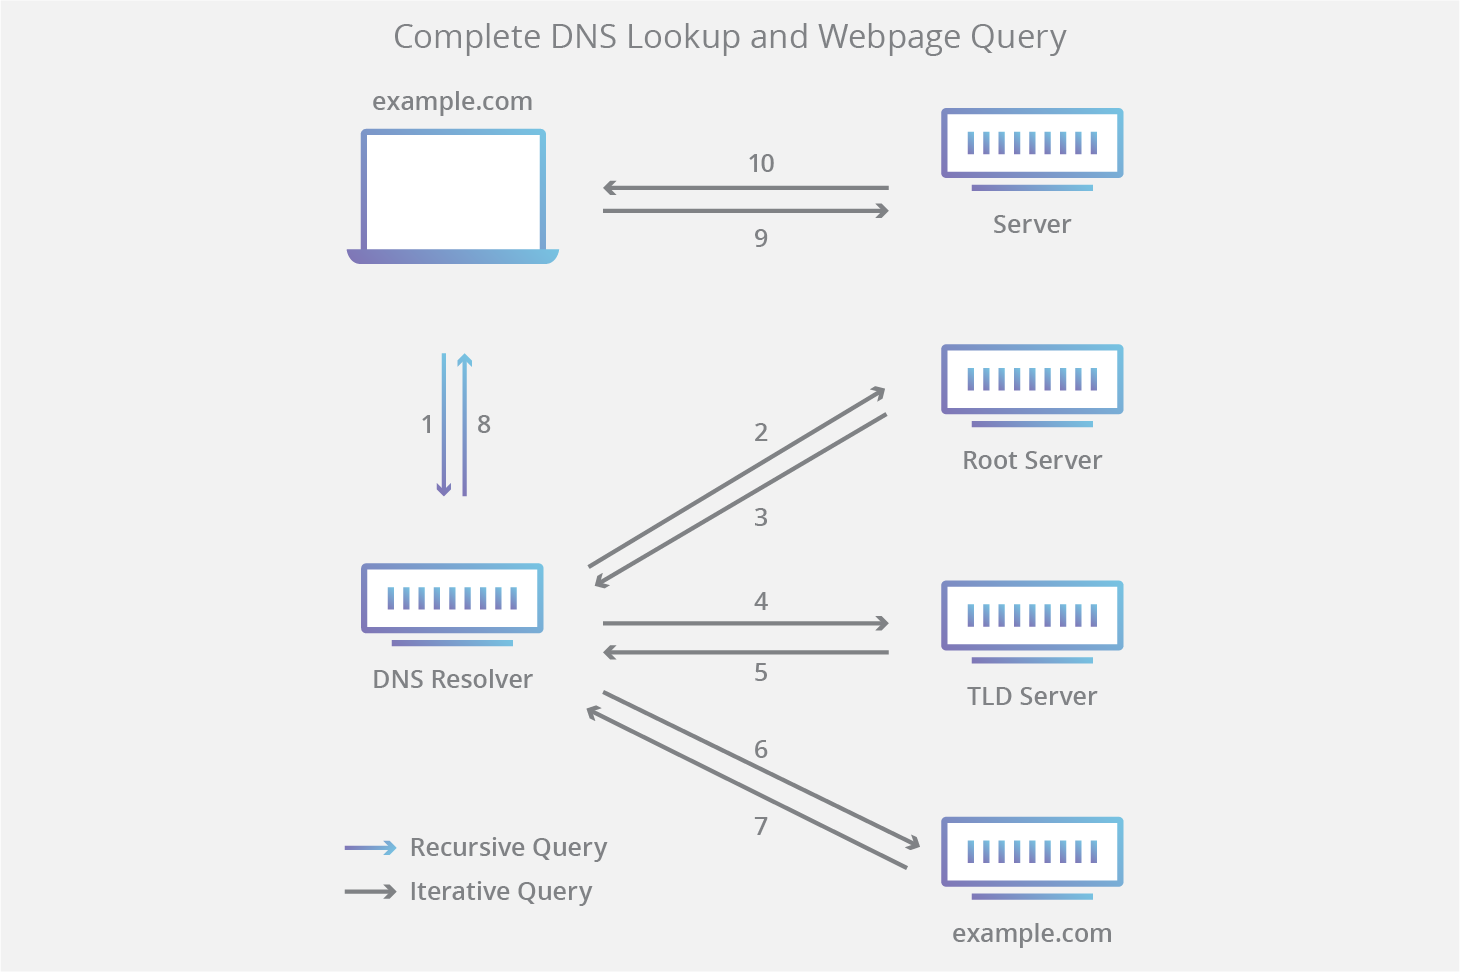
Now, let's get a clear textual description of these steps.
What is DNS? | How DNS works - Cloudflare
This Cloudflare article, 'What is DNS?', provides a concise, 8-step breakdown of the DNS lookup process. This perfectly matches the visual flow we just saw.
Read the section titled 'The 8 steps in a DNS lookup:'. As you read, compare each step to the diagram above and the animation you watched. Notice how the recursive resolver does all the work on behalf of your computer.
To summarize, the key steps are:
- User to Resolver: You type
example.com. Your computer sends a recursive query to its configured DNS resolver (e.g., your ISP's server). - Resolver to Root: The resolver, not knowing the answer, sends an iterative query to a Root server (
.). - Root to Resolver: The Root server replies with a referral: "I don't know, but here are the addresses for the
.comTLD servers." - Resolver to TLD: The resolver sends an iterative query to a
.comTLD server. - TLD to Resolver: The TLD server replies with another referral: "I don't know, but here are the addresses for the authoritative nameservers for
example.com." - Resolver to Authoritative: The resolver sends an iterative query to the authoritative nameserver for
example.com. - Authoritative to Resolver: The authoritative nameserver, being the source of truth for the domain, replies with the final answer: the IP address for
example.com. - Resolver to User: The resolver passes this IP address back to your computer. It will also cache this answer for a period of time (defined by the TTL) to speed up future requests.
The Importance of Caching
In the 8-step process, we assumed nothing was cached. In reality, caching is crucial for DNS performance. A request for a popular site like google.com rarely goes all the way to the root servers because the answer is likely cached somewhere along the path.
DNS data can be cached at multiple levels:
- Browser Cache: Your web browser itself keeps a short-term cache of recently resolved domains.
- Operating System Cache: Your OS (Windows, macOS, Linux) maintains a DNS cache (sometimes called a "stub resolver").
- Recursive Resolver Cache: Your ISP's resolver caches the answers to queries from all its users, making lookups for popular domains extremely fast.
Each step in the lookup is an opportunity to find a cached answer and return it immediately, short-circuiting the full 8-step process.
What is DNS? | How DNS works - Cloudflare
To understand how caching dramatically speeds up DNS, let's return to the Cloudflare article.
Read the section 'What is DNS caching? Where does DNS caching occur?'. Pay attention to the different locations where data is stored and how a resolver can use cached NS records to skip querying the root or TLD servers.
Tracing a Query in the Real World with dig
Now for the practical part you enjoy. We can use a command-line tool to perform this trace ourselves. The dig (Domain Information Groper) tool is standard on Linux and macOS, and can be installed on Windows. Its +trace option instructs it to perform an iterative query, mimicking what a recursive resolver does.
First, let's watch a quick demonstration of this command in action.
DNS (Domain Name System) Full Course Basics to Advanced - How a DNS Server Works
This short clip from a detailed DNS course shows a practical demonstration of the dig +trace command.
Watch the segment from 01:53:37 to 01:54:49. The presenter traces www.infoblocks.com. Observe how the output shows the query to the root servers, the referral to the .com servers, the referral to the infoblocks.com servers, and finally, the answer.
Now, let's examine the output of dig +trace www.google.com more closely and map it to our 8-step model.
SDC#24 - How DNS Works? - System Design Codex
The article 'How DNS Works?' from System Design Codex provides a fantastic walkthrough that aligns each step of the DNS lookup with the actual output from the dig +trace command.
Read the section titled 'Steps in a DNS Lookup'. This section walks through the resolution of www.google.com. Focus on how the text explains each block of dig output, corresponding to: The initial query to the root servers (Step 2). The referral to the .com TLD servers (Step 4). The referral to Google's authoritative nameservers (Step 6). The final A record (IP address) from the authoritative server (Step 7-8).
If you have access to a terminal with dig installed, I encourage you to run dig +trace <some-domain-name> yourself. Try it for a common domain like google.com and then for a less common one, like a university website from another country (e.g., www.ox.ac.uk). You will see the full chain of trust and delegation in action.
Conclusion
In this lesson, we connected all the dots of the DNS resolution process. We followed a query from its origin in your browser, through the hard work of the recursive resolver, across the global hierarchy of DNS servers, and back again with a final answer.
Key Takeaways:
- A standard, uncached DNS lookup involves a sequence of steps: client -> resolver -> root -> TLD -> authoritative server.
- The client's query to the resolver is recursive ("find the answer for me").
- The resolver's queries to the root, TLD, and authoritative servers are iterative ("give me the best answer you have").
- Caching at every level (browser, OS, resolver) is critical for making DNS fast and efficient by short-circuiting the full lookup process.
- Tools like
dig +traceallow us to observe this process in real-time, providing a practical window into the internet's infrastructure.
Preview of the Next Lesson:
We've now seen how to trace a query path from start to finish. In the next lesson, Use nslookup or dig to perform and interpret DNS lookups, we will dive deeper into using these powerful command-line tools. We'll move beyond just tracing and learn how to query for different types of DNS records (like mail servers or aliases) and interpret the rich information these tools provide.