Introduction
Hello! In our last lesson, you successfully built and tested a TCP client. You wrote C code to create a socket, actively connect to a server, and exchange data using send() and recv(). This gave you practical experience with one half of the client-server model.
Today, we're going to build the other half. Your goal is to implement a simple TCP echo server in C that handles a client connection. While the client initiates a conversation, the server's role is to listen for incoming requests and respond to them. By building the server, you will gain a complete, end-to-end understanding of how a basic network application communicates.
We will focus on the unique sequence of socket calls that defines a server: bind(), listen(), and accept(). By the end of this lesson, you will have a working client-server pair, both written by you, that can communicate over your local machine.
The Server's Lifecycle: A Passive Approach
Unlike a client that actively initiates a connection, a server takes a more passive role. It sets up shop at a known address and waits for clients to come to it. The following diagram, which we saw in the last lesson, clearly outlines the server's distinct workflow.
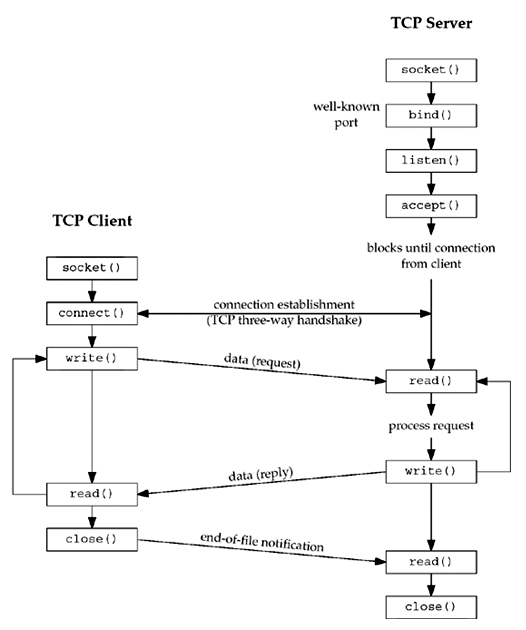
Here is the core sequence for a TCP server:
socket(): Create a socket, just as the client does. This is our initial endpoint.bind(): Associate the socket with a specific port number and IP address on the machine where the server is running. This is like putting a numbered sign on your door so clients know where to find you.listen(): Designate the socket as a "listening socket." This tells the operating system's kernel to start queuing incoming connection requests destined for this socket's port.accept(): This is the crucial step. The server callsaccept()and blocks (pauses execution), waiting for a connection request from a client. When a client connects,accept()creates a new socket dedicated to communicating with that specific client and returns its file descriptor. The original listening socket remains open, ready to accept more connections.
Let's watch a video that provides a live-coding demonstration of these steps.
Let's create a Tcp server in C
This video, 'Let's create a Tcp server in C' by dr Jonas Birch, walks through building a basic server from scratch. It clearly demonstrates the socket -> bind -> listen -> accept sequence and is a great practical introduction.
Watch from the beginning to 13:35. Pay close attention to how the presenter explains and implements each of the key server functions: The overview of the server's role (00:00 - 03:27) Initializing the socket and the sockaddr_in struct (03:27 - 07:06) Using bind() and listen() (07:06 - 10:17) The role of accept() and how it returns a new socket for the client (10:17 - 13:35)
Implementing the Server, Step by Step
Now, let's break down the C code for each of those steps. Much of the structure will be familiar from your C programming experience.
1. Headers and Socket Creation
We start with the necessary headers and the socket() call, which is identical to the client's.
#include <stdio.h>
#include <stdlib.h>
#include <string.h>
#include <unistd.h>
#include <sys/socket.h>
#include <netinet/in.h>

int listenfd, connfd; // Two socket descriptors!
struct sockaddr_in servaddr;

// Create a listening socket
listenfd = socket(AF_INET, SOCK_STREAM, 0);
Notice we have two integer variables for socket descriptors: listenfd for the main listening socket and connfd for the per-client connected socket.
2. bind(): Claiming an Address and Port
The bind() function anchors our socket to a specific port on the machine. Without this, the OS wouldn't know where to direct incoming packets for our application.
// Prepare the server's address structure
memset(&servaddr, 0, sizeof(servaddr));
servaddr.sin_family = AF_INET;
servaddr.sin_addr.s_addr = htonl(INADDR_ANY); // Listen on any available network interface
servaddr.sin_port = htons(SERV_PORT); // A chosen port number, e.g., 3000

// Bind the socket to the prepared address
bind(listenfd, (struct sockaddr *) &servaddr, sizeof(servaddr));
htonl(INADDR_ANY): This is a key detail for servers. Instead of binding to a specific IP address (like127.0.0.1),INADDR_ANYtells the OS to accept connections on any of the machine's network interfaces.htonl()ensures the value is in network byte order.htons(SERV_PORT): As with the client, we convert our chosen port number to network byte order.
For a more detailed explanation of bind(), you can refer to the following resource.
Socket Programming - Dartmouth Computer Science
The resource from Dartmouth College provides a concise definition of the bind() function and its parameters.
Read the section titled 'The bind() Function'. Note how it explains the function's role in assigning an address to a socket and the table that summarizes how specifying the IP and port works.
3. listen(): Opening for Business
The listen() call is simple but profound. It transforms our socket from an active one (capable of connect()-ing) into a passive listening socket.
// Start listening for incoming connections
listen(listenfd, 10); // 10 is the backlog size
The second argument, 10, is the backlog. It defines the maximum number of pending connections the kernel should queue up for our server. If the server is busy and new clients try to connect, the OS will hold them in this queue. Once the queue is full, further connection attempts will be rejected.
4. accept(): Welcoming a Client
This is where the server waits for action. The accept() function is where your server program will spend most of its time, patiently waiting for a client to knock on the door.
struct sockaddr_in cliaddr;
socklen_t clilen = sizeof(cliaddr);

printf("Server running...waiting for connections.\n");

// Accept a client connection
connfd = accept(listenfd, (struct sockaddr *) &cliaddr, &clilen);
printf("Received request...\n");
Here's the magic of accept():
- It blocks program execution until a client's
connect()request arrives. - When a connection is made,
accept()creates a brand new socket for communication with this specific client. - It returns the file descriptor for this new socket (which we store in
connfd). - The original socket,
listenfd, remains in the listening state, ready toaccept()the next client.
This "socket factory" model is a fundamental concept in server design. The IBM Developer article you have access to explains this concept very well.
To solidify your understanding of the accept() mechanism, let's review a clear explanation of this 'socket factory' concept.
Read the subsections under 'A TCP echo server', specifically 'A TCP echo server (binding and listening)' and 'A TCP echo server (socket factory)'. Focus on the explanation of how the initial listening socket's purpose is to produce new connected sockets via accept().
5. recv() and send(): The Echo Conversation
Once accept() returns connfd, the rest is straightforward. We use this new socket descriptor to recv() data from the client and send() it right back—the echo logic.
char buf[4096];
int n;

while ((n = recv(connfd, buf, sizeof(buf), 0)) > 0) {
    printf("String received from client: %.*s\n", n, buf);
    send(connfd, buf, n, 0);
}

// After the loop, the client has disconnected
close(connfd);
Note that this while loop runs as long as recv() returns a positive number of bytes. When the client closes its end of the connection, recv() will return 0, the loop will terminate, and we close() the connected socket connfd.
Practical Exercise: Building and Testing the Echo Server
In the last lesson, you downloaded echoServer.c from the Dartmouth resource. Now, let's analyze and use it with purpose.
Your Task:
-
Analyze the Code:
Open your local copy ofechoServer.cfrom the last lesson. Read through the code and identify the five steps we just discussed:socket,bind,listen,accept, and therecv/sendloop. Add comments to your file to explain what each of these main function calls is doing. This will help solidify your understanding.The reference
echoServer.ccode can be found in the Dartmouth resource (LINK) in the section "TCP Iterative Server." -
Compile and Run:
Open a terminal and ensure your commentedechoServer.cis compiled.gcc -o echoServer echoServer.cNow, run it. It will block, waiting for a client.
./echoServerYour terminal should display:
Server running...waiting for connections. -
Connect with Your Client:
Open a second terminal window. In this new window, run theechoClientyou built in the previous lesson. Tell it to connect to your server running on127.0.0.1../echoClient 127.0.0.1 -
Observe the Interaction:
Type a message in your client terminal and press Enter.- You will see the echoed message appear in the client terminal.
- At the same time, look at your server terminal. You will see the log messages as the server receives and processes the request.
Client Terminal:
Hello from the client!
String received from the server: Hello from the client!
Server Terminal:
Server running...waiting for connections. Received request... String received from and resent to the client:Hello from the client! -
Handling Multiple Clients (Iteratively):
The Dartmouth server code places theaccept()call inside an infinitefor ( ; ; )loop. This makes it an iterative server. After one client disconnects, theclose(connfd)call finishes, and the loop brings execution back toaccept(), ready to handle the next client.To see this in action:
- Stop your client with
Ctrl+C. - Notice the server is still running, waiting.
- Start the client again. It will connect successfully.
- When you are finished, stop both the client and server with
Ctrl+C.
- Stop your client with
Conclusion
Excellent work! You have now implemented both a TCP client and a TCP server, giving you a complete, practical view of a network conversation. You've demystified the server's role, translating the passive bind, listen, and accept sequence into working C code.
Key Takeaways:
- A server's primary function is to listen passively for incoming connections.
bind()attaches the server's socket to a specific port and IP address.listen()enables the socket to queue incoming connection requests.accept()is a blocking call that creates a new, dedicated socket for each client that connects. This is the "socket factory" model.- An iterative server uses a loop around
accept()to handle multiple clients one after another.
Preview of the Next Lesson:
You've mastered the basics of TCP, a connection-oriented protocol that guarantees delivery. But what about situations where speed is more important than reliability? In our next lesson, we will move on to implementing a simple UDP echo client-server program in C. This will highlight the fundamental differences between TCP and UDP and show you why both protocols are essential parts of the internet's toolkit.