Hello! Welcome to your first lesson on Next.js.
Given your goal of building full-stack applications, we'll start by ensuring your React fundamentals are up-to-date. In this lesson, we'll focus on a core concept that is central to both React and Next.js: creating modern functional components that can receive and display data using props.
You mentioned you have experience with older, class-based React components. We'll build on that foundation, transitioning to the modern, function-based approach that is now the standard. You'll find it more concise and intuitive. By the end of this lesson, you'll be able to build reusable UI elements and pass data to them, setting the stage for building dynamic pages in Next.js.
1. From Class to Function: A Modern Approach to Components
In React, we build user interfaces by composing small, reusable pieces of code called components. While you might be familiar with components written as JavaScript classes, the modern standard is to write them as simple functions. These are called functional components.
A functional component is a JavaScript function that accepts data as an argument (we'll call this props) and returns a description of the UI, written in a syntax called JSX.
Let's watch a short segment that demonstrates how to create your first functional component.
This video from Programming with Mosh will show you how to create a basic functional component. Notice the simplicity compared to a class component—there's no render() method or this keyword.
Watch the section from 11:17 to 13:59. Pay attention to the PascalCase naming convention for the function and the file, and how it simply returns JSX.
As you saw, a functional component is refreshingly straightforward:
- It's a plain JavaScript function.
- Its name must start with a capital letter (e.g.,
Message,UserProfile). - It returns the JSX that defines the component's output.
- You use
export defaultto make it available to other parts of your application.
2. What Are Props?
Now, how do we make these components dynamic and reusable? A Message component that always says "Hello World" isn't very useful. We need a way to pass data into a component from its parent. This is where props (short for "properties") come in.
Props are to a component what arguments are to a function. They allow a parent component to configure its children.
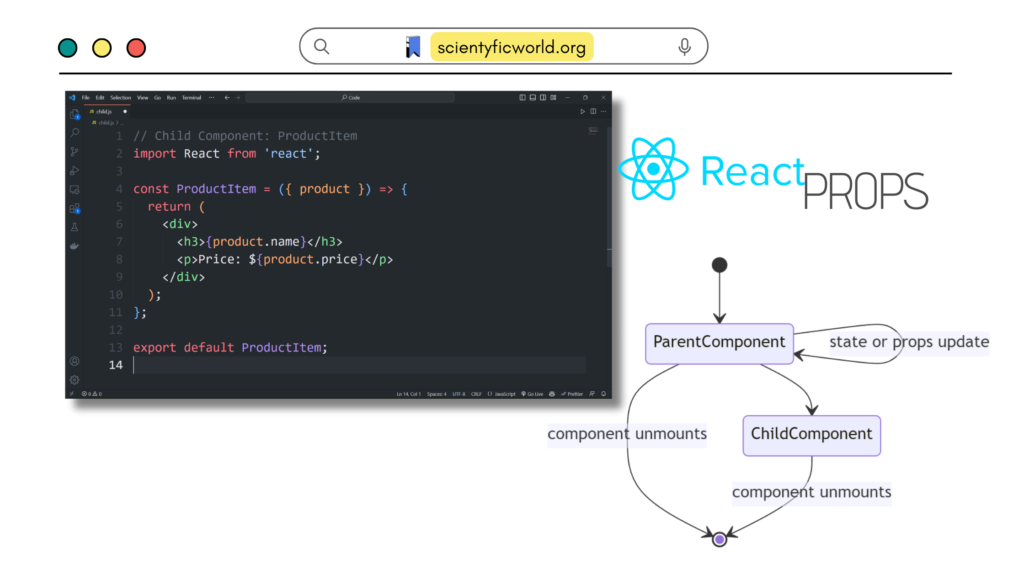
You can pass any kind of JavaScript data as a prop: strings, numbers, booleans, arrays, objects, and even functions. This is the primary way you'll make your UI dynamic.
To get a feel for how this works, let's look at the official React documentation. It provides a clear, two-step process for passing and reading props.
The official React documentation, 'Passing Props to a Component', clearly explains the core mechanism. Focus on the first two steps.
Read the sections 'Step 1: Pass props to the child component' and 'Step 2: Read props inside the child component'. Notice how props are passed like HTML attributes and then received as a function argument.
3. Passing and Using Props in Practice
Let's solidify this with more examples. The key things to remember are:
- Passing Props: You add them to the component's JSX tag, similar to HTML attributes.
- For string literals:
name="Alex" - For any other JavaScript value (numbers, booleans, objects):
age={30}oruser={{ name: 'Alex' }}
- For string literals:
- Receiving Props: The props are collected into a single object, which is the first (and only) argument to your component function. The modern way to access them is by "destructuring" this object right in the function signature.
This video demonstrates passing various data types and the power of reusability that props unlock.
This clip from Bro Code shows how to pass different data types like strings, numbers, and booleans. It also highlights the main benefit of props: reusability.
Watch from 01:23 to 04:52. Observe how strings are passed with quotes, while numbers and booleans use curly braces. See how the Student component is reused multiple times with different data.
Destructuring Props
In the videos and documentation, you saw two ways to access props:
// Method 1: Accessing via the 'props' object
function Greeting(props) {
  return <h1>Hello, {props.name}</h1>;
}

// Method 2: Destructuring in the function signature (preferred)
function Greeting({ name }) {
  return <h1>Hello, {name}</h1>;
}
Destructuring is the standard practice because it's cleaner and makes it immediately clear what props the component expects.
The following video provides a comprehensive look at defining the "shape" of props and using destructuring effectively.
Let's return to the Programming with Mosh tutorial for a more in-depth look at defining and destructuring props. He uses TypeScript's interface to define the shape of the props object, which is a great practice for building robust applications.
Watch from 50:49 to 54:48. Focus on how he defines the expected items and heading props and then destructures them in the component's signature.
Test your understanding!
Imagine you have a GameCard component used in your main App component like this:
// In App.js
import GameCard from './GameCard';

export default function App() {
  const gameData = {
    title: 'Puzzle Quest',
    genre: 'RPG-Puzzle',
    rating: 4.5,
    isMultiplayer: true,
  };

  return (
    <div>
      <h1>Featured Game</h1>
      <GameCard game={gameData} />
    </div>
  );
}
Your task is to write the GameCard.js component. It should receive the game object as a prop and display the game's title, genre, and rating.
Show answer
Here is one possible solution for GameCard.js:
// In GameCard.js
export default function GameCard({ game }) {
  return (
    <div className="card">
      <h2>{game.title}</h2>
      <p>Genre: {game.genre}</p>
      <p>Rating: {game.rating} / 5</p>
    </div>
  );
}
This component uses destructuring to get the game prop and then accesses its properties (game.title, game.genre, game.rating) inside the JSX.
4. The Golden Rule of Props: They Are Read-Only
This is one of the most important concepts in React. A component must never change its own props. Props flow in one direction: down from parent to child.
Think of props as a snapshot of data at a specific point in time. Each time the parent component renders, it may pass new props to its children, but the child itself cannot modify the props it receives. This principle, known as immutability, makes your application's data flow predictable and easier to debug.
So, what happens when a component needs to change something in response to user interaction, like a button click? For that, you'll need state, which is the topic of our very next lesson.
Conclusion
Great work! You've taken a significant first step into modern React development. Let's summarize the key takeaways:
- Functional Components are the modern standard for writing React components. They are simple JavaScript functions that return JSX.
- Props are used to pass data from a parent component to a child, making components reusable and dynamic.
- You pass props like HTML attributes and receive them as a single object argument in the child component's function. Destructuring is the preferred way to access them.
- Props are read-only. A component cannot modify its own props.
You now have the fundamental skill to create static, reusable UI pieces. In the next lesson, we'll answer the question: "How does a component remember information and react to changes over time?" We will explore the useState hook to manage local component state and make our applications interactive.