Hello! Let's build on what we've learned and tackle a situation that is guaranteed to happen in any active open-source project.
In our last session, we mastered the pull request workflow: branching, committing, pushing to your fork, and opening a PR to propose your changes to the upstream project. This is the core mechanism for contributing. But what happens when the project you're contributing to changes after you've started your work? This is where merging comes in, and sometimes, it brings friends: merge conflicts.
This lesson is designed to equip you with the skills to merge branches locally and resolve common merge conflicts. Understanding this process is crucial for keeping your work in sync with a project and ensuring your contributions can be integrated smoothly.
Integrating Changes with git merge
Merging is the process of integrating changes from one branch into another. For example, when you finish a feature on its own branch, you merge it back into your main branch. Similarly, you'll often need to merge the latest changes from the upstream project into your feature branch to keep it up-to-date.
The command is straightforward:
# First, switch to the branch you want to merge INTO
git checkout main

# Then, run the merge command with the branch you want to merge FROM
git merge <branch-name>
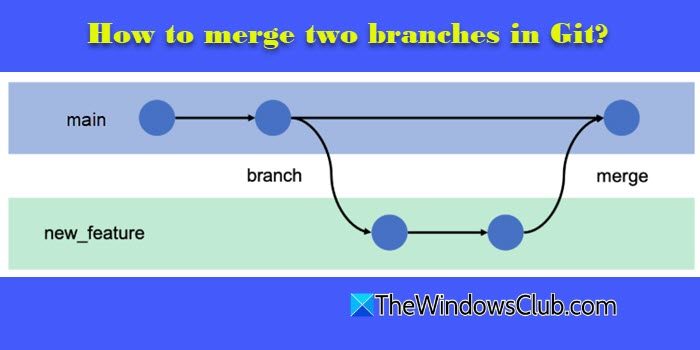
Git uses two primary strategies for merging:
- Fast-Forward Merge: If the branch you're merging into (
main) hasn't had any new commits since you created your feature branch, Git can simply move themainpointer forward to the tip of your feature branch. It's a clean, linear move. - Three-Way Merge: If both branches have new commits (i.e., their histories have diverged), Git must create a new "merge commit" to tie the two histories together. This commit has two parents and represents the integration of both lines of work.
To see these concepts in action, let's watch a quick demonstration.
Git & GitHub Tutorial for Beginners #9 - Merging Branches (& conflicts)
The video "Git & GitHub Tutorial for Beginners #9" from Net Ninja provides a clear demonstration of both fast-forward and recursive (three-way) merges.
Watch from the beginning to 03:41. Pay attention to how a simple git merge command is used and the different messages Git outputs for a fast-forward merge versus a recursive (three-way) merge.
When Merges Go Wrong: Understanding Conflicts
A merge conflict occurs when you try to merge two branches that have edited the same line(s) in the same file, or when one branch deletes a file that another branch has modified. Git can't automatically decide which change is correct, so it stops and asks you to resolve the situation manually.
This isn't an error; it's a normal part of collaborative development. Your task is to act as the human arbiter and tell Git what the final version of the code should be.
To truly understand conflicts, let's create one intentionally. The following guide from Atlassian provides a perfect simulation. I encourage you to follow these steps in your own terminal to get a feel for the process.
How to Resolve Merge Conflicts in Git?
The article "How to Resolve Merge Conflicts in Git?" provides an excellent, self-contained exercise for creating a conflict. We'll use this to see exactly what happens.
Read the section titled 'Creating a merge conflict'. Follow the command-line instructions provided to initialize a repository and create two diverging branches that will conflict when you try to merge them. Stop when you see the 'BOOM 💥. A conflict appears.' message.
The Conflict Resolution Workflow
Once you've encountered a conflict, the resolution process follows a consistent, four-step pattern: Identify, Inspect, Resolve, and Commit.
1. Identify the Conflict
As you saw in the exercise, Git gives you a clear message when a conflict occurs: Automatic merge failed; fix conflicts and then commit the result.
To find out which files have conflicts, use the git status command. It will list the conflicted files under an "Unmerged paths" section.
2. Inspect the Conflicted Files
Now, open the conflicted file(s) in your code editor. Git will have inserted special markers to show you exactly where the conflict lies.

The markers are:
<<<<<<< HEAD: Everything between this marker and the next (=======) is the version from your current branch (referred to asHEAD).=======: This divides the two conflicting versions.>>>>>>> <branch-name>: Everything between the divider and this marker is the version from the branch you are trying to merge in.
The following video provides an excellent walkthrough of how to identify conflicts and interpret these markers. It also introduces some indispensable commands.
Resolve Git MERGE CONFLICTS: The Definitive Guide
The video "Resolve Git MERGE CONFLICTS: The Definitive Guide" by The Modern Coder clearly explains how to diagnose a conflict. It also introduces a critical command for backing out of a confusing merge.
Watch from 02:35 to 04:24. Pay close attention to the use of git status and the introduction of git merge --abort. Knowing how to safely abort a merge is an invaluable safety net.
3. Resolve the Conflict
This is where you make a decision. You must edit the file to produce the final, correct version.
- Remove the conflict markers (
<<<<<<<,=======,>>>>>>>). - Decide which code to keep. You might choose the code from your branch, the code from the other branch, a combination of both, or something entirely new.
Many modern IDEs, like VS Code, have fantastic built-in tools to make this process much easier. They provide a visual interface that lets you accept one version, the other, or both, with the click of a button.
Resolve Git MERGE CONFLICTS: The Definitive Guide
Let's continue with "The Definitive Guide" to see both manual resolution and how an IDE can help.
Watch from 04:24 to 07:12. The first part (until 06:15) shows how to manually edit the file to resolve the conflict. The second part (from 06:15) demonstrates the powerful conflict resolution UI built into VS Code. This is how most developers handle conflicts in practice.
4. Commit the Resolution
Once you have edited the file(s) to resolve the conflict, you need to tell Git that you're done. This follows the standard add/commit workflow:
- Stage the resolved file(s): Use
git add <file-name>for each file you fixed. This tells Git that the conflict in that file is resolved. - Commit the merge: Run
git commit. Git will open your editor with a pre-populated commit message (e.g., "Merge branch 'feature'"). You can usually just save and close this to finalize the merge.
Test your understanding!
You are merging a branch called new-docs into main. You encounter a merge conflict in the README.md file. You open the file and see the conflict markers. After you manually edit the README.md file to combine the changes and remove the markers, what are the next two Git commands you need to run to complete the merge?
Show answer
git add README.md(to stage the resolved file)git commit(to create the merge commit and finalize the merge)
A Common Pitfall: Uncommitted Local Changes
Sometimes, Git will refuse to even start a merge. This often happens if you have uncommitted changes in your working directory that would be overwritten by the merge.
error: Your local changes to the following files would be overwritten by merge:
  <file-name>
Please commit your changes or stash them before you merge.
Git is protecting your work. The solution is to either commit your changes or, if they're not ready for a commit, temporarily set them aside using git stash.
Resolve Git MERGE CONFLICTS: The Definitive Guide
The Modern Coder's guide covers this exact scenario at the beginning. It's a quick but important concept to understand.
Watch from 01:44 to 02:35. This section demonstrates how uncommitted changes block a merge and how git stash can be used to solve it.
Conclusion
You've now learned one of the most practical and necessary skills in collaborative development. While merge conflicts can seem intimidating at first, they are a manageable part of the process once you understand the workflow to resolve them.
Key Takeaways:
git mergeis used to integrate changes from one branch into another.- Conflicts happen when two branches have competing changes to the same part of a file.
- The resolution workflow is: Identify (
git status), Inspect (look for markers), Resolve (edit the file), and Commit (git add,git commit). - Modern IDEs provide powerful tools to simplify conflict resolution.
- You can always escape a confusing merge state with
git merge --abort.
Preview of the next lesson:
We've learned how to move forward by merging branches. But what if you make a mistake? In the next lesson, we will explore the different ways you can undo changes in your working directory, staging area, or previous commits using git checkout, reset, and revert. This will complete your foundational toolkit for safely managing your code history.