Hello! In our previous lesson, we explored how to use git log to inspect the history of a project and understand that changes have occurred. Now, we'll take the next logical step and learn how to see precisely what those changes are.
This lesson focuses on git diff, one of the most fundamental commands for any developer, especially in a team setting. You'll learn how to compare changes between commits, branches, and the various states of your local repository. Mastering git diff is essential for reviewing your own work before you commit, understanding the changes in a teammate's pull request, and debugging your code with historical context.
The Three States of Git
To use git diff effectively, you first need a clear mental model of the three main areas where your code lives in Git:
- Working Directory: This is your project folder, containing the files you are actively editing. These are your "live" files.
- Staging Area (or Index): This is a preparation area where you gather changes that will be included in your next commit. You move changes from the working directory to the staging area using
git add. - Repository (History): This is the
.gitdirectory where Git stores the entire history of your project as a series of commits. TheHEADpointer typically points to the most recent commit on your current branch.
git diff works by comparing the content between these three areas. The following article provides an excellent explanation of this "three-tree architecture."
Git Diff Explained: A Complete Guide with Examples
This section from DataCamp's guide clearly explains the concept of the Working Directory, Staging Area, and Repository.
Read the section titled "Three-Tree Architecture". Focus on understanding the role of each of the three states and the list of comparisons that this enables.
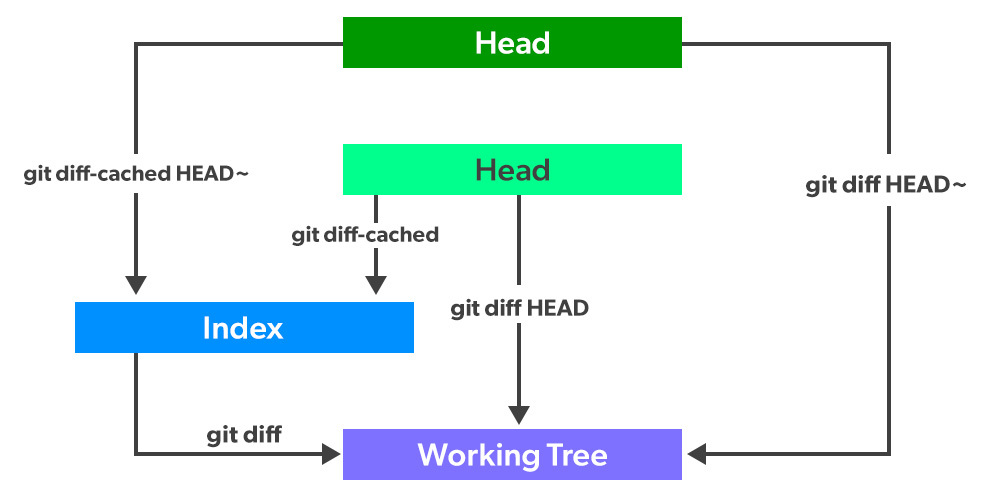
The relationships between these areas and the commands used to compare them can be visualized like this:

Basic Comparisons: Reviewing Your Own Work
Let's look at the three most common git diff commands you'll use daily to review your work before creating a commit.
-
git diff: Compares the Working Directory with the Staging Area.- Use case: To see changes you have made but have not yet staged with
git add. This is perfect for reviewing your work as you go.
- Use case: To see changes you have made but have not yet staged with
-
git diff --staged(or its synonymgit diff --cached): Compares the Staging Area with the last commit (HEAD).- Use case: To see the changes that are staged and will be included in your next commit. This is your final chance to review before you run
git commit.
- Use case: To see the changes that are staged and will be included in your next commit. This is your final chance to review before you run
-
git diff HEAD: Compares the Working Directory with the last commit (HEAD).- Use case: To see all changes you've made since your last commit, both staged and unstaged combined.
The article below provides a fantastic, practical guide to these commands and, crucially, explains how to interpret the command's output.
Mastering Git Diff: From Beginner to Power User | by Kalana Dias | Stackademic
This article by Kalana Dias clearly demonstrates the basic diff commands and breaks down the output format, making it easy to understand.
Please read the sections "The Default Git Diff Command" and "Decoding Git Diff Output". Pay close attention to the explanation of the +, -, and @@ markers, as these are the universal language of diffs. Then, continue with the section on viewing staged changes.
Comparing Across History: Branches and Commits
In a collaborative environment, you'll frequently need to compare different lines of development. git diff allows you to compare any two points in your project's history, such as the tips of two branches or two specific commits. This is the mechanism that powers code reviews in pull requests.
git diff <branch1>..<branch2>: Shows the changes onbranch2since it diverged frombranch1. This helps you understand what a feature branch will add before you merge it.git diff <commit-hash-1> <commit-hash-2>: Shows the difference between any two commits in your history. You can get commit hashes from thegit logcommand you learned in the previous lesson.git diff HEAD~1: A handy shortcut to see the changes introduced by the very last commit.HEAD~1refers to the parent of theHEADcommit.
The following video provides a concise and practical demonstration of these comparisons.
Git Diff 2 Different Commits, Tags or Branches
This short video by Nick Janetakis gets straight to the point, showing you exactly how to compare commits and branches.
Watch the segments on comparing two commits, comparing two branches, and using the HEAD~N shorthand to compare with recent commits.
The various git diff commands and the Git components they compare can be summarized in this more comprehensive flowchart.
Focusing Your Diffs
Sometimes, a full diff is too noisy. If you're reviewing a large feature branch, you might want a high-level summary first, or you might want to inspect the changes to a single, critical file.
git diff --stat: Provides a summary of changes, showing which files were changed and the number of lines added and removed. It's a great way to get a quick overview.git diff --name-only: Lists only the names of the files that have been changed.git diff <branch1>..<branch2> -- <path/to/file>: Limits the diff to a specific file or directory. The--is used to separate the branch/commit references from the file paths.
These options are covered in the same Stackademic article you read earlier. You can refer to the sections on "Focusing on Specific Files" and "Statistics and Summaries" if you'd like to explore them further.
Conclusion
In this lesson, we've unpacked the git diff command, moving from the conceptual model of Git's three states to practical applications for reviewing your own work and comparing branches.
Here are the key takeaways:
git diffoperates on three areas: the Working Directory, the Staging Area, and the Repository (HEAD).git diffshows unstaged changes,git diff --stagedshows what you're about to commit, andgit diff HEADshows all your uncommitted work.- You can compare any two branches or commits using
git diff <ref1> <ref2>, which is fundamental to code review workflows. - Flags like
--stator focusing on a specific file can help you manage and understand large sets of changes.
In our next lesson, we will look at git show, a command that provides a convenient way to inspect the content and metadata of a specific commit, building directly on the diffing skills you've learned today.