Welcome to our next lesson. In our previous session, we dove deep into git diff to understand how to compare changes between different points in your project's history. Now, we'll narrow our focus from comparing two points to closely inspecting a single one: a specific commit.
This lesson introduces git show, a command that acts like a magnifying glass for any commit in your repository. You'll learn how to use it to view a commit's metadata—who made the change, when they made it, and why—along with the exact code changes it contains. This skill is a direct and powerful combination of what you've learned from git log and git diff, providing a complete snapshot of a single step in your project's evolution.
What is git show?
At its core, git show is a command to view expanded details on Git objects. When used for a commit, its default behavior is incredibly useful: it displays the commit's log message and a diff showing the changes that commit introduced. Think of it as running git log -1 and git diff for a specific commit, all in one convenient command.
If you run git show without any arguments, it will show you the most recent commit on your current branch, which is referenced by HEAD.
# This will show the details of the latest commit
git show
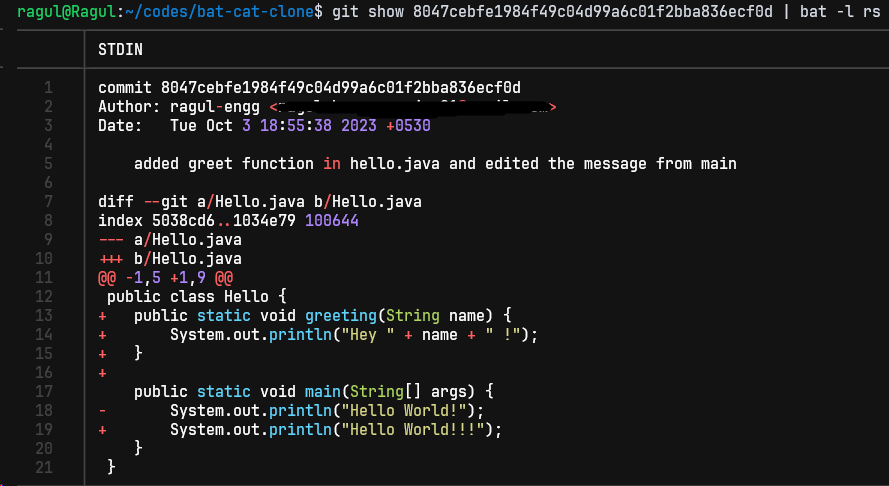
The output typically includes the commit hash, author, date, the full commit message, and then the diff output, just like you saw in the last lesson.
The Atlassian guide on git show provides a good overview of the command's purpose.
This article offers a concise introduction to the git show command, explaining its default behavior and what it displays for different Git objects.
Please read the introductory section, from the beginning down to the end of the first paragraph in that section. This will solidify your understanding of what git show does for commits.
The following image provides a clear example of what the output of git show for a specific commit looks like in the terminal.
Specifying a Commit to Inspect
While showing the HEAD commit is useful, the real power of git show comes from your ability to target any commit in your project's history. To do this, you need a way to refer to commits. You've already seen the long SHA-1 hashes in git log, but Git provides several more convenient ways to specify a commit.
The official Pro Git book has an excellent chapter on this topic. We'll focus on the most common and practical methods.
This chapter from the Pro Git book is the definitive guide to referencing commits. It covers everything from short hashes to ancestry navigation.
Please read the following sections: Start with Short SHA-1. This explains how you can use a shorter, more manageable version of the commit hash. Next, read Branch References, which shows how to use branch names as a shortcut to refer to the latest commit on that branch. Finally, read the section on Ancestry References. Pay close attention to the difference between the ^ (caret) and ~ (tilde) notations. This is a powerful technique for navigating recent history without needing to look up hashes.
To summarize the key methods for specifying a commit:
- Full SHA-1 Hash: The 40-character unique ID for a commit (e.g.,
8047cebfe198...). You get this fromgit log.git show 8047cebfe1984f49c04d99a6c01f2bba836ecf0d
- Short SHA-1 Hash: The first 7-10 characters of the hash, as long as it's unique within your project. This is much more common in practice.
git show 8047cebfe
- Branch or Tag Name: Refers to the commit that the branch or tag points to.
HEADis a special reference to your current commit.git show maingit show HEAD
- Ancestry References:
HEAD~orHEAD^: The parent of theHEADcommit.HEAD~2: The grandparent of theHEADcommit (two steps back in the first-parent history).main^2: The second parent of a merge commit at the tip of themainbranch. This is useful for seeing what was merged in.
Customizing the Output
Just like git log and git diff, git show has options to tailor its output. Sometimes you don't need the full diff and just want a summary or to see a specific file.
The Atlassian article you viewed earlier also provides some great examples of these options.
This resource also contains a great list of formatting options and practical examples.
First, skim the section "Pretty formats" to see the different ways you can format the commit metadata. Then, focus on the "Examples" section to see these options in action.
Here are some of the most practical options for git show:
- To get a summary of changes: Use
--statto see which files were changed and how many lines were added/removed, without the line-by-line diff.git show HEAD~1 --stat - To see only the names of changed files: Use
--name-only. This is great for a quick overview.git show HEAD~1 --name-only - To format the metadata: Use
--pretty=<format>or the--onelineshorthand to show just the commit hash and title. Note that this will suppress the diff output.git show --oneline HEAD~1 - To see the contents of a single file from that commit: This is a particularly powerful feature. By adding a colon and a file path after the commit reference, you can extract the version of that file as it existed in that specific commit.
# Show the contents of 'src/app.js' from the commit before the last one.
git show HEAD~1:src/app.js
Hands-On Practice
Now it's time to try this out yourself. Open a terminal in any of your Git projects and perform the following steps:
- Run
git log --oneline --graphto get a sense of your recent history and find an interesting commit hash. - Pick a short hash (the first 7 characters) and run
git show <short-hash>. Examine the full output. - Now, try navigating from
HEAD. Rungit show HEAD~2. See how it shows the commit two steps before your latest one. - Find a merge commit in your log (it will have more than one parent). Run
git show <merge-commit-hash>^1and thengit show <merge-commit-hash>^2to see the different parent commits. - Finally, pick a commit and view just the file statistics with
git show <hash> --stat.
This hands-on exercise will help solidify the different ways you can reference commits and format the output.
Conclusion
In this lesson, you've added git show to your toolkit for inspecting project history. It provides a detailed, focused view of a single commit, making it an indispensable command for understanding specific changes.
Key takeaways from this lesson:
git showdisplays the metadata and code changes for a single commit.- By default,
git showtargets theHEADcommit. - You can specify any commit using its full or short hash, a branch name, or powerful ancestry references like
HEAD~andHEAD^. - You can customize the output to show summaries (
--stat), file lists (--name-only), or even the content of a file at that point in history (<commit>:<file>).
In our next lesson, we will tie together several concepts we've discussed. We'll use git log and git status to better understand what HEAD is, what it means for it to be in a "detached state," and how that impacts your workflow.