Introduction
Welcome to the final lesson in our module on building a 4G security test lab. In the previous lesson, you successfully programmed a physical SIM card with a unique subscriber identity (IMSI) and the secret keys (Ki, OPc) required for authentication. You've essentially created the "key" for our private network.
Today, your learning outcome is to add a corresponding subscriber profile to the Open5GS database via its web interface. This is the other half of the puzzle. The network's core, specifically the Home Subscriber Server (HSS), needs a record of this subscriber to verify the key when the device tries to connect. Think of it as adding a user's profile and credentials to a server-side authentication database.
By completing this step, you will have fully provisioned our first subscriber, linking the physical credential (the SIM card) to the network's digital record (the HSS entry). This completes the setup of our lab environment and prepares us to finally launch the network and connect a device.
Accessing the Open5GS Web Interface
Open5GS includes a web-based user interface for managing its components, most importantly for our purpose, the subscriber database. Since you've already installed Open5GS, the web UI service should also be installed.
Your proficiency with Linux environments and managing services will be useful here. First, let's ensure the service is running.
-
Check the Service Status: Open a terminal on the machine where you installed Open5GS and run the following command:
sudo systemctl status open5gs-webui.serviceYou should see an "active (running)" status. If it's not active, you can start or restart it with:
sudo systemctl restart open5gs-webui.service -
Log in to the Web UI: Once the service is running, open a web browser on the same machine.
- The Open5GS documentation typically points to
http://localhost:9999. - Some guides, like the ShareTechnote resource, mention
http://localhost:3000. This port may vary depending on the version of Open5GS you installed. Tryhttp://localhost:9999first.
You will be prompted for credentials. The default login is:
- Username:
admin - Password:
1423
- The Open5GS documentation typically points to
The following resource from ShareTechnote provides a good overview of these initial steps.
Running WebUI - OpenRAN | ShareTechnote
This guide from ShareTechnote shows how to check the web UI service and log in. It serves as a good reference for the initial access steps.
Read the sections 'Running WebUI' and 'Log in to WebUI'. These sections cover the systemctl commands and the login procedure.
Creating the Subscriber Profile
Once logged in, you will see the main dashboard. Our goal is to create a new subscriber entry in the HSS that exactly matches the data you programmed onto your SIM card.
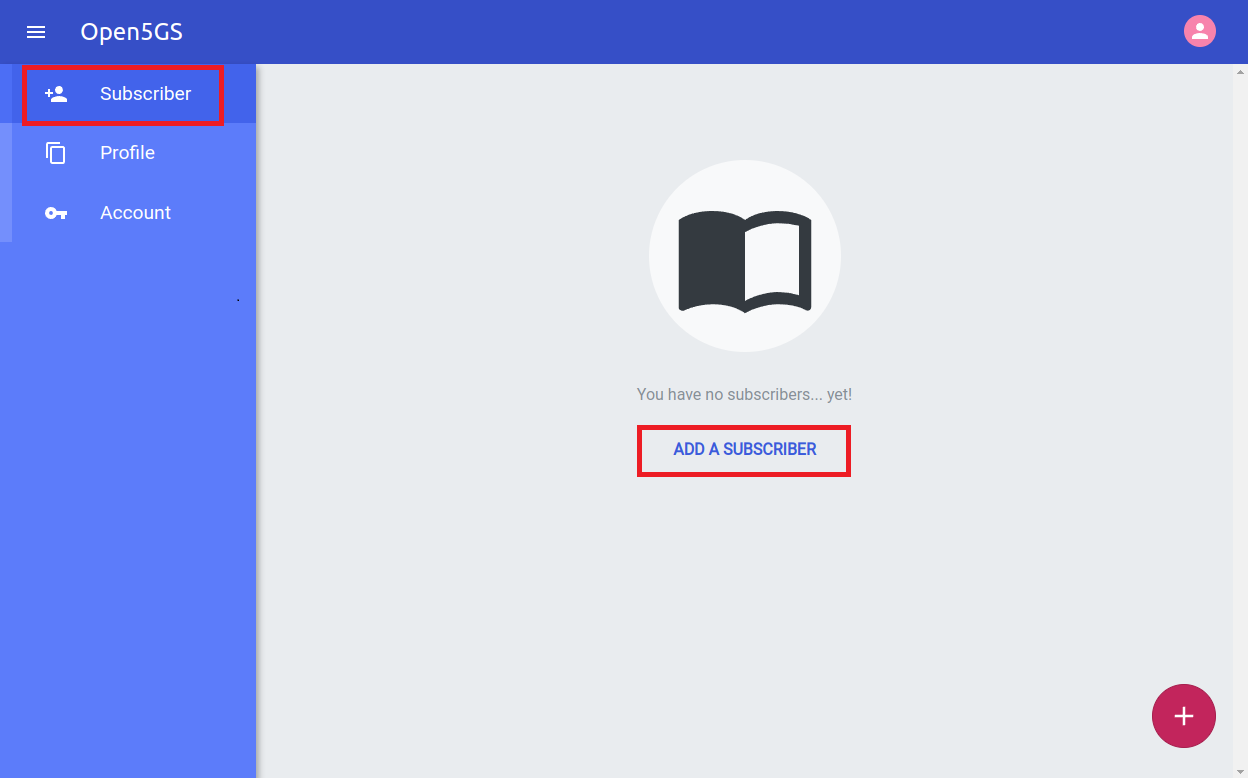
Step 1: Navigate to the Subscriber Section
As shown in the image below, start by clicking on the Subscriber menu item on the left, and then click the ADD A SUBSCRIBER button.
Step 2: Fill in the Subscriber Details
This will open a form with numerous fields. For a successful 4G attach, only a few are mandatory. The most critical are the IMSI and the security keys, which must be identical to the ones on your SIM card.
Let's use the exact values from the previous lesson:
- IMSI:
999700000000001 - Ki:
00112233445566778899AABBCCDDEEFF - OPc:
E8ED289DEBA952E4283B54E88E6183CA
Now, let's map these to the web form fields. The image below shows the "Create Subscriber" form with the key fields highlighted.
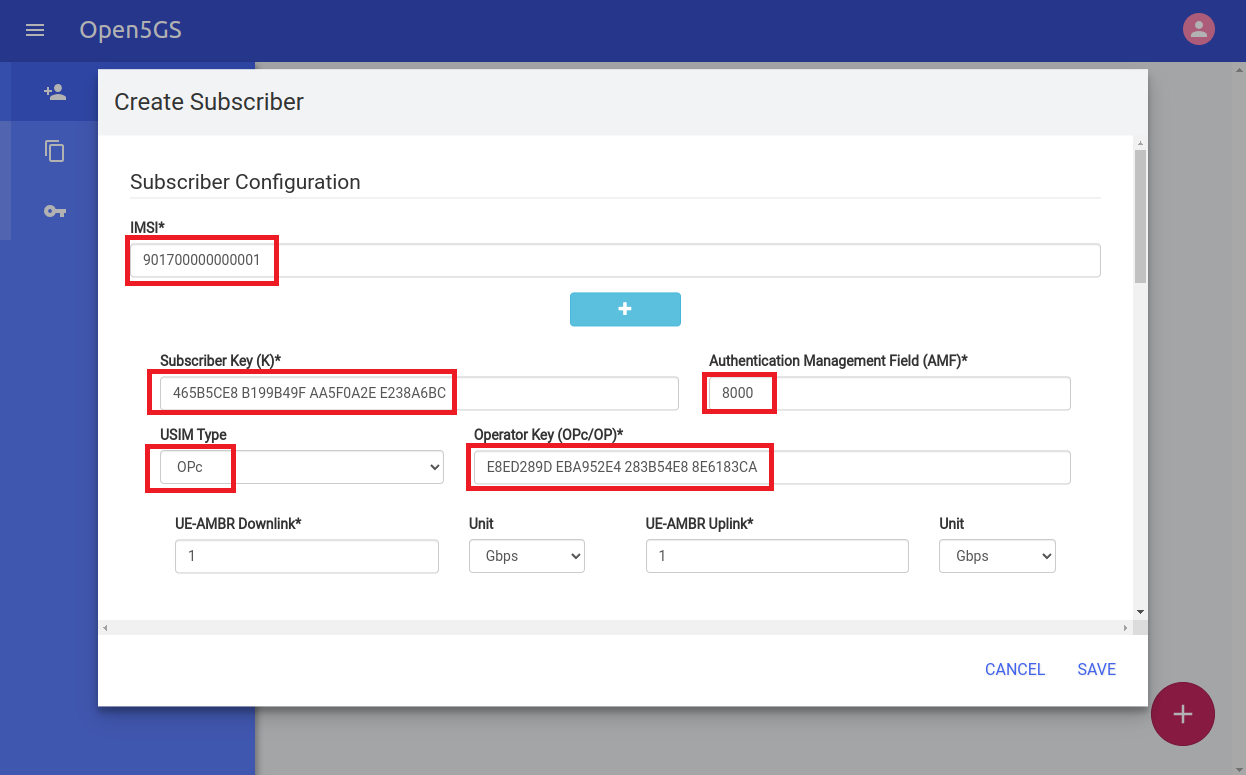
Fill out the form as follows:
- IMSI: Enter
999700000000001. - Security Section:
- Subscriber Key (K): Enter
00112233445566778899AABBCCDDEEFF. - USIM Type: Select OPc. This tells Open5GS that you are providing the pre-computed OPc value, not the root OP key.
- Operator Key (OPc/OP): Enter
E8ED289DEBA952E4283B54E88E6183CA. - Authentication Management Field (AMF): Leave this at the default value, which is typically
8000.
- Subscriber Key (K): Enter
- Subscription Section:
- Access Point Name (APN): You need to define at least one APN. An APN is a gateway that connects the mobile network to an external IP network. For our test lab, we can define a simple one. Click + Add and enter
internetas the identifier. You can leave the other APN fields (like QCI) at their default values for now.
- Access Point Name (APN): You need to define at least one APN. An APN is a gateway that connects the mobile network to an external IP network. For our test lab, we can define a simple one. Click + Add and enter
The official Open5GS tutorial also walks through this process. You can review it for reinforcement.
The official Open5GS documentation provides a concise reference for adding a subscriber. Focus on the steps related to the web UI.
Review the steps under the 'Connect to http://localhost:9999...' heading. This section lists the key fields (IMSI, K, OPc) and shows the step-by-step process of adding a subscriber.
For a dynamic overview of this process and a bit more context on the fields, the following short video is helpful.
This video provides a quick walkthrough of the Open5GS web interface, including adding a subscriber. Pay attention to how the IMSI, key, and APN are configured.
Watch the segment from 04:37 to 06:00. The presenter shows the subscriber list and discusses the essential fields like the key (K), APN, and QCI for a new subscriber.
Step 3: Save and Verify
After filling in the IMSI, security credentials, and APN, scroll to the bottom of the page and click the SAVE button.
The page will return to the subscriber list, and you should now see your newly created subscriber, identified by its IMSI. A key advantage of the web UI is that this change takes effect immediately in the Open5GS HSS database; no service restart is required.
You have now successfully provisioned the subscriber in the core network.
Conclusion
Fantastic work. You have now completed the configuration of all the fundamental components for your private 4G lab. The base station (srsENB) and core network (Open5GS) are configured, the subscriber's physical credential (the SIM card) is programmed, and the network's authentication database (the HSS) now has a matching record.
Key Takeaways:
- The Open5GS web UI is the management portal for the core network's subscriber database (HSS).
- For successful authentication, the subscriber profile in the HSS must contain the exact same IMSI, Ki, and OPc values that are programmed on the USIM card.
- In addition to security credentials, a subscriber profile must have at least one APN defined to allow for data connectivity.
- Changes made via the web UI are typically applied to the HSS in real-time without needing to restart core network services.
Preview of the Next Lesson:
With the lab built and the first subscriber fully provisioned, we are ready for the exciting part. The next module, "Operating the 4G Test Lab," will guide you through launching all the software components. In the very first lesson, you will launch and verify the operation of the Open5GS core network services, bringing the "brain" of our network online and preparing it to receive a connection request from a base station.