Introduction
Welcome back! In our last lesson, you successfully identified the frequencies of nearby GSM base stations using tools like kalibrate-rtl. You now have a list of active targets. Today, we put that information to use.
This lesson directly addresses the learning outcome: Capture GSM broadcast channels (BCCH) using gr-gsm and analyze them in Wireshark. We will tune your RTL-SDR to one of the frequencies you discovered, capture the base station's public "announcements," and decode them in real-time.
This is a significant step. You will be moving from simply detecting signals to interpreting the language of the cellular network. The data we capture from the Broadcast Control Channel (BCCH) is unencrypted and fundamental to how any phone joins the network, making it a primary target for passive reconnaissance.
1. The Target: What is the Broadcast Control Channel (BCCH)?
Before we capture the BCCH, let's clarify what it is. Every GSM base station (BTS) continuously broadcasts information that phones in the area need to know. Think of it as the cell's public announcement system. The BCCH carries a set of messages called System Information (SI) messages. These messages tell a phone:
- Who the network operator is (e.g., T-Mobile, Vodafone).
- What the cell's identifiers are.
- What control channel configurations to use.
- Information about neighboring cells for seamless handovers.
This information is broadcast "in the clear" (unencrypted) so that any phone can discover and evaluate the network before attempting to connect. For a security researcher, this is a goldmine of information about the local cellular landscape.
Given your experience with network analysis, you can draw a parallel between the BCCH and the beacon frames in 802.11 (Wi-Fi) networks, which broadcast the SSID and other network parameters.
To get a more formal understanding of the GSM signal structure we're about to dissect, the following video from the creator of gr-gsm is an excellent resource.
Camp++ 0x7e0 // GSM signal sniffing for everyone with gr-gsm and Multi-RTL by Piotr Krysik
To understand what we're about to capture, it's helpful to know a bit about the structure of a GSM signal. The creator of gr-gsm, Piotr Krysik, provides an excellent overview in this talk. It will give you a solid theoretical footing for our practical work.
Watch the section from 21:28 to 26:04. Focus on the explanation of TDMA frames, time slots, and especially the logical channels that make up the Broadcast Channel (FCCH, SCH, BCCH, CCCH). Don't worry about memorizing everything; the goal is to get a conceptual model of what gr-gsm is decoding.
2. The Workflow: gr-gsm and Wireshark
Our strategy involves a simple but powerful toolchain:
grgsm_livemon: This tool from thegr-gsmsuite will use your RTL-SDR to tune to the GSM frequency you provide. It will receive the raw radio signal, demodulate it, and decode the logical channels (like the BCCH).- UDP Socket:
grgsm_livemonwill then encapsulate the decoded GSM messages into a special format called GSMTAP. It sends these GSMTAP packets to a local UDP port on your machine (port 4729 by default). - Wireshark: You will run Wireshark and instruct it to listen on your local loopback interface (
lo) for these UDP packets. Because Wireshark natively understands the GSMTAP format, it will automatically dissect the packets, presenting the GSM protocol information in the familiar, structured view you're used to from analyzing IP networks.
This setup allows for live, real-time analysis of a cell tower's broadcasts.
3. Hands-On Lab: Capturing the BCCH
Let's get this running. You will need two terminal windows.
Step 1: Start Wireshark
First, we'll get Wireshark ready to receive the data. Since we're listening on a local interface for packets from another local process, you may need elevated privileges.
Open your first terminal and run the following command:
sudo wireshark -k -i lo -f "udp port 4729" -Y gsmtap
Let's break down that command:
sudo wireshark: Runs Wireshark with root privileges. (You can configure your system to run it as a non-root user, as mentioned in thegr-gsmwiki).-k: Starts capturing immediately.-i lo: Listens on the loopback interface, which is wheregrgsm_livemonwill send its data.-f "udp port 4729": A capture filter to only grab packets on UDP port 4729, where GSMTAP data is sent.-Y gsmtap: A display filter to only show packets of thegsmtapprotocol once captured.
Your Wireshark window will open, but it will be empty for now.
Step 2: Start grgsm_livemon
Now, pick one of the strongest frequencies you found in the last lesson. Let's say you found a strong signal at 945.2 MHz.
In your second terminal, run grgsm_livemon, providing that frequency with the -f flag. Note that the frequency must be in Hertz.
# Example for a frequency of 945.2 MHz
grgsm_livemon -f 945.2e6
Replace 945.2e6 with your target frequency. A GUI window should appear showing the signal's spectrum. If the signal is strong and your SDR's clock is reasonably accurate, you should see messages start printing in the terminal and, more importantly, packets appearing in Wireshark.
Troubleshooting:
- No data? Your SDR's frequency offset might be too high. Try adjusting the PPM correction with the
-pflag, just as you did withkalibrate-rtl. You might also need to adjust the gain with-g(e.g.,-g 40).grgsm_livemon -f 945.2e6 -p <your_ppm> -g 40 - Still no data? Double-check your frequency and try another one from your scan list.
The following video provides a concise demonstration of this exact process.
GSM Sniffing: Using GR-GSM - Software Defined Radio Series #8
This video provides a very clear, step-by-step demonstration of the exact process we're undertaking: running grgsm_livemon and seeing the decoded packets appear in Wireshark.
Watch from 2:18 to 6:58. The first part (until 3:26) shows the live connection between grgsm_livemon and Wireshark. The second part (from 3:26 onwards) is an excellent walkthrough of how to interpret the captured packets, pointing out key fields like MCC, MNC, and the Cell Channel Description.
4. Analyzing the Data in Wireshark
With packets flowing into Wireshark, you're now observing the heartbeat of the cell. Your Wireshark window should look something like this:
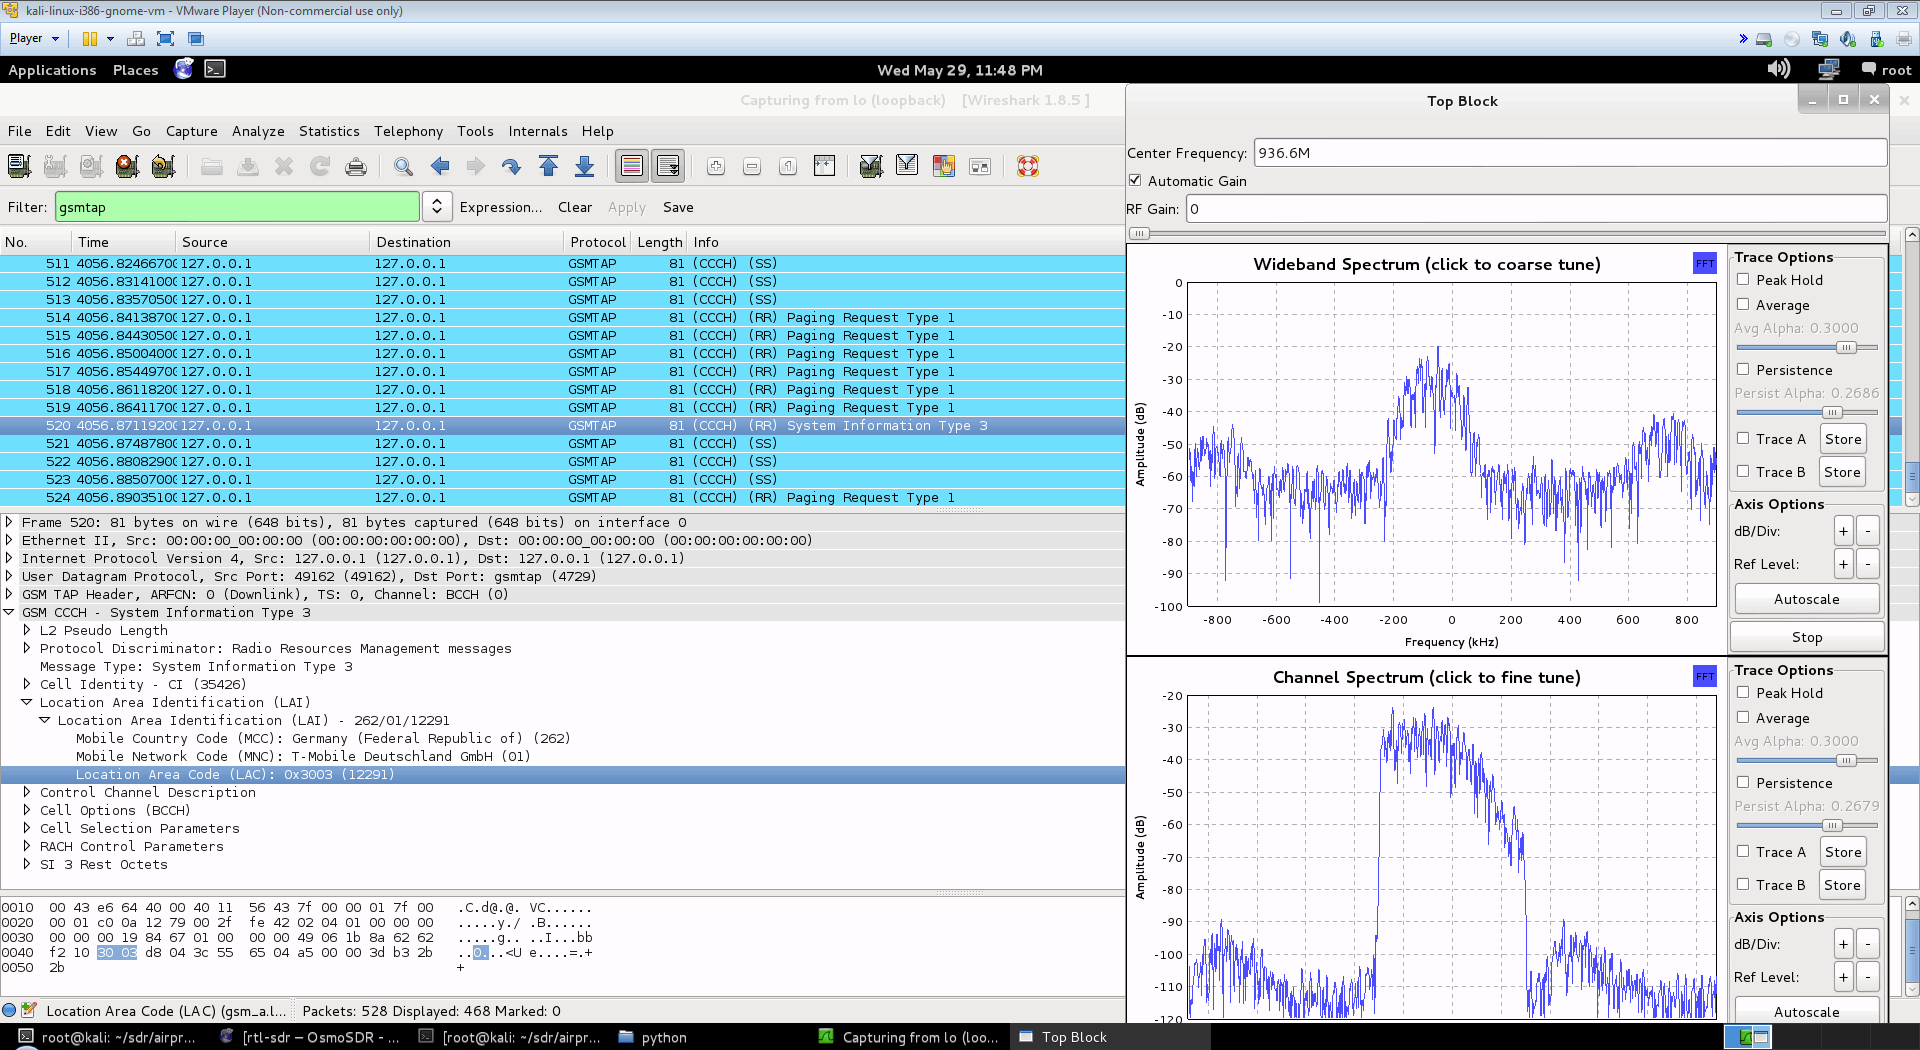
Let's focus on the most important messages you'll see on the BCCH. In Wireshark's display filter bar, you can use filters to isolate them.
| Message Type | Wireshark Filter | Information Contained |
|---|---|---|
| System Information Type 1 | gsm_a.dtap.msg_rr_type == 0x19 |
A list of channels used by the cell. Critical for understanding frequency hopping, a topic we'll touch on later. |
| System Information Type 2 | gsm_a.dtap.msg_rr_type == 0x1a |
Information about neighboring cells. |
| System Information Type 3 | gsm_a.dtap.msg_rr_type == 0x1b |
This is the jackpot. It contains the Cell ID, MCC, MNC, and LAC. |
| System Information Type 4 | gsm_a.dtap.msg_rr_type == 0x1c |
Additional information about the cell and control channels. Often includes information that indicates if the cell supports GPRS. |
| Paging Request | gsm_a.dtap.msg_rr_type == 0x21 |
The BTS broadcasting a phone's temporary identity (TMSI) to notify it of an incoming call or text. |
Click on a System Information Type 3 packet. In the packet details pane, expand the "GSM A-I/F DTAP" and "Radio Resource Management" sections. You will be able to clearly see:
- Mobile Country Code (MCC): Identifies the country.
- Mobile Network Code (MNC): Identifies the specific carrier within that country.
- Location Area Code (LAC): Identifies a group of base stations.
- Cell Identity (CI): Identifies this specific base station within the LAC.
You have now successfully de-anonymized the cell tower you are listening to.
For a complementary written guide on this process, the following resource is very helpful.
The blog post 'A look at GSM' provides a written walkthrough that complements the video. It clearly shows how to decode BCCH traffic and what to look for in Wireshark.
Read the section titled 'Analyzing BCCH traffic'. The example uses grgsm_decode on a saved file, but the Wireshark analysis is identical to our live capture. Pay attention to the Wireshark filter used and the breakdown of the 'Immediate Assignment' message, another important control message you will see.
Conclusion
Congratulations! You have successfully intercepted and decoded live cellular network traffic. This is a foundational skill for nearly all the practical attacks and analysis that will follow in this course.
Key Takeaways:
- The Broadcast Control Channel (BCCH) carries unencrypted System Information (SI) messages that are essential for passive reconnaissance.
- The
grgsm_livemon-> UDP -> Wireshark toolchain provides a powerful method for live analysis of GSM signals. - Wireshark uses the GSMTAP protocol to understand and dissect the messages sent by
gr-gsm. - By analyzing System Information Type 3 messages, you can identify a cell's operator (MNC), country (MCC), Location Area (LAC), and Cell ID (CI).
Preview of the Next Lesson:
We have now established a solid workflow for finding and analyzing 2G/GSM signals. Now it's time to turn our attention to the more modern networks that are your ultimate goal. In the next lesson, "Use an LTE cell scanner tool to find and identify nearby LTE base stations," we will apply a similar methodology to the 4G network, setting the stage for analyzing LTE security.