Hello! Welcome back to our deep dive into database recovery.
In our last lesson, we successfully navigated the Analysis phase of ARIES. We learned how to scan the log from the last checkpoint to the crash point, reconstructing the Active Transaction Table (ATT) and Dirty Page Table (DPT). This gave us a crucial "map" of the database's state at the moment of failure, identifying "winner" transactions that committed and "loser" transactions that were still active, along with pages that might not have been written to disk.
Today, we move to the next logical step: using that map to start the restoration process. This lesson covers the Redo phase. Your learning goal is to perform the Redo phase of ARIES to repeat history and restore the database state, including for uncommitted transactions. We will meticulously replay the log to bring the database to the exact state it was in at the time of the crash, ensuring that the promises of durability are kept.
The ARIES Recovery Roadmap: Phase 2
Let's revisit our recovery roadmap. We've completed Analysis; now we're on to Redo.
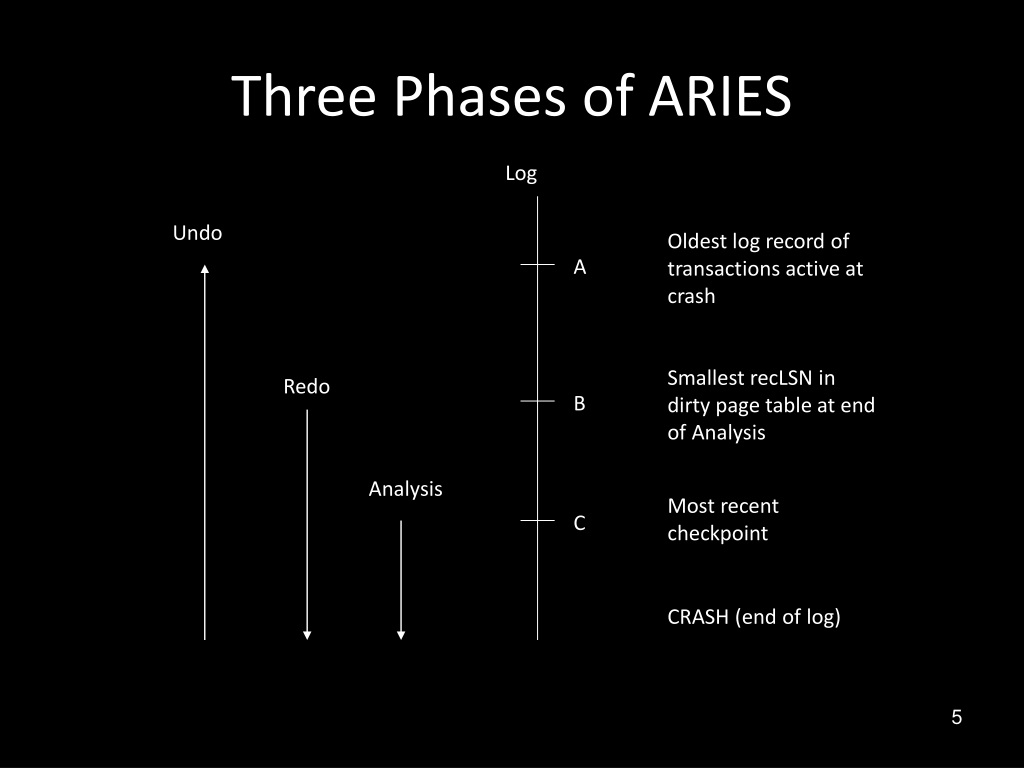
- Phase 1: Analysis - Done! We have the final ATT and DPT.
- Phase 2: Redo (Our focus today)
- Goal: "Repeat history." Reapply all updates from a specific point in the log to ensure the database reflects the state at the crash. This includes the effects of uncommitted ("loser") transactions.
- Phase 3: Undo
- Goal: "Clean up the mess." Roll back all "loser" transactions.
The Redo Phase: Repeating History
The core principle of the Redo phase is to ensure that all changes recorded in the log are reflected on the data pages on disk. Why is this necessary? Because of the NO-FORCE buffer management policy, a transaction can commit (and its log records flushed to disk) without its modified data pages being flushed. If a crash occurs, those changes exist in the log but not on the data pages. The Redo phase fixes this discrepancy.
Where Does Redo Start?
The Analysis phase gave us the DPT, which contains a recLSN for every page that was dirty at the time of the checkpoint. The Redo phase starts its forward scan of the log from the smallest recLSN found in the DPT.
This LSN represents the earliest point in the log where a change was made to a page that might not have been written to disk. By starting here, we guarantee that we consider every single modification that could possibly be missing from the persisted data pages.
The Redo Algorithm
The Redo algorithm is a single forward pass over the log. Given your experience with C++ and data structures, you can think of it as iterating through a file (the log) and, for each entry, deciding whether to perform an action based on information in a hash table (the DPT) and metadata on the page itself.
For a deeper look into the logic, the following video segment provides a clear and concise explanation.
20 - Database Recovery with ARIES (CMU Intro to Database Systems / Fall 2022)
Watch this segment from the CMU Database Systems course. Professor Andy Pavlo explains the Redo phase, detailing how it starts and the rules it follows to reapply changes.
Watch from 1:06:20 to 1:08:41. Focus on these key points: The starting point of the scan: the smallest recLSN from the DPT. The conditions under which a change is re-applied versus skipped. The fact that Redo applies to both UPDATE records and CLRs (Compensation Log Records). The final housekeeping step for committed transactions at the end of the phase.
As you saw in the video, the logic is very specific to ensure changes are applied if and only if they are needed. This makes the Redo process idempotent—running it multiple times has the same effect as running it once, which is critical if the system crashes during recovery.
Here are the rules for redoing an action for a log record with LSN = L:
- Find the page
Paffected by the log record. - The change is re-applied only if all of the following conditions are true:
- The page
Pis present in the DPT constructed during the Analysis phase. - The
recLSNfor pagePin the DPT is less than or equal toL. - The
pageLSNon the actual data page on disk is strictly less thanL.
- The page
This final check is the most important. If the page's pageLSN is already greater than or equal to L, it means the change from this log record (and possibly later ones) has already been successfully written to the page on disk. There's no need to do it again.
To "redo" an action, the system:
- Fetches the page
Pfrom disk into the buffer pool (if not already there). - Applies the "after" value from the log record to the page.
- Sets the
pageLSNof the in-memory page toL.
Crucially, no new log records are generated during this process. We are simply replaying what has already been logged.
A Worked Example
Let's walk through a concrete example to solidify these rules. This document from the University of Washington provides an excellent scenario.
This document walks through a full ARIES recovery example. We'll focus on the setup and the Redo phase.
Please read the sections titled 'State of the System Before Crash' and 'Redo Phase'. Pay close attention to the state of the log and which pages are flushed to disk before the crash. Then, in the Redo Phase section, trace why each LSN is either 'Redone' or 'Skipped'.
Let's break down the Redo phase from that example:
- Analysis Outcome: The DPT is
{ (P1, recLSN=1), (P2, recLSN=3) }. The smallestrecLSNis 1. The Redo phase starts at LSN 1. - Log on Disk (after crash):
LSN 1toLSN 5.
Here is the trace of the Redo phase:
-
LSN 1: (T1, UPDATE P1)
- Is P1 in the DPT? Yes.
- Is
recLSNfor P1 (1) <= current LSN (1)? Yes. - Assume P1 was not flushed, so its
pageLSNon disk is old (e.g., 0). IspageLSN(0) < 1? Yes. - Result: Redone. The change to
Ais applied to page P1.
-
LSN 2: (T2, UPDATE P1)
- Is P1 in DPT? Yes.
recLSNis 1.pageLSNis now 1 (from previous step). - Is
pageLSN(1) < 2? Yes. - Result: Redone. The change to
Bis applied to page P1.
- Is P1 in DPT? Yes.
-
LSN 3: (T2, UPDATE P2)
- Is P2 in DPT? Yes.
recLSNis 3. - The scenario states P2 was flushed to disk after this update. This means the
pageLSNon the disk version of P2 is 3. - Is
pageLSN(3) < 3? No. - Result: Skipped. The change is already on disk.
- Is P2 in DPT? Yes.
-
LSN 4: (T1, UPDATE P2)
- Is P2 in DPT? Yes.
recLSNis 3.pageLSNon disk is 3. - Is
pageLSN(3) < 4? Yes. - Result: Redone. The change to
Dis applied to page P2.
- Is P2 in DPT? Yes.
-
LSN 5: (T1, COMMIT) - This is not an update record, so it is skipped in this part of the Redo phase.
At the end of this scan, any transaction with status 'C' (Committed) in the ATT has a TXN-END record written for it. In this case, a TXN-END for T1 is appended to the log.
Test your understanding!
Let's use the result from the previous lesson's exercise. After the Analysis phase, we had:
- ATT:
{(T1, C, lastLSN=4), (T2, U, lastLSN=3)} - DPT:
{(P1, recLSN=1), (P2, recLSN=3)}
The log on disk was:
LSN  Log Record
---  ----------
1    <T1, UPDATE P1, ...>
2    <T2, UPDATE P1, ...>
3    <T2, UPDATE P2, ...>
4    <T1, UPDATE P2, ...>
5    <T1, COMMIT>
Assuming no pages were flushed to disk between their modification and the crash, which LSNs will have their actions re-applied during the Redo phase?
Show answer
- Start Point: The smallest
recLSNin the DPT is 1. The Redo scan starts atLSN 1. - LSN 1 (T1, UPDATE P1): Redone. The
pageLSNon disk for P1 is old (less than 1). - LSN 2 (T2, UPDATE P1): Redone. The
pageLSNfor P1 is now 1, which is less than 2. - LSN 3 (T2, UPDATE P2): Redone. The
pageLSNon disk for P2 is old (less than 3). - LSN 4 (T1, UPDATE P2): Redone. The
pageLSNfor P2 is now 3, which is less than 4. - LSN 5 (T1, COMMIT): Skipped (not an update).
Conclusion: All update records (LSN 1, 2, 3, 4) are redone. This makes sense, as we assumed no pages were flushed, so the database on disk is completely out of date with respect to the log. The Redo phase brings it up to speed.
Conclusion
In this lesson, we executed the second crucial phase of ARIES recovery. By "repeating history," the Redo phase ensures the fundamental database promise of durability. Even though a crash occurred, the changes from all committed transactions are now safely reflected in the database state.
Key Takeaways:
- The Redo phase is a forward pass that ensures all logged changes are applied to disk, fulfilling the durability property of ACID.
- It starts from the smallest
recLSNin the Dirty Page Table that was constructed during the Analysis phase. - It re-applies changes for all transactions (winners and losers) to bring the database to its exact state at the moment of the crash.
- The process is idempotent, using the
pageLSNon disk to decide whether to skip or re-apply a logged change.
Preview of the Next Lesson
We have successfully restored the database to the state it was in at the moment of the crash. However, this state includes changes from "loser" transactions that never committed. The job isn't done yet. In our next lesson, we will tackle the final step: the Undo phase. We will learn how ARIES rolls back the changes made by these loser transactions, leaving the database in a final, clean, and consistent state.