Hello again! It's great to connect for our next session.
In our last lesson, we dug into the real-world performance of the Rankine cycle, the workhorse behind steam power plants. We saw how irreversibilities, especially in the pump and turbine, reduce the actual work output and efficiency compared to the ideal blueprint. The key takeaway was understanding how we generate power by moving heat from a hot source to a cold sink.
Today, we're going to flip that idea on its head. What if we want to move heat in the opposite direction—from a cold space to a warmer one? This is exactly what a refrigerator or an air conditioner does. To do this, we need to supply energy. We're moving from a cycle that produces work to a cycle that consumes it.
Our learning goal for this lesson is to describe the basic components and operation of the ideal vapor-compression refrigeration cycle. This is the fundamental cycle that makes modern refrigeration possible. By the end, you'll understand the magic behind how your fridge keeps your food cold.
The Big Idea: Moving Heat, Not Creating Cold
First, let's get a core concept straight. A refrigerator doesn't "create cold." Cold isn't really a "thing" in thermodynamics; it's simply the absence of heat energy. Therefore, a refrigerator works by acting as a heat mover (or a heat pump). It pulls heat energy from the inside of the fridge and dumps that heat into the surrounding room.
This is an unnatural process. Heat naturally flows from hot to cold, not the other way around. To force heat to move against its natural tendency, we must put in work. This is where the Second Law of Thermodynamics, which we've touched on before, comes into play.
Watch this short clip to see this idea explained. The presenter does a great job of breaking down a real fridge to get to the core principle.
How does a fridge work? | The Secret Genius of Modern Life - BBC
In this video from the BBC series 'The Secret Genius of Modern Life', the presenter makes the crucial point that a refrigerator is a 'heat moving system' and explains the roles of the key parts.
Please watch from 0:23 to 2:14. Focus on the idea that cold is the absence of heat and that a fridge's job is to move heat from inside to outside.
The Two Key Physical Principles
So, how do we actually move this heat? The entire refrigeration cycle is built on two simple, yet powerful, physical principles that you've probably experienced.
- Compression Heats a Gas: When you pump up a bicycle tire, the pump gets hot. This is because you are doing work to squeeze the air molecules closer together, which increases their internal energy and, therefore, their temperature.
- Expansion Cools a Gas: When you use a spray deodorant or an air duster, the can gets noticeably cold. This is because the high-pressure fluid inside rapidly expands and evaporates as it exits the nozzle, a process which requires energy. It draws this energy from its immediate surroundings, causing a cooling effect.
This next video demonstrates these two effects perfectly using a bike pump and a spray can. This is the heart of the intuition behind refrigeration.
Refrigerator - How Does It Work?
This classic video from 'CuriosityShow' provides a fantastic hands-on demonstration of the two core principles of refrigeration.
Watch from the beginning (0:03) to 3:02. First, you'll see how a bike pump heats up, and then how a spray can and a tire valve cool down when gas is released.
Now, let's use these two ideas to build a refrigerator.
- Inside the fridge (where we want it to be cold), we need the cooling effect of expansion.
- Outside the fridge (where we want to dump heat), we need the heating effect of compression.
By connecting these two processes in a closed loop with a special fluid, we can create a continuous heat-moving machine.
The Four Key Components of the Refrigeration Cycle
Every standard vapor-compression refrigeration system, from your kitchen fridge to a large commercial freezer, operates with four essential components. A special fluid called a refrigerant circulates through them in a closed loop.
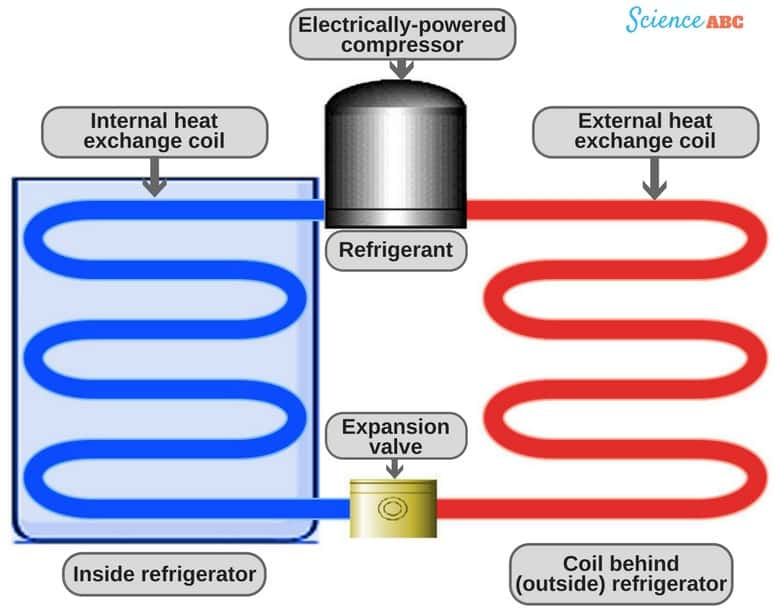
Let's walk through each component, following the path of the refrigerant. I recommend reading the following webpage, which does an excellent job introducing these parts.
The Refrigeration Cycle - In easy to understand ...
The article 'The Refrigeration Cycle' from Torr Engineering provides a clear and concise breakdown of the four main components. We'll use it as a guide for this section.
Please read the first part of the article, down to the end of the numbered list describing the five elements (Compressor, Condenser, Restriction, Evaporator, Refrigerant). This will give you a great overview.
Now, let's break down the function of each part in our own words.
1. The Evaporator (The Heat Absorber)
- Location: Inside the cold compartment (e.g., the freezer section of your fridge).
- What it does: The low-pressure, very cold liquid refrigerant flows through a series of coils. The heat from the food and air inside the fridge is higher than the refrigerant's temperature. This heat flows into the refrigerant, causing it to boil and turn into a gas (evaporate).
- Analogy: This is the "spray can" part of our system. By boiling at a very low temperature (e.g., -20°C), it soaks up heat from its surroundings, just like sweat evaporating from your skin cools you down.
- Result: The refrigerant leaves the evaporator as a low-pressure, low-temperature gas. The inside of the fridge gets colder because its heat has been carried away by the refrigerant.
2. The Compressor (The Heart of the System)
- Location: Usually the black, dome-shaped motor at the bottom-back of your fridge.
- What it does: This is where we put work (electricity) into the system. The compressor sucks in the low-pressure gas from the evaporator and compresses it.
- Analogy: This is the "bike pump" part. Compressing the gas forces the molecules together, drastically increasing its pressure and temperature.
- Result: The refrigerant leaves the compressor as a high-pressure, high-temperature gas (superheated vapor). It is now much hotter than the air in your kitchen.
3. The Condenser (The Heat Rejector)
- Location: The large coils on the back of an older fridge, or embedded in the side walls of a newer one. This is the part that feels warm to the touch.
- What it does: The hot, high-pressure gas from the compressor flows into the condenser coils. Since it's hotter than the room air, heat flows out of the refrigerant and into the room. As it loses heat, the refrigerant cools down and condenses back into a liquid.
- Analogy: Think of steam from a kettle hitting a cold window. The steam (gas) gives up its heat to the glass and turns back into water (liquid).
- Result: The refrigerant leaves the condenser as a high-pressure, warm liquid. The heat that was originally inside your fridge has now been successfully "dumped" into your kitchen.
4. The Expansion Valve (The Pressure Dropper)
- Location: A very narrow section of the tubing, often a long, thin copper tube called a capillary tube, located between the condenser and the evaporator.
- What it does: The warm, high-pressure liquid from the condenser is forced through this tiny opening. The sudden restriction causes a massive drop in pressure. According to the pressure-temperature relationship for fluids, this huge pressure drop causes a corresponding huge drop in temperature.
- Analogy: This is like the nozzle on the spray can. It creates the pressure difference needed for the rapid expansion and cooling effect. A portion of the liquid instantly "flashes" into vapor, cooling the remaining mixture down significantly.
- Result: The refrigerant leaves the expansion valve as a low-pressure, very cold liquid-vapor mixture, ready to enter the evaporator and absorb heat all over again.
Test your understanding!
You put warm leftovers in the fridge. On which component of the refrigeration cycle does this place the greatest immediate load, and why?
Show answer
The greatest immediate load is placed on the evaporator. The evaporator's job is to absorb heat from the refrigerated space. The warm leftovers release a significant amount of heat, which must be absorbed by the refrigerant in the evaporator coils to cause it to boil. To handle this increased heat load, the system will run longer to remove the extra heat and bring the temperature back down.
The Ideal Vapor-Compression Refrigeration Cycle on a T-s Diagram
Now that we have the physical intuition, let's formalize this into the ideal vapor-compression refrigeration cycle. This is the theoretical model engineers use for analysis, much like the ideal Rankine cycle.

Let's trace the journey of the refrigerant through the four processes shown on the diagram:
-
Process 1 → 2: Isentropic Compression
- The refrigerant enters the compressor at state 1 as a saturated vapor (it has just finished boiling).
- It is compressed to a high pressure and temperature at state 2, leaving as a superheated vapor.
- In the ideal cycle, we assume this is isentropic (), just like the ideal pump in the Rankine cycle. Work () is required.
-
Process 2 → 3: Constant-Pressure Heat Rejection
- The hot gas enters the condenser.
- It rejects heat () to the warm surroundings (the kitchen), first cooling down to its saturation temperature and then condensing completely into a liquid.
- It leaves the condenser at state 3 as a saturated liquid.
-
Process 3 → 4: Throttling
- The high-pressure liquid enters the expansion valve.
- It undergoes a large pressure drop, exiting at state 4 as a low-pressure, low-temperature liquid-vapor mixture.
- This process is highly irreversible. In our model, we treat it as a throttling process, which means its enthalpy is constant (). This is a key difference from the Rankine cycle, which uses a work-producing turbine for expansion. Here, we sacrifice potential work for the simplicity and low cost of a valve.
-
Process 4 → 1: Constant-Pressure Heat Absorption
- The cold mixture enters the evaporator.
- It absorbs heat () from the cold refrigerated space, causing the remaining liquid to boil.
- It leaves the evaporator at state 1 as a saturated vapor, and the cycle begins again.
This continuous process effectively "pumps" heat from the low-temperature region () to the high-temperature region (), all powered by the work () put into the compressor.
To solidify your understanding, please watch this final short segment which narrates the entire cycle.
How does a fridge work? | The Secret Genius of Modern Life - BBC
The presenter from the earlier BBC video now walks through the complete vapor compression cycle, tying all four components together.
Watch from 2:14 to 4:14. This provides an excellent summary of the entire process we've just discussed, showing how the refrigerant changes state as it moves through the system.
Conclusion
Fantastic work today! We've unpacked the "magic" of your refrigerator and translated it into a clear engineering cycle. You've seen how simple physical principles—compression heating and expansion cooling—can be harnessed in a clever loop to move heat against its natural flow.
Key Takeaways:
- Refrigeration is not about "creating cold" but about moving heat from a cold space to a warm space, which requires work input.
- The cycle relies on the phase changes of a special fluid, the refrigerant.
- The four essential components are:
- Evaporator: Absorbs heat inside the cold space (refrigerant boils).
- Compressor: Puts in work to raise the pressure and temperature of the refrigerant gas.
- Condenser: Rejects heat to the warm surroundings (refrigerant condenses).
- Expansion Valve: Creates a large pressure drop, making the refrigerant intensely cold.
- The ideal vapor-compression cycle models these processes as isentropic compression, constant-pressure heat transfer, and constant-enthalpy throttling.
Preview of the Next Lesson
Now that we understand how the refrigeration cycle works, our next step is to analyze its performance. How do we measure how "good" a refrigerator is? In the next lesson, we will introduce the Coefficient of Performance (COP), which is the efficiency measure for refrigerators and heat pumps. We will also learn how to analyze the cycle using a new type of diagram, the Pressure-Enthalpy (P-h) diagram, which is the tool of choice for refrigeration engineers.