Hello! In our last lesson, you constructed a complete preprocessing pipeline for your project, a crucial step for writing clean and reproducible machine learning code. That pipeline encapsulates all your feature engineering logic into a single, elegant object.
Today, we'll leverage that pipeline to perform the core tasks of model selection and optimization. This lesson will show you how to train multiple machine learning models, rigorously evaluate their performance using cross-validation, and automatically tune their settings to find the best possible configuration for your problem. By the end, you'll have a systematic and robust workflow to confidently select a high-performing model for your project.
1. Robust Evaluation with Cross-Validation
So far, you've used a single train_test_split to create a training set and a testing set. While simple, relying on a single split to evaluate a model can be misleading. The performance score you get might be artificially high or low simply due to the specific data points that happened to land in the test set.
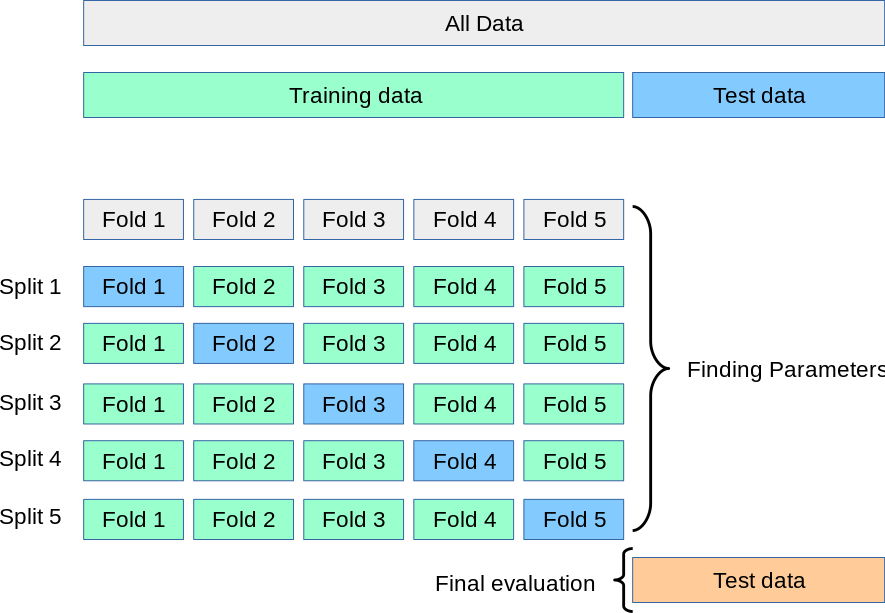
To get a more reliable estimate of how your model will perform on new, unseen data, we use k-fold cross-validation. The core idea is to repeat the train-and-test process multiple times on different subsets of your data and average the results.
This video from StatQuest provides an excellent, intuitive explanation of why we need cross-validation and how it works.
Machine Learning Fundamentals: Cross Validation
This video, "Machine Learning Fundamentals: Cross Validation" by StatQuest with Josh Starmer, will build your intuition for this essential technique.
Please watch from the beginning to the end. Pay attention to: The problem with training and testing on the same data. Why even a single train/test split might not be enough. The visual explanation of how k-fold cross-validation iteratively creates different training and validation sets. The brief mention of using cross-validation for tuning parameters, which we'll cover next.
The process of training, tuning, and evaluating a model using cross-validation before a final check on the test set is a standard practice in machine learning.
2. A Systematic Approach to Comparing Models
Your project can likely be tackled by several different algorithms (e.g., Logistic Regression, a Decision Tree, a Random Forest). How do you choose the best one? The most effective way is to empirically test them.
We will create a "test harness" to evaluate a list of candidate models on your dataset using cross-validation. Thanks to the pipeline you built in the previous lesson, this is remarkably straightforward. The cross_val_score function from scikit-learn can take your entire pipeline object, and it will correctly handle fitting the preprocessor and the model inside the cross-validation loop, preventing any data leakage.
How To Compare Machine Learning Algorithms in Python ...
This article from Machine Learning Mastery provides a concise, powerful template for comparing algorithms.
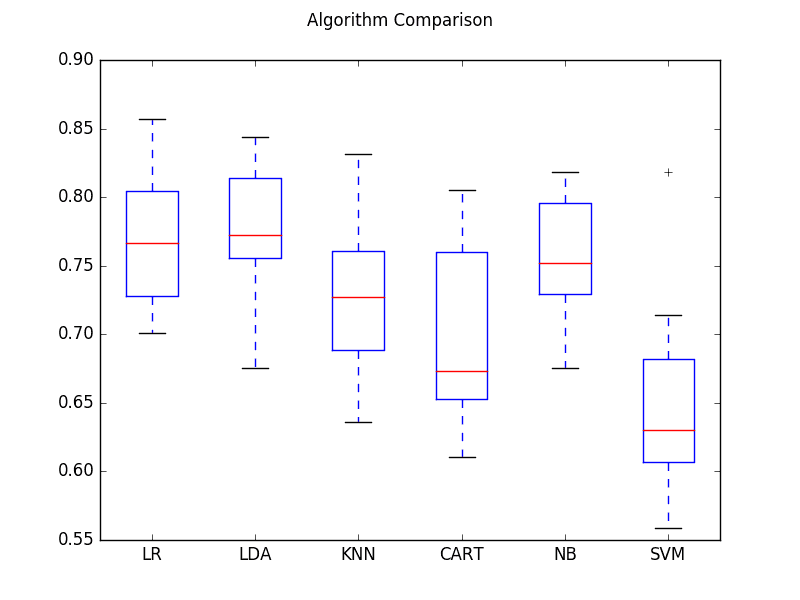
Read the article up to the end of the section with the box plot. Focus on the code block in the middle of the article. Notice how it: Creates a list of models to evaluate. Loops through the list, using cross_val_score for each model with a consistent KFold configuration. Stores and prints the mean and standard deviation of the accuracy scores. Generates a box plot to visually compare the distribution of scores for each algorithm.
The box plot is a particularly effective visualization. It shows not only the average performance (the median line) but also the stability of the model's performance across different data folds. A model with a high average score but also a very wide box and whiskers might be less reliable than a model with a slightly lower but much more consistent score.
3. Hyperparameter Tuning with GridSearchCV
Most machine learning models have "hyperparameters"—knobs and dials you can tune to alter their behavior. For example, a Random Forest has hyperparameters like n_estimators (the number of trees) and max_depth (the maximum depth of each tree). Finding the optimal combination of these settings can significantly improve your model's performance.
Doing this manually would be incredibly tedious. Instead, we use tools like GridSearchCV, which automates this process. You define a "grid" of hyperparameter values you want to test, and GridSearchCV exhaustively tries every possible combination, using cross-validation to determine which combination performs best.
The following video provides a practical guide to using GridSearchCV, RandomizedSearchCV (a more efficient alternative), and putting it all together to compare different models.
Machine Learning Tutorial Python - 16: Hyper parameter Tuning (GridSearchCV)
The video "Hyper parameter Tuning (GridSearchCV)" from the codebasics channel walks through the exact workflow we need.
Watch these key segments: GridSearchCV: Start with the introduction to GridSearchCV at the main section. Pay close attention to how the parameter grid is defined as a dictionary. When using a pipeline, you must prefix the hyperparameter name with the name of the model step in your pipeline, followed by two underscores. For example: {'model__n_estimators': [10, 50, 100]}. RandomizedSearchCV: Next, watch the section on RandomizedSearchCV from the alternative. This is useful when your grid of possible hyperparameters is very large, as it samples a fixed number of random combinations instead of trying all of them. Comparing Models and Tuning: Finally, watch the section on choosing the best model. This demonstrates a powerful pattern where you create a list of dictionaries, each containing a model and its specific parameter grid, and then loop through them to find the overall best approach.
This final pattern—looping through a configuration of models and their respective hyperparameter grids—is exactly the workflow you will implement for your project.
4. Your Turn: Train, Tune, and Evaluate
It's time to apply this systematic workflow to your project. You will extend the Jupyter Notebook from the previous lesson.
Instructions:
- Ensure Your Base Pipeline is Ready: You should have your final
Pipelineobject from the last lesson, which combines yourColumnTransformerpreprocessor with a placeholder model. - Define Models and Hyperparameter Grids:
- Choose 3-4 candidate algorithms suitable for your problem (classification or regression). Good choices for a first pass include:
- Classification:
LogisticRegression,DecisionTreeClassifier,RandomForestClassifier,XGBClassifier. - Regression:
LinearRegression,Ridge,RandomForestRegressor,XGBRegressor.
- Classification:
- Create a list of dictionaries like the one shown in the codebasics video. Each dictionary should contain the keys
'model'(the estimator object) and'params'(the hyperparameter grid for that model). - Keep the grids small for this first run. For example, test 2-3 values for 2 different hyperparameters for each model. Remember to use the
model__<param_name>syntax. - Here's a sample structure for one entry in your list (for a classification task):
{
    'model': RandomForestClassifier(random_state=42),
    'params': {
        'model__n_estimators': [50, 100, 200],
        'model__max_depth': [10, 20, None]
    }
}
- Choose 3-4 candidate algorithms suitable for your problem (classification or regression). Good choices for a first pass include:
- Run the Comparison Loop:
- Write a
forloop that iterates through your list of models and grids. - Inside the loop, for each model/grid combination:
- Update your main pipeline's model step to use the current model from the loop.
- Instantiate
GridSearchCV(orRandomizedSearchCV), passing it your full pipeline, the parameter grid, the cross-validation strategy (e.g.,cv=5), and the scoring metric. - Fit
GridSearchCVon your training data (X_train,y_train). - Append the best score (
.best_score_) and best parameters (.best_params_) to a results list.
- Write a
- Analyze and Document Results:
- Convert your results list into a pandas DataFrame for easy viewing.
- Identify the top-performing model and its optimal hyperparameters.
- Add a Markdown cell in your notebook summarizing your findings. Which model performed best? What were its settings?
Commit the updated notebook to your project's GitHub repository. This is a significant milestone that demonstrates a core competency in applied machine learning.
Conclusion
You have now established a robust and repeatable process for selecting and optimizing machine learning models. This workflow moves beyond simple, naive approaches and embraces the best practices used by professionals to build high-quality models.
Key Takeaways:
- Cross-validation provides a reliable estimate of a model's generalization performance by averaging results over multiple train-validate splits.
- A systematic comparison of multiple algorithms is essential to find the best tool for the job.
GridSearchCVandRandomizedSearchCVautomate the tedious but critical task of hyperparameter tuning.- Scikit-learn Pipelines integrate seamlessly with these tools, ensuring that your entire workflow, including preprocessing, is handled correctly and without data leakage.
In our next lesson, we will take our best-performing model and dive deeper. We won't just look at its performance score; we will learn how to interpret its predictions using techniques like SHAP and perform error analysis to understand its strengths and weaknesses.