Welcome back! In our last lesson, we crafted sophisticated prompts to transform our AI from a simple Q&A bot into a genuine tutor capable of providing step-by-step explanations. However, this powerful "brain" is still confined to the command line. It's time to give it a face and a voice.
This lesson marks a significant step in your project: building the user-facing application. We will use Streamlit, a powerful Python library, to create a clean, interactive web interface for your AI Tutor. You'll learn how to display conversational history, handle user input, and manage the state of the chat—all without leaving the comfort of Python. Given your experience with frameworks like React and Django, you'll likely appreciate how quickly you can build a polished data application with Streamlit.
1. Envisioning the Final Product
Before we dive into the code, let's visualize our goal. We are building the front-end component of a complete Retrieval-Augmented Generation (RAG) system.
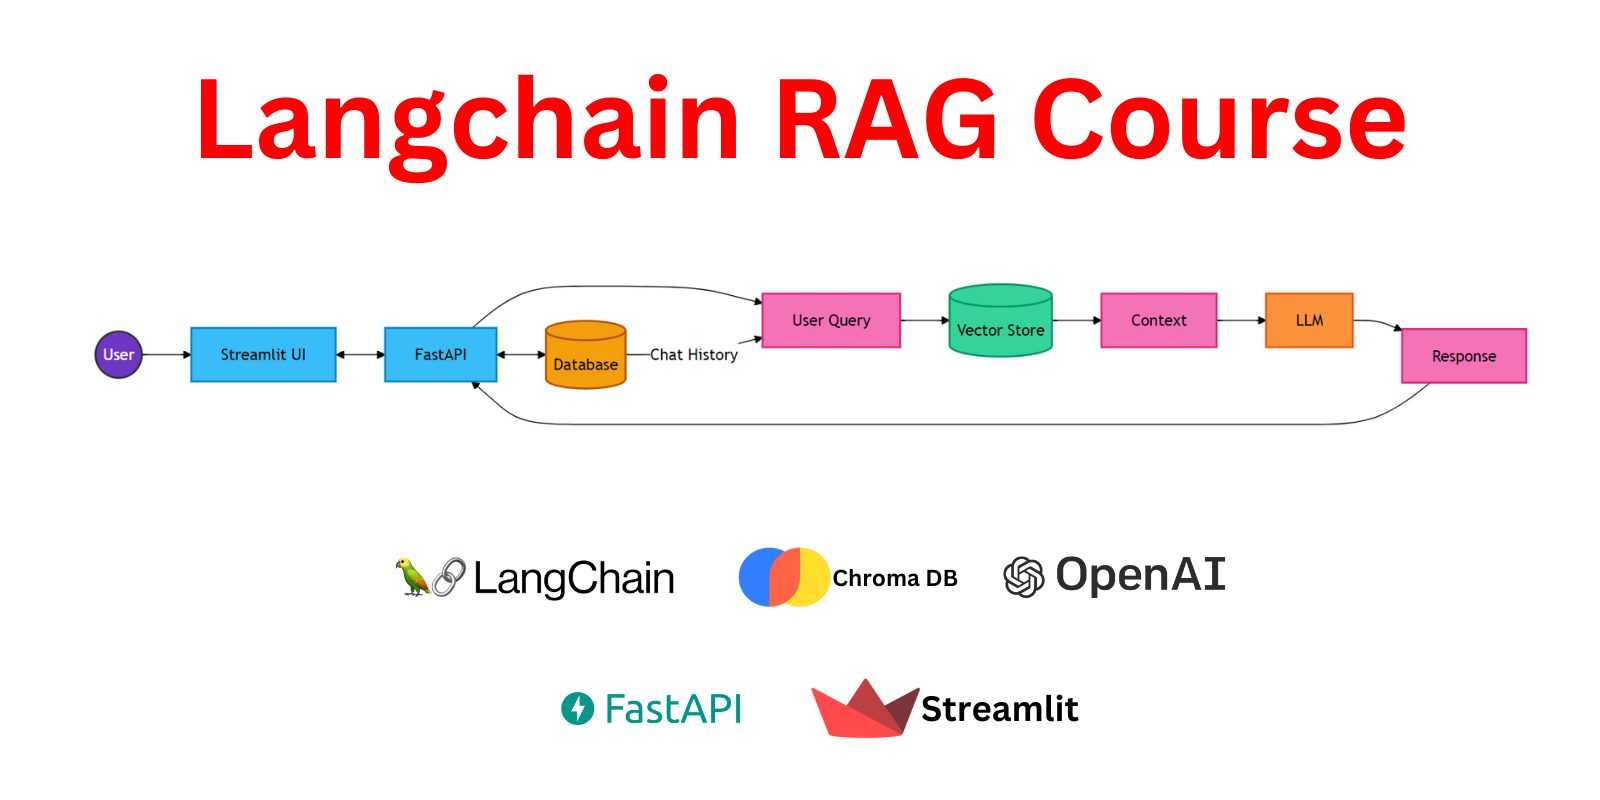
The user interface will look something like this—a clean, conversational layout where the user can ask questions and receive the tutor's guided responses.

2. The Streamlit Way: Core Concepts
Streamlit allows you to build web apps for machine learning and data science with remarkable speed. To use it effectively, you need to understand two core concepts: its execution model and session state.
The Dataquest article, "Build a Web Interface for Your Chatbot with Streamlit," provides an excellent explanation of these foundational ideas.
Project Tutorial: Build a Web Interface for Your Chatbot ... - Dataquest
This tutorial is a comprehensive guide to building a chatbot UI. We'll focus on the conceptual parts first.
Please read the following sections: "Part 3: Understanding Session State": This is the most crucial concept. Pay close attention to why session state is necessary and how it solves the problem of Streamlit rerunning the entire script on each interaction. "Part 4: The Chat Interface": Focus on the explanation of st.chat_input and the use of the walrus operator (:=). "Understanding Key Concepts": Briefly review the "Session State Deep Dive" and "The Streamlit Execution Model" subsections for a more formal summary.
To summarize, every time a user interacts with a widget (like typing a message or clicking a button), Streamlit reruns your entire Python script from top to bottom. To prevent your chat history from being wiped out on every turn, you must store it in st.session_state, a special object that persists across reruns.
3. The Building Blocks of a Chat Interface
Let's explore the specific Streamlit elements for building conversational apps. The official Streamlit documentation and the following video provide clear, hands-on demonstrations.
Build a basic LLM chat app - Streamlit Docs
The official documentation is the best place to start. It introduces the main chat elements and how to combine them.
Read from the Introduction up to and including "Build a bot that mirrors your input". This will walk you through: st.chat_message: How to create containers for user and assistant messages. st.chat_input: How to create the text input box at the bottom of the screen. Putting them together with st.session_state to create a simple "Echo Bot" that remembers the conversation.
Now, let's see these concepts in action. This video provides a very fast and practical walkthrough of building a chat interface.
Build a Streamlit Chatbot FAST 🤯
This video by "Coding Is Fun" demonstrates how to assemble a chat UI very quickly.
Please watch these two segments: Basic chat element: This shows the fundamental st.chat_message element and how to specify the role ('user' or 'assistant'). Building an echo bot: This is a live-coded example that puts all the pieces together: initializing session state, displaying history, getting user input, and appending new messages. This directly mirrors the code you will write.
These resources give you the complete pattern for a Streamlit chat application:
- Initialize: Check if a
messageslist exists inst.session_state. If not, create it. - Display: Loop through the
messagesinst.session_stateand display each one usingst.chat_message. - Accept Input: Use
st.chat_inputto capture the user's next message. - Update and Rerun: If the user submitted a message, add it to
st.session_state.messages, add the assistant's reply, and Streamlit will automatically rerun the script to display the updated history.
4. Streaming Responses for a Better UX
A key feature of modern chatbots is the "typewriter" effect, where the response is streamed token by token. This provides immediate feedback to the user that the bot is working. Streamlit makes this incredibly simple with the st.write_stream function.
Stream LLMs with LangChain + Streamlit | Tutorial
This tutorial from Alejandro AO, while using LangChain, has an excellent demonstration of Streamlit's modern streaming capabilities.
Watch the section from streaming with st.write_stream. The key takeaway is that if your function that calls the LLM is a generator (i.e., it uses yield to return chunks of the response), you can pass that generator directly to st.write_stream to render the output as it arrives.
When we integrate our RAG pipeline in the next lesson, we will ensure that the function generating the LLM response is a generator so we can use this elegant streaming feature.
5. Your Task: Build the Chatbot's UI Skeleton
It's time to build the front-end for your AI Tutor. For this task, you will create a Streamlit app that has a complete, functional chat interface but uses a simple placeholder for the AI's response. This allows you to focus purely on the UI logic before we wire it up to the RAG backend in the next lesson.
Create a new file named app.py.
Instructions:
-
Set up the basic app structure:
- Import
streamlit. - Give your app a title, e.g.,
st.title("SQL AI Tutor").
- Import
-
Initialize Chat History:
- Use the standard pattern to initialize your chat history in
st.session_state. The history should be a list of dictionaries, where each dictionary has aroleandcontent. - You can start the conversation with a greeting from the assistant.
# Example initialization if "messages" not in st.session_state: st.session_state.messages = [{"role": "assistant", "content": "Hello! I'm Codey, your SQL AI Tutor. How can I help you learn today?"}] - Use the standard pattern to initialize your chat history in
-
Display Chat History:
- Iterate through
st.session_state.messages. - For each message, use a
with st.chat_message(...)block to display its content.
- Iterate through
-
Handle User Input:
- Use
st.chat_input()to get the user's prompt. Anifstatement with the walrus operator (if prompt := ...) is a concise way to do this. - Inside the
ifblock:- Append the user's message (role: 'user', content:
prompt) tost.session_state.messages. - Display the user's message immediately using
st.chat_message.
- Append the user's message (role: 'user', content:
- Use
-
Create a Placeholder Assistant Response:
- Inside the same
ifblock, create a placeholder response. For now, we are not calling your RAG pipeline. This keeps the task focused on the UI. - Append the assistant's placeholder message (role: 'assistant', content:
response_text) tost.session_state.messages. - Display the assistant's message.
# Example placeholder logic within the `if prompt...` block


# For now, we'll just echo the prompt.
# In the next lesson, this will be replaced with the call to your RAG chain.
response_text = f"Echo: {prompt}"

with st.chat_message("assistant"):
    st.markdown(response_text)

st.session_state.messages.append({"role": "assistant", "content": response_text})
Note: The user message should be displayed before the assistant message to maintain the correct conversational order. Your final code should display history first, then process the new input and its response.
- Inside the same
-
Run Your App:
- Open your terminal in the project directory.
- Run the command:
streamlit run app.py - Your web browser should open with your new chat interface. Test it by sending a few messages. The conversation should persist as you interact with it.
Conclusion
Congratulations! You've successfully built a functional, interactive web interface for your AI Tutor. You now have a solid understanding of Streamlit's core components for conversational AI and, most importantly, the critical role of session state.
Key Takeaways:
- Streamlit's Core Chat Elements:
st.chat_messageandst.chat_inputare the fundamental building blocks for any conversational app. - Session State is Essential:
st.session_stateis the key to maintaining conversational memory across user interactions in Streamlit's rerunning execution model. - The Chat App Pattern: The loop of initializing state, displaying history, capturing input, and appending new messages is the standard architecture for Streamlit chat applications.
- Streaming for UX:
st.write_streamoffers a simple and powerful way to display LLM responses as they are generated, significantly improving the user experience.
Preview of the Next Lesson:
Our AI Tutor now has a polished front-end, but its brain isn't yet connected. In the next lesson, we will perform the final and most exciting step: integrating the RAG pipeline with the Streamlit front-end. We will replace the simple "echo" response with the real, context-aware, and pedagogically sound answers generated by your full RAG system, bringing your AI Tutor to life.